HP Latex 2700 User Guide 3 - Page 139
Color calibration
 |
View all HP Latex 2700 manuals
Add to My Manuals
Save this manual to your list of manuals |
Page 139 highlights
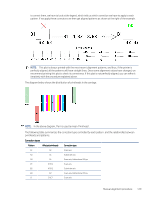
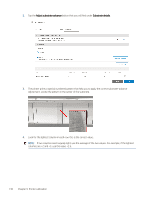
Color calibration Color calibration enables your printer to produce consistent colors with a particular substrate type, even if printheads, ink cartridges, and environmental conditions change. Color calibration sets the ink restriction and linearization, which varies with the drop weight of the printhead. This calibration has been designed to provide consistency as the printhead ages (drop-weight degradation) and from one printer to another. For example, to reach a maximum cyan density of 0.6, one printhead may require 3 drops while another one may require 3.5 drops (lower drop weight). For generic substrate profiles, there are no factory-reference color-calibration values in the printer or within the presets: the first calibration for each substrate sets the color reference for future calibrations. The future calibrations will therefore try to match the colors of the first calibration. In this way you maintain consistency as the printhead ages. Good nozzle health is important, and the printheads should also be as new as possible for best performance when you make the first calibration. It is also important to have the printheads well aligned (see Align the printheads on page 125), and to make sure the substrate is advancing correctly (see Substrate-advance compensation on page 134), otherwise the color pattern may appear blurry or with slightly different colors. NOTE: Substrates can be color-calibrated only if they are cloned, white, opaque, non-porous, and wider than 61 cm (24 in). Backlit substrates cannot be color-calibrated (they are not opaque). NOTE: Color calibration is enabled when the carriage is configured for colored inks only. White-ink carriage configurations cannot launch color calibration. To start color calibration from the Internal Print Server, tap the Substrate Library icon in the app bar, and select the substrate you want to calibrate from the list on the left-which must have been previously cloned, because generic substrates cannot be calibrated. Once you can see your substrate in the center of the screen, tap the ellipsis icon , then Edit > Set color reference/Calibrate, and the color calibration starts. IMPORTANT: To calibrate a flexible substrate, you must calibrate a roll on a spindle, not just a loose sheet of flexible substrate. NOTE: Color calibration is not recommended when the carriage beam is in a higher position than normal. The calibration process is fully automatic and can be performed unattended after you have loaded substrate of the type you wish to calibrate. The process takes about 15 minutes and consists of the following steps: 1. The color calibration test chart is printed, which contains patches of different densities of each ink used in your printer. 132 Chapter 9 Printer calibration
-
 1
1 -
2
-
3
-
4
-
5
-
6
-
7
-
8
-
9
-
10
-
11
-
12
-
13
-
14
-
15
-
16
-
17
-
18
-
19
-
20
-
21
-
22
-
23
-
24
-
25
-
26
-
27
-
28
-
29
-
30
-
31
-
32
-
33
-
34
-
35
-
36
-
37
-
38
-
39
-
40
-
41
-
42
-
43
-
44
-
45
-
46
-
47
-
48
-
49
-
50
-
51
-
52
-
53
-
54
-
55
-
56
-
57
-
58
-
59
-
60
-
61
-
62
-
63
-
64
-
65
-
66
-
67
-
68
-
69
-
70
-
71
-
72
-
73
-
74
-
75
-
76
-
77
-
78
-
79
-
80
-
81
-
82
-
83
-
84
-
85
-
86
-
87
-
88
-
89
-
90
-
91
-
92
-
93
-
94
-
95
-
96
-
97
-
98
-
99
-
100
-
101
-
102
-
103
-
104
-
105
-
106
-
107
-
108
-
109
-
110
-
111
-
112
-
113
-
114
-
115
-
116
-
117
-
118
-
119
-
120
-
121
-
122
-
123
-
124
-
125
-
126
-
127
-
128
-
129
-
130
-
131
-
132
-
133
-
 134
134 -
 135
135 -
 136
136 -
 137
137 -
 138
138 -
 139
139 -
 140
140 -
 141
141 -
 142
142 -
 143
143 -
 144
144 -
145
-
146
-
147
-
148
-
149
-
150
-
151
-
152
-
153
-
154
-
155
-
156
-
157
-
158
-
159
-
160
-
161
-
162
-
163
-
164
-
165
-
166
-
167
-
168
-
169
-
170
-
171
-
172
-
173
-
174
-
175
-
176
-
177
-
178
-
179
-
180
-
181
-
182
-
183
-
184
-
185
-
186
-
187
-
188
-
189
-
190
-
191
-
192
-
193
-
194
-
195
-
196
-
197
-
198
-
199
-
200
-
201
-
202
-
203
-
204
-
205
-
206
-
207
-
208
-
209
-
210
-
211
-
212
-
213
-
214
-
215
-
216
-
217
-
218
-
219
-
220
-
221
-
222
-
223
-
224
-
225
-
226
-
227
-
228
-
229
-
230
-
231
-
232
-
233
-
234
-
235
-
236
-
237
-
238
-
239
-
240
-
241
-
242
-
243
-
244
-
245
-
246
-
247
-
248
-
249
-
250
-
251
-
252
-
253
-
254
-
255
-
256
-
257
-
258
-
259
-
260
-
261
-
262
-
263
-
264
-
265
-
266
-
267
-
268
-
269
-
270
-
271
-
272
-
273
-
274
-
275
-
276
-
277
-
278
-
279
-
280
-
281
-
282
-
283
-
284
-
285
-
286
-
287
-
288
-
289
-
290
-
291
-
292
-
293
-
294
-
295
-
296
-
297
-
298
-
299
-
300
-
301
-
302
-
303
-
304
-
305
-
306
-
307
-
308
-
309
-
310
-
311
-
312
-
313
-
314
-
315
-
316
-
317
-
318
-
319
-
320
-
321
-
322
-
323
-
324
-
325
-
326
-
327
-
328
-
329
-
330
-
331
-
332
-
333
-
334
-
335
-
336
-
337
-
338
-
339
-
340
-
341
-
342
-
343
-
344
-
345
 |
 |
