HP Scanjet 7450c HP Scanjet 7400C Series Scanner Windows - (English) User Manu - Page 73
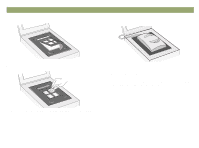
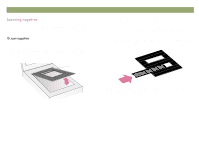
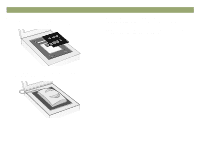
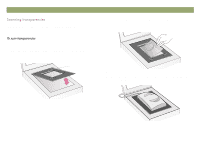
Back to TOC, Using accessories
 |
View all HP Scanjet 7450c manuals
Add to My Manuals
Save this manual to your list of manuals |
Page 73 highlights
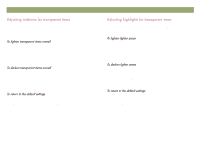
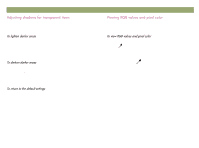
Back to TOC Using accessories 73 You can adjust the overall lightness or darkness of the scanned image using the midtone setting. The range for the number in the Midtone field is -100 to 100. 1 On the Advanced menu, click Adjust Exposure. 2 Do one of the following: Drag the Midtone slider to the right. Type a higher number in the Midtone field and press ENTER. 1 On the Advanced menu, click Adjust Exposure. 2 Do one of the following: Drag the Midtone slider to the left. Type a lower number in the Midtone field and press ENTER. 1 On the Advanced menu, click Adjust Exposure. 2 Click Auto to return the midtone, highlight, and shadow settings to the defaults for this transparent item. You can adjust highlights to lighten or darken the light areas. The range for the number in the Highlights field is -100 to 100. 1 On the Advanced menu, click Adjust Exposure. 2 Do one of the following: Drag the Highlight slider to the right. Type a higher number in the Highlights field and press ENTER. 1 On the Advanced menu, click Adjust Exposure. 2 Do one of the following: Drag the Highlight slider to the left. Type a lower number in the Highlights field and press ENTER. 1 On the Advanced menu, click Adjust Exposure. 2 Click Auto to return the midtone, highlight, and shadow settings to the defaults for this transparent item.
-
 1
1 -
2
-
3
-
4
-
5
-
6
-
7
-
8
-
9
-
10
-
11
-
12
-
13
-
14
-
15
-
16
-
17
-
18
-
19
-
20
-
21
-
22
-
23
-
24
-
25
-
26
-
27
-
28
-
29
-
30
-
31
-
32
-
33
-
34
-
35
-
36
-
37
-
38
-
39
-
40
-
41
-
42
-
43
-
44
-
45
-
46
-
47
-
48
-
49
-
50
-
51
-
52
-
53
-
54
-
55
-
56
-
57
-
58
-
59
-
60
-
61
-
62
-
63
-
64
-
65
-
66
-
67
-
 68
68 -
 69
69 -
 70
70 -
 71
71 -
 72
72 -
 73
73 -
 74
74 -
 75
75 -
 76
76 -
 77
77 -
 78
78 -
79
-
80
-
81
-
82
-
83
-
84
-
85
-
86
-
87
-
88
-
89
-
90
-
91
-
92
-
93
-
94
-
95
-
96
-
97
-
98
-
99
-
100
-
101
-
102
-
103
-
104
-
105
-
106
-
107
-
108
-
109
-
110
-
111
-
112
-
113
-
114
-
115
-
116
-
117
-
118
-
119
-
120
-
121
-
122
-
123
-
124
-
125
-
126
-
127
-
128
-
129
-
130
-
131
-
132
-
133
-
134
-
135
-
136
 |
 |