Lexmark X644E Service Manual - Page 203
Scan quality service check, Vertical streaks or lines on image
 |
UPC - 734646093156
View all Lexmark X644E manuals
Add to My Manuals
Save this manual to your list of manuals |
Page 203 highlights
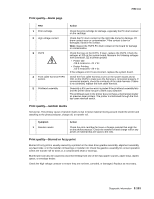
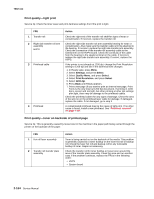
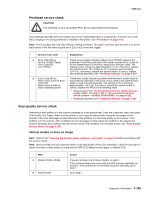
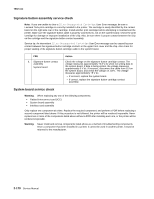
7002-xxx Printhead service check CAUTION The printhead is not a serviceable FRU. Do not disassemble the printhead. The printhead assembly does not contain any service replaceable parts or components. If service error code 930.xx displays, the wrong printhead is installed in the printer. See "Printhead" on page 7-24. Note: A 201.xx paper jam may also indicate a failing printhead. The paper may have jammed prior to or at the input sensor. Print the event log and see if 201 or 931 errors are logged. Service error code 1 Error code 931.xx No first HYSNC Signal Error Code 932 Lost HYSNC 2 Error Code 934.xx Mirror motor lost lock Error Code 935 Mirror motor unable to reach operating speed Explanation These errors usually indicate a failure in the HYSNC signal to the printhead. Check the continuity of the cables connected to J2 and J4 on the system board. If incorrect, replace the defective cable. The voltage at J4-1 measures approximately +5 V dc. If incorrect, replace the system board. The voltage at J2-7 measures approximately +24 V dc. If incorrect, replace the system board. If correct, replace the printhead assembly. See "Printhead removal" on page 4-127. These error codes indicate a problem with the mirror motor circuit in the printhead assembly or the mirror motor cable to the system board cable or system board assembly. The voltage at J5-2 measures approximately +24 V dc. If incorrect, replace the system board. If correct, replace the FRUs in the following order: • System board. See "System board and inner shield removal- model X642e" on page 4-130 or "System board and inner shield removal -models X644e/X646e" on page 4-131. • Printhead assembly See "Printhead removal" on page 4-127. Scan quality service check Determine if the problem is in the scanner assembly or in the base printer. Enter the Diagnostic Menu and select Print Quality Test Pages. Make sure the printer is set to specifications before using the test pages on the scanner. Check the test pages to help determine if the problem is in the base printer or the scanner. If the problem is in the scanner, ADF, or flatbed use the test pages to help isolate the problem in the appropriate scanner assembly and continue with this service check. If the problem is in the base printer, see "Print quality service check" on page 2-160. Vertical streaks or lines on image Note: Perform the "Cleaning the scanner glass, cushions, and strips" on page 6-2 before proceeding with this service check. Note: Vertical streaks can be caused by debris in the optical path of the CCD module(s). Check for any signs of pieces of media or other debris in or around the ADF CCD, flatbed contact glass, or flatbed CCD. FRU 1 Models X644e, X646e 2 Model X642e Action If you do not have one of these models, to step 2. If the vertical streaks only occur with the ADF scanner assembly, go to step 3. If the streaks are in the flatbed scanner assembly, go to step 7. Go to step 7. Diagnostic information 2-165
-
 1
1 -
2
-
3
-
4
-
5
-
6
-
7
-
8
-
9
-
10
-
11
-
12
-
13
-
14
-
15
-
16
-
17
-
18
-
19
-
20
-
21
-
22
-
23
-
24
-
25
-
26
-
27
-
28
-
29
-
30
-
31
-
32
-
33
-
34
-
35
-
36
-
37
-
38
-
39
-
40
-
41
-
42
-
43
-
44
-
45
-
46
-
47
-
48
-
49
-
50
-
51
-
52
-
53
-
54
-
55
-
56
-
57
-
58
-
59
-
60
-
61
-
62
-
63
-
64
-
65
-
66
-
67
-
68
-
69
-
70
-
71
-
72
-
73
-
74
-
75
-
76
-
77
-
78
-
79
-
80
-
81
-
82
-
83
-
84
-
85
-
86
-
87
-
88
-
89
-
90
-
91
-
92
-
93
-
94
-
95
-
96
-
97
-
98
-
99
-
100
-
101
-
102
-
103
-
104
-
105
-
106
-
107
-
108
-
109
-
110
-
111
-
112
-
113
-
114
-
115
-
116
-
117
-
118
-
119
-
120
-
121
-
122
-
123
-
124
-
125
-
126
-
127
-
128
-
129
-
130
-
131
-
132
-
133
-
134
-
135
-
136
-
137
-
138
-
139
-
140
-
141
-
142
-
143
-
144
-
145
-
146
-
147
-
148
-
149
-
150
-
151
-
152
-
153
-
154
-
155
-
156
-
157
-
158
-
159
-
160
-
161
-
162
-
163
-
164
-
165
-
166
-
167
-
168
-
169
-
170
-
171
-
172
-
173
-
174
-
175
-
176
-
177
-
178
-
179
-
180
-
181
-
182
-
183
-
184
-
185
-
186
-
187
-
188
-
189
-
190
-
191
-
192
-
193
-
194
-
195
-
196
-
197
-
 198
198 -
 199
199 -
 200
200 -
 201
201 -
 202
202 -
 203
203 -
 204
204 -
 205
205 -
 206
206 -
 207
207 -
 208
208 -
209
-
210
-
211
-
212
-
213
-
214
-
215
-
216
-
217
-
218
-
219
-
220
-
221
-
222
-
223
-
224
-
225
-
226
-
227
-
228
-
229
-
230
-
231
-
232
-
233
-
234
-
235
-
236
-
237
-
238
-
239
-
240
-
241
-
242
-
243
-
244
-
245
-
246
-
247
-
248
-
249
-
250
-
251
-
252
-
253
-
254
-
255
-
256
-
257
-
258
-
259
-
260
-
261
-
262
-
263
-
264
-
265
-
266
-
267
-
268
-
269
-
270
-
271
-
272
-
273
-
274
-
275
-
276
-
277
-
278
-
279
-
280
-
281
-
282
-
283
-
284
-
285
-
286
-
287
-
288
-
289
-
290
-
291
-
292
-
293
-
294
-
295
-
296
-
297
-
298
-
299
-
300
-
301
-
302
-
303
-
304
-
305
-
306
-
307
-
308
-
309
-
310
-
311
-
312
-
313
-
314
-
315
-
316
-
317
-
318
-
319
-
320
-
321
-
322
-
323
-
324
-
325
-
326
-
327
-
328
-
329
-
330
-
331
-
332
-
333
-
334
-
335
-
336
-
337
-
338
-
339
-
340
-
341
-
342
-
343
-
344
-
345
-
346
-
347
-
348
-
349
-
350
-
351
-
352
-
353
-
354
-
355
-
356
-
357
-
358
-
359
-
360
-
361
-
362
-
363
-
364
-
365
-
366
-
367
-
368
-
369
-
370
-
371
-
372
-
373
-
374
-
375
-
376
-
377
-
378
-
379
-
380
-
381
-
382
-
383
-
384
-
385
-
386
-
387
-
388
-
389
-
390
-
391
-
392
-
393
-
394
-
395
-
396
-
397
-
398
-
399
-
400
-
401
-
402
-
403
-
404
-
405
-
406
-
407
-
408
-
409
-
410
-
411
-
412
-
413
-
414
-
415
-
416
-
417
-
418
-
419
-
420
-
421
-
422
-
423
-
424
-
425
-
426
-
427
-
428
-
429
-
430
-
431
-
432
-
433
-
434
-
435
-
436
-
437
-
438
-
439
-
440
-
441
-
442
-
443
-
444
-
445
-
446
-
447
-
448
-
449
-
450
-
451
-
452
-
453
-
454
-
455
-
456
-
457
-
458
-
459
-
460
-
461
-
462
-
463
-
464
-
465
-
466
-
467
-
468
-
469
-
470
-
471
-
472
-
473
-
474
-
475
-
476
-
477
-
478
-
479
-
480
-
481
-
482
-
483
-
484
-
485
-
486
-
487
-
488
-
489
-
490
-
491
-
492
-
493
-
494
-
495
-
496
-
497
-
498
-
499
-
500
-
501
-
502
-
503
-
504
-
505
-
506
-
507
-
508
-
509
-
510
-
511
-
512
-
513
-
514
-
515
-
516
-
517
-
518
-
519
-
520
-
521
-
522
-
523
-
524
-
525
 |
 |