Panasonic KX-P7310 Laser Printer - Page 137
Place the media with the print side down.
 |
UPC - 092281830131
View all Panasonic KX-P7310 manuals
Add to My Manuals
Save this manual to your list of manuals |
Page 137 highlights
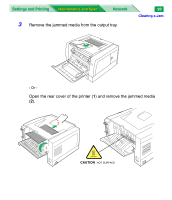
Settings and Printing Maintenance and Spec. Network 3 Place the media with the print side down. •Be sure that the media does not exceed the limit mark. 15 Clearing a Jam Print side down Paper feeds in direction of arrow. NOTE • If the metal plate is in the up position by accident, the media tray cannot be inserted into the printer. Before loading the media, push down the metal plate until it clicks, locking it in place. 4 Replace the media tray into the printer or 2nd feeder (option). CAUTION • Be sure to hold the media tray with both hands so you do not drop it especially when it is fully loaded.
-
 1
1 -
2
-
3
-
4
-
5
-
6
-
7
-
8
-
9
-
10
-
11
-
12
-
13
-
14
-
15
-
16
-
17
-
18
-
19
-
20
-
21
-
22
-
23
-
24
-
25
-
26
-
27
-
28
-
29
-
30
-
31
-
32
-
33
-
34
-
35
-
36
-
37
-
38
-
39
-
40
-
41
-
42
-
43
-
44
-
45
-
46
-
47
-
48
-
49
-
50
-
51
-
52
-
53
-
54
-
55
-
56
-
57
-
58
-
59
-
60
-
61
-
62
-
63
-
64
-
65
-
66
-
67
-
68
-
69
-
70
-
71
-
72
-
73
-
74
-
75
-
76
-
77
-
78
-
79
-
80
-
81
-
82
-
83
-
84
-
85
-
86
-
87
-
88
-
89
-
90
-
91
-
92
-
93
-
94
-
95
-
96
-
97
-
98
-
99
-
100
-
101
-
102
-
103
-
104
-
105
-
106
-
107
-
108
-
109
-
110
-
111
-
112
-
113
-
114
-
115
-
116
-
117
-
118
-
119
-
120
-
121
-
122
-
123
-
124
-
125
-
126
-
127
-
128
-
129
-
130
-
131
-
 132
132 -
 133
133 -
 134
134 -
 135
135 -
 136
136 -
 137
137 -
 138
138 -
 139
139 -
 140
140 -
 141
141 -
 142
142 -
143
-
144
-
145
-
146
-
147
-
148
-
149
-
150
-
151
-
152
-
153
-
154
-
155
-
156
-
157
-
158
-
159
-
160
-
161
-
162
-
163
-
164
-
165
-
166
-
167
-
168
-
169
-
170
-
171
-
172
-
173
-
174
-
175
-
176
-
177
-
178
-
179
-
180
-
181
-
182
-
183
-
184
-
185
-
186
-
187
-
188
-
189
-
190
-
191
-
192
-
193
-
194
-
195
-
196
-
197
-
198
-
199
-
200
-
201
-
202
-
203
-
204
-
205
-
206
-
207
-
208
-
209
-
210
-
211
-
212
-
213
-
214
-
215
-
216
-
217
-
218
-
219
-
220
-
221
-
222
-
223
-
224
-
225
-
226
-
227
-
228
-
229
-
230
-
231
-
232
-
233
-
234
-
235
-
236
-
237
-
238
-
239
-
240
-
241
-
242
-
243
-
244
-
245
-
246
-
247
-
248
-
249
-
250
-
251
-
252
-
253
-
254
-
255
-
256
-
257
-
258
-
259
-
260
-
261
-
262
-
263
-
264
-
265
-
266
-
267
-
268
-
269
-
270
-
271
-
272
-
273
-
274
-
275
-
276
-
277
 |
 |
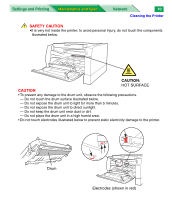
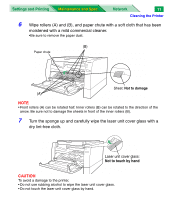
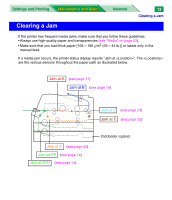
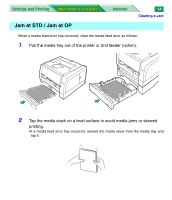
Clearing a Jam
Settings and Printing
Network
Maintenance and Spec.
Maintenance and Spec.
15
3
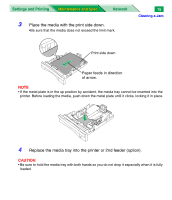
Place the media with the print side down.
•Be sure that the media does not exceed the limit mark.
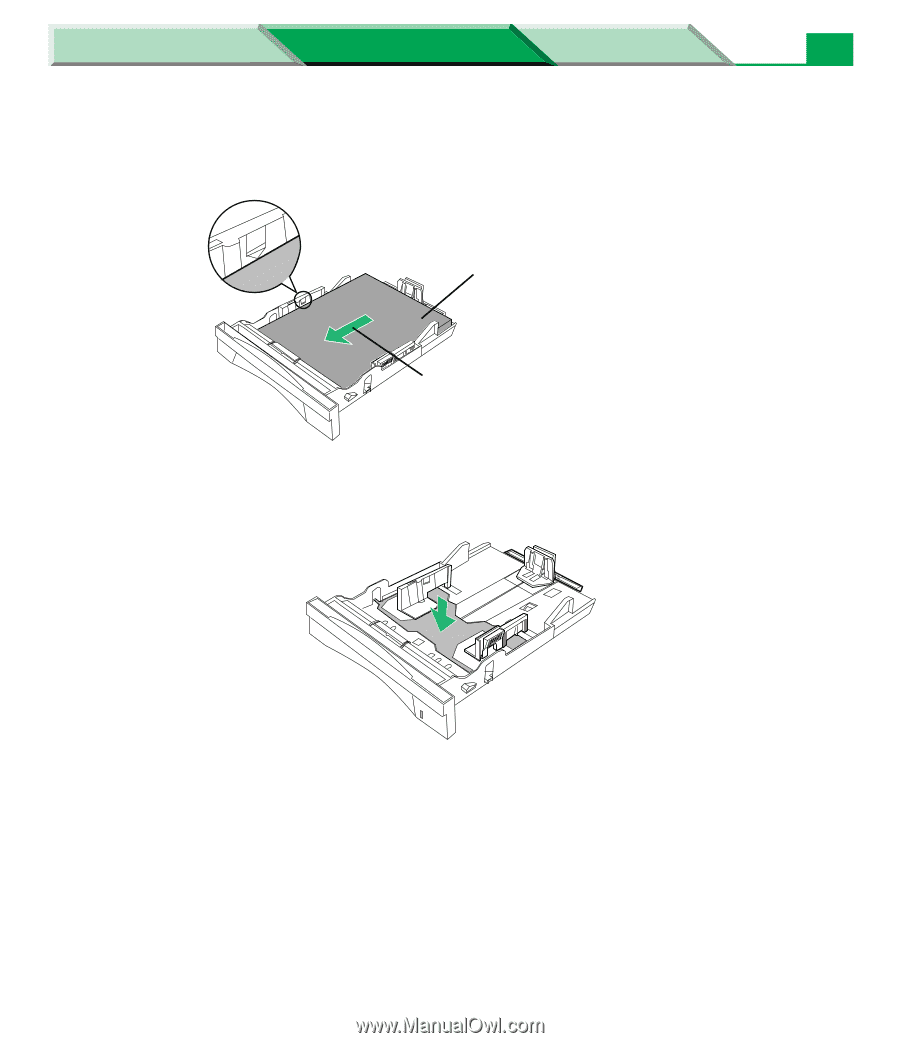
NOTE
• If the metal plate is in the up position by accident, the media tray cannot be inserted into the
printer. Before loading the media, push down the metal plate until it clicks, locking it in place.
4
Replace the media tray into the printer or 2nd feeder (option).
CAUTION
• Be sure to hold the media tray with both hands so you do not drop it especially when it is fully
loaded.
Print side down
Paper feeds in direction
of arrow.