Panasonic KX-P7310 Laser Printer - Page 71
Panasonic KX-P7305 PCL6, Panasonic KX-P7310 PCL6, Properties, Preferences], Overlay
 |
UPC - 092281830131
View all Panasonic KX-P7310 manuals
Add to My Manuals
Save this manual to your list of manuals |
Page 71 highlights
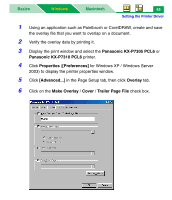
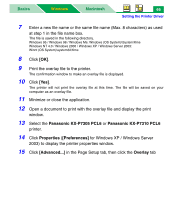
Basics Windows Macintosh 66 Setting the Printer Driver 7 Enter a new file name or the same file name (Max. 8 characters) as used at step 1 in the file name box. The file is saved in the following directory. Windows 95 / Windows 98 / Windows Me: Windows (OS System)\System\Kme Windows NT 4.0 / Windows 2000 / Windows XP / Windows Server 2003: Winnt (OS System)\system32\Kme 8 Click [OK]. 9 Print the overlay file to the printer. The confirmation window to make an overlay file is displayed. 10 Click [Yes]. The printer will not print the overlay file at this time. The file will be saved on your computer as an overlay file. 11 Minimize or close the application. 12 Open a document to print with the overlay file and display the print window. 13 Select the Panasonic KX-P7305 PCL6 or Panasonic KX-P7310 PCL6 printer. 14 Click Properties ([Preferences] for Windows XP / Windows Server 2003) to display the printer properties window. 15 Click [Advanced...] in the Page Setup tab, then click the Overlay tab
-
 1
1 -
2
-
3
-
4
-
5
-
6
-
7
-
8
-
9
-
10
-
11
-
12
-
13
-
14
-
15
-
16
-
17
-
18
-
19
-
20
-
21
-
22
-
23
-
24
-
25
-
26
-
27
-
28
-
29
-
30
-
31
-
32
-
33
-
34
-
35
-
36
-
37
-
38
-
39
-
40
-
41
-
42
-
43
-
44
-
45
-
46
-
47
-
48
-
49
-
50
-
51
-
52
-
53
-
54
-
55
-
56
-
57
-
58
-
59
-
60
-
61
-
62
-
63
-
64
-
65
-
 66
66 -
 67
67 -
 68
68 -
 69
69 -
 70
70 -
 71
71 -
 72
72 -
 73
73 -
 74
74 -
 75
75 -
 76
76 -
77
-
78
-
79
-
80
-
81
-
82
-
83
-
84
-
85
-
86
-
87
-
88
-
89
-
90
-
91
-
92
-
93
-
94
-
95
-
96
-
97
-
98
-
99
-
100
-
101
-
102
-
103
-
104
-
105
-
106
-
107
-
108
-
109
-
110
-
111
-
112
-
113
-
114
-
115
-
116
-
117
-
118
-
119
-
120
-
121
-
122
-
123
-
124
-
125
-
126
-
127
-
128
-
129
-
130
-
131
-
132
-
133
-
134
-
135
-
136
-
137
-
138
-
139
-
140
-
141
-
142
-
143
-
144
-
145
-
146
-
147
-
148
-
149
-
150
-
151
-
152
-
153
-
154
-
155
-
156
-
157
-
158
-
159
-
160
-
161
-
162
-
163
-
164
-
165
-
166
-
167
-
168
-
169
-
170
-
171
-
172
-
173
-
174
-
175
-
176
-
177
-
178
-
179
-
180
-
181
-
182
-
183
-
184
-
185
-
186
-
187
-
188
-
189
-
190
-
191
-
192
-
193
-
194
-
195
-
196
-
197
-
198
-
199
-
200
-
201
-
202
-
203
-
204
-
205
-
206
-
207
-
208
-
209
-
210
-
211
-
212
-
213
-
214
-
215
-
216
-
217
-
218
-
219
-
220
-
221
-
222
-
223
-
224
-
225
-
226
-
227
-
228
-
229
-
230
-
231
-
232
-
233
-
234
-
235
-
236
-
237
-
238
-
239
-
240
-
241
-
242
-
243
-
244
-
245
-
246
-
247
-
248
-
249
-
250
-
251
-
252
-
253
-
254
-
255
-
256
-
257
-
258
-
259
-
260
-
261
-
262
-
263
-
264
-
265
-
266
-
267
-
268
-
269
-
270
-
271
-
272
-
273
-
274
-
275
-
276
-
277
 |
 |