Panasonic KX-P7310 Laser Printer - Page 226
Step 2: Setting up TCP/IP on the printer, A] Using the DHCP server
 |
UPC - 092281830131
View all Panasonic KX-P7310 manuals
Add to My Manuals
Save this manual to your list of manuals |
Page 226 highlights
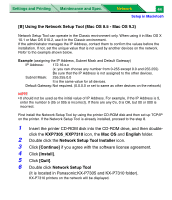
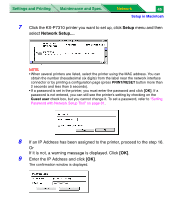
Settings and Printing Maintenance and Spec. Network 43 Setup in Macintosh Step 2: Setting up TCP/IP on the printer You need to set the IP Address, Subnet Mask and Default Gateway for the printer. Set them by using one of the following two methods. You may need to contact your network administrator to select the best way. • Using the DHCP server (see below) • Using the Network Setup Tool (see page 44) NOTE • You can also setup the printer using BOOTP or RARP. [A] Using the DHCP server If the administrator manages the network with DHCP server, it is possible to assign IP Address, Subnet Mask and Default Gateway automatically from DHCP server by default. These can be viewed by printing out the configuration page. It can be printed by pressing the PRINT/RESET button on the printer panel more than 2 seconds and less than 5 seconds. NOTE • If the printer receives the IP Address with unlimited lease term, the printer keeps the address permanently. The printer saves the address statically and the DHCP function becomes disable automatically. • If the printer's LPR port is created on the computer with the IP Address leased by DHCP server (ex. Broadband Router), the printer may not print when the printer's IP Address is changed because of the time limit of lease. In that case, it is strongly recommended to assign a static IP Address to the printer using the method "[B] Using the Network Setup Tool (Mac OS 8.5 - Mac OS 9.2)".
-
 1
1 -
2
-
3
-
4
-
5
-
6
-
7
-
8
-
9
-
10
-
11
-
12
-
13
-
14
-
15
-
16
-
17
-
18
-
19
-
20
-
21
-
22
-
23
-
24
-
25
-
26
-
27
-
28
-
29
-
30
-
31
-
32
-
33
-
34
-
35
-
36
-
37
-
38
-
39
-
40
-
41
-
42
-
43
-
44
-
45
-
46
-
47
-
48
-
49
-
50
-
51
-
52
-
53
-
54
-
55
-
56
-
57
-
58
-
59
-
60
-
61
-
62
-
63
-
64
-
65
-
66
-
67
-
68
-
69
-
70
-
71
-
72
-
73
-
74
-
75
-
76
-
77
-
78
-
79
-
80
-
81
-
82
-
83
-
84
-
85
-
86
-
87
-
88
-
89
-
90
-
91
-
92
-
93
-
94
-
95
-
96
-
97
-
98
-
99
-
100
-
101
-
102
-
103
-
104
-
105
-
106
-
107
-
108
-
109
-
110
-
111
-
112
-
113
-
114
-
115
-
116
-
117
-
118
-
119
-
120
-
121
-
122
-
123
-
124
-
125
-
126
-
127
-
128
-
129
-
130
-
131
-
132
-
133
-
134
-
135
-
136
-
137
-
138
-
139
-
140
-
141
-
142
-
143
-
144
-
145
-
146
-
147
-
148
-
149
-
150
-
151
-
152
-
153
-
154
-
155
-
156
-
157
-
158
-
159
-
160
-
161
-
162
-
163
-
164
-
165
-
166
-
167
-
168
-
169
-
170
-
171
-
172
-
173
-
174
-
175
-
176
-
177
-
178
-
179
-
180
-
181
-
182
-
183
-
184
-
185
-
186
-
187
-
188
-
189
-
190
-
191
-
192
-
193
-
194
-
195
-
196
-
197
-
198
-
199
-
200
-
201
-
202
-
203
-
204
-
205
-
206
-
207
-
208
-
209
-
210
-
211
-
212
-
213
-
214
-
215
-
216
-
217
-
218
-
219
-
220
-
 221
221 -
 222
222 -
 223
223 -
 224
224 -
 225
225 -
 226
226 -
 227
227 -
 228
228 -
 229
229 -
 230
230 -
 231
231 -
232
-
233
-
234
-
235
-
236
-
237
-
238
-
239
-
240
-
241
-
242
-
243
-
244
-
245
-
246
-
247
-
248
-
249
-
250
-
251
-
252
-
253
-
254
-
255
-
256
-
257
-
258
-
259
-
260
-
261
-
262
-
263
-
264
-
265
-
266
-
267
-
268
-
269
-
270
-
271
-
272
-
273
-
274
-
275
-
276
-
277
 |
 |