Panasonic KX-P7310 Laser Printer - Page 20
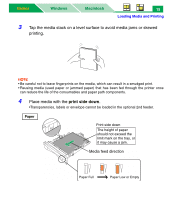
print side down, Tap the media stack on a level surface to avoid media jams or skewed, printing.
 |
UPC - 092281830131
View all Panasonic KX-P7310 manuals
Add to My Manuals
Save this manual to your list of manuals |
Page 20 highlights
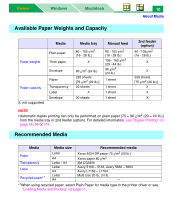
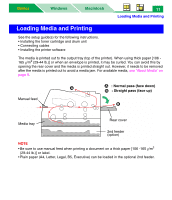
Basics Windows Macintosh 15 Loading Media and Printing 3 Tap the media stack on a level surface to avoid media jams or skewed printing. NOTE • Be careful not to leave fingerprints on the media, which can result in a smudged print. • Reusing media (used paper or jammed paper) that has been fed through the printer once can reduce the life of the consumables and paper path components. 4 Place media with the print side down. •Transparencies, labels or envelope cannot be loaded in the optional 2nd feeder. Paper Print side down The height of paper should not exceed the limit mark on the tray, or it may cause a jam. Media feed direction Paper Full Paper Low or Empty
-
 1
1 -
2
-
3
-
4
-
5
-
6
-
7
-
8
-
9
-
10
-
11
-
12
-
13
-
14
-
 15
15 -
 16
16 -
 17
17 -
 18
18 -
 19
19 -
 20
20 -
 21
21 -
 22
22 -
 23
23 -
 24
24 -
 25
25 -
26
-
27
-
28
-
29
-
30
-
31
-
32
-
33
-
34
-
35
-
36
-
37
-
38
-
39
-
40
-
41
-
42
-
43
-
44
-
45
-
46
-
47
-
48
-
49
-
50
-
51
-
52
-
53
-
54
-
55
-
56
-
57
-
58
-
59
-
60
-
61
-
62
-
63
-
64
-
65
-
66
-
67
-
68
-
69
-
70
-
71
-
72
-
73
-
74
-
75
-
76
-
77
-
78
-
79
-
80
-
81
-
82
-
83
-
84
-
85
-
86
-
87
-
88
-
89
-
90
-
91
-
92
-
93
-
94
-
95
-
96
-
97
-
98
-
99
-
100
-
101
-
102
-
103
-
104
-
105
-
106
-
107
-
108
-
109
-
110
-
111
-
112
-
113
-
114
-
115
-
116
-
117
-
118
-
119
-
120
-
121
-
122
-
123
-
124
-
125
-
126
-
127
-
128
-
129
-
130
-
131
-
132
-
133
-
134
-
135
-
136
-
137
-
138
-
139
-
140
-
141
-
142
-
143
-
144
-
145
-
146
-
147
-
148
-
149
-
150
-
151
-
152
-
153
-
154
-
155
-
156
-
157
-
158
-
159
-
160
-
161
-
162
-
163
-
164
-
165
-
166
-
167
-
168
-
169
-
170
-
171
-
172
-
173
-
174
-
175
-
176
-
177
-
178
-
179
-
180
-
181
-
182
-
183
-
184
-
185
-
186
-
187
-
188
-
189
-
190
-
191
-
192
-
193
-
194
-
195
-
196
-
197
-
198
-
199
-
200
-
201
-
202
-
203
-
204
-
205
-
206
-
207
-
208
-
209
-
210
-
211
-
212
-
213
-
214
-
215
-
216
-
217
-
218
-
219
-
220
-
221
-
222
-
223
-
224
-
225
-
226
-
227
-
228
-
229
-
230
-
231
-
232
-
233
-
234
-
235
-
236
-
237
-
238
-
239
-
240
-
241
-
242
-
243
-
244
-
245
-
246
-
247
-
248
-
249
-
250
-
251
-
252
-
253
-
254
-
255
-
256
-
257
-
258
-
259
-
260
-
261
-
262
-
263
-
264
-
265
-
266
-
267
-
268
-
269
-
270
-
271
-
272
-
273
-
274
-
275
-
276
-
277
 |
 |
Loading Media and Printing
Macintosh
Windows
Basics
Basics
15
3
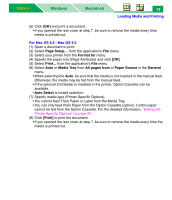
Tap the media stack on a level surface to avoid media jams or skewed
printing.
NOTE
• Be careful not to leave fingerprints on the media, which can result in a smudged print.
• Reusing media (used paper or jammed paper) that has been fed through the printer once
can reduce the life of the consumables and paper path components.
4
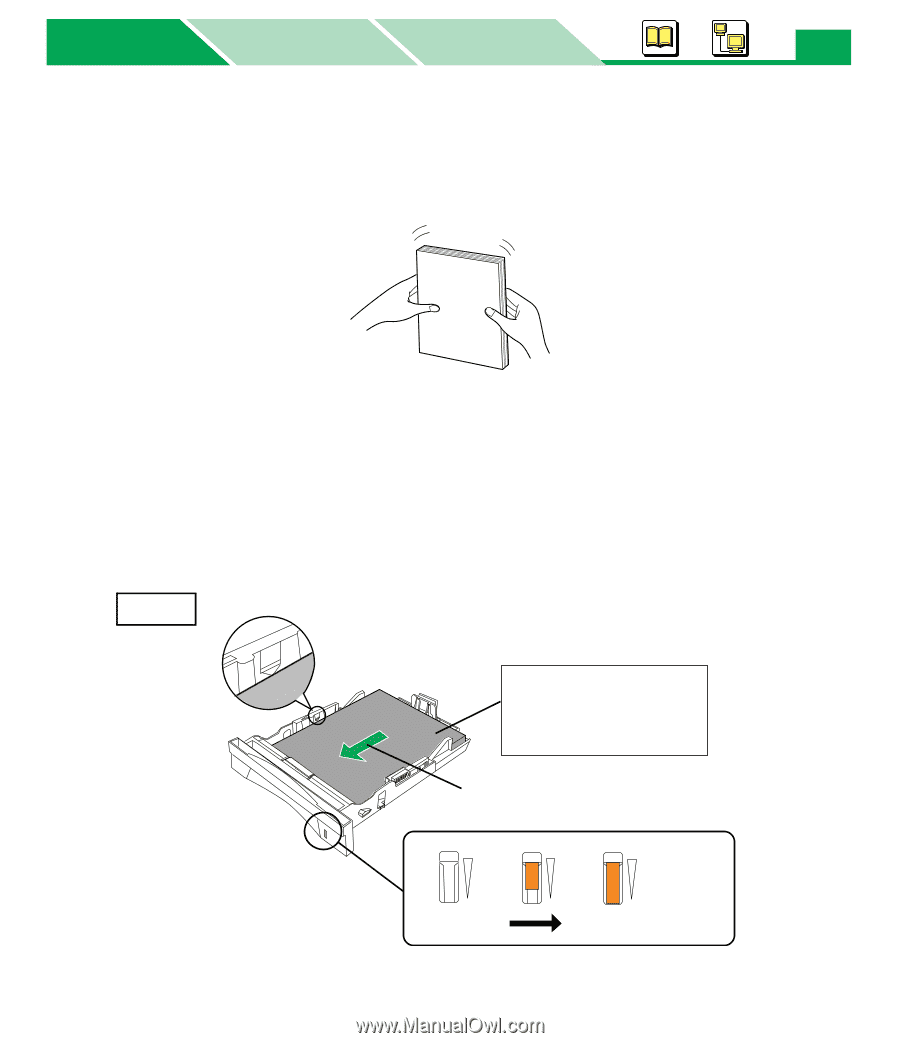
Place media with the
print side down
.
•Transparencies, labels or envelope cannot be loaded in the optional 2nd feeder.
The height of paper
should not exceed the
limit mark on the tray, or
it may cause a jam.
Print side down
Media feed direction
Paper Full
Paper Low or Empty
Paper