Panasonic KX-P7310 Laser Printer - Page 191
LPR Port Printing - Printing directly from a computer, Step 1: Setting up TCP/IP on the computer
 |
UPC - 092281830131
View all Panasonic KX-P7310 manuals
Add to My Manuals
Save this manual to your list of manuals |
Page 191 highlights
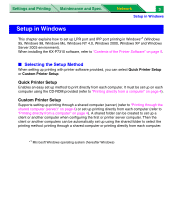
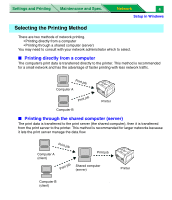
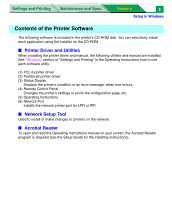
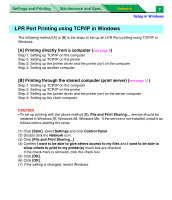
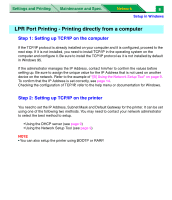
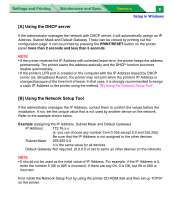
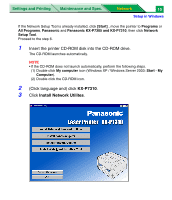
Settings and Printing Maintenance and Spec. Network 8 Setup in Windows LPR Port Printing - Printing directly from a computer Step 1: Setting up TCP/IP on the computer If the TCP/IP protocol is already installed on your computer and it is configured, proceed to the next step. If it is not installed, you need to install TCP/IP in the operating system on the computer and configure it. Be sure to install the TCP/IP protocol as it is not installed by default in Windows 95. If the administrator manages the IP Address, contact him/her to confirm the values before setting up. Be sure to assign the unique value for the IP Address that is not used on another device on the network. Refer to the example of "[B] Using the Network Setup Tool" on page 9. To confirm that the IP Address is set correctly, see page 14. Checking the configuration of TCP/IP, refer to the help menu or documentation for Windows. Step 2: Setting up TCP/IP on the printer You need to set the IP Address, Subnet Mask and Default Gateway for the printer. It can be set using one of the following two methods. You may need to contact your network administrator to select the best method to setup. • Using the DHCP server (see page 9) • Using the Network Setup Tool (see page 9) NOTE • You can also setup the printer using BOOTP or RARP.
-
 1
1 -
2
-
3
-
4
-
5
-
6
-
7
-
8
-
9
-
10
-
11
-
12
-
13
-
14
-
15
-
16
-
17
-
18
-
19
-
20
-
21
-
22
-
23
-
24
-
25
-
26
-
27
-
28
-
29
-
30
-
31
-
32
-
33
-
34
-
35
-
36
-
37
-
38
-
39
-
40
-
41
-
42
-
43
-
44
-
45
-
46
-
47
-
48
-
49
-
50
-
51
-
52
-
53
-
54
-
55
-
56
-
57
-
58
-
59
-
60
-
61
-
62
-
63
-
64
-
65
-
66
-
67
-
68
-
69
-
70
-
71
-
72
-
73
-
74
-
75
-
76
-
77
-
78
-
79
-
80
-
81
-
82
-
83
-
84
-
85
-
86
-
87
-
88
-
89
-
90
-
91
-
92
-
93
-
94
-
95
-
96
-
97
-
98
-
99
-
100
-
101
-
102
-
103
-
104
-
105
-
106
-
107
-
108
-
109
-
110
-
111
-
112
-
113
-
114
-
115
-
116
-
117
-
118
-
119
-
120
-
121
-
122
-
123
-
124
-
125
-
126
-
127
-
128
-
129
-
130
-
131
-
132
-
133
-
134
-
135
-
136
-
137
-
138
-
139
-
140
-
141
-
142
-
143
-
144
-
145
-
146
-
147
-
148
-
149
-
150
-
151
-
152
-
153
-
154
-
155
-
156
-
157
-
158
-
159
-
160
-
161
-
162
-
163
-
164
-
165
-
166
-
167
-
168
-
169
-
170
-
171
-
172
-
173
-
174
-
175
-
176
-
177
-
178
-
179
-
180
-
181
-
182
-
183
-
184
-
185
-
 186
186 -
 187
187 -
 188
188 -
 189
189 -
 190
190 -
 191
191 -
 192
192 -
 193
193 -
 194
194 -
 195
195 -
 196
196 -
197
-
198
-
199
-
200
-
201
-
202
-
203
-
204
-
205
-
206
-
207
-
208
-
209
-
210
-
211
-
212
-
213
-
214
-
215
-
216
-
217
-
218
-
219
-
220
-
221
-
222
-
223
-
224
-
225
-
226
-
227
-
228
-
229
-
230
-
231
-
232
-
233
-
234
-
235
-
236
-
237
-
238
-
239
-
240
-
241
-
242
-
243
-
244
-
245
-
246
-
247
-
248
-
249
-
250
-
251
-
252
-
253
-
254
-
255
-
256
-
257
-
258
-
259
-
260
-
261
-
262
-
263
-
264
-
265
-
266
-
267
-
268
-
269
-
270
-
271
-
272
-
273
-
274
-
275
-
276
-
277
 |
 |