Samsung GT-N5110 User Manual Generic Gt-n5110 English User Manual Ver.mca_f5 ( - Page 52
Groups
 |
View all Samsung GT-N5110 manuals
Add to My Manuals
Save this manual to your list of manuals |
Page 52 highlights
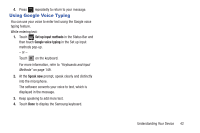
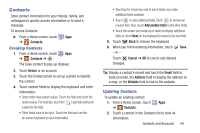
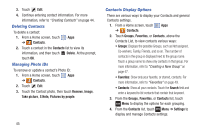
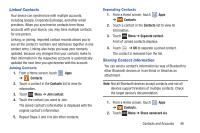
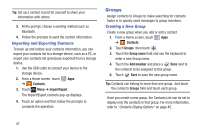
Tip: Set up a contact record for yourself to share your information with others. 3. At the prompt, choose a sending method such as Bluetooth. 4. Follow the prompts to send the contact information. Importing and Exporting Contacts To back up and restore your contacts information, you can export your contacts list to a storage device, such as a PC, or import your contacts list (previously exported) from a storage device. 1. Use the USB cable to connect your device to the storage device. 2. From a Home screen, touch Apps ➔ Contacts. 3. Touch Menu ➔ Import/Export. The Import/Export contacts pop-up displays. 4. Touch an option and then follow the prompts to complete the operation. Groups Assign contacts to Groups to make searching for contacts faster or to quickly send messages to group members. Creating a New Group Create a new group when you add or edit a contact. 1. From a Home screen, touch Apps ➔ Contacts. 2. Touch Groups then touch . 3. Touch the Group name field and use the keyboard to enter a new Group name. 4. Touch the Add member and place a Done next to the contacts to be assigned to this group. 5. Touch Save to save the new group name. Tip: Contacts can belong to more than one group. Just touch the contact's Groups field and touch each group. Once you create a new group, the Contacts List can be set to display only the contacts in that group. For more information, refer to "Contacts Display Options" on page 45. 47
-
 1
1 -
2
-
3
-
4
-
5
-
6
-
7
-
8
-
9
-
10
-
11
-
12
-
13
-
14
-
15
-
16
-
17
-
18
-
19
-
20
-
21
-
22
-
23
-
24
-
25
-
26
-
27
-
28
-
29
-
30
-
31
-
32
-
33
-
34
-
35
-
36
-
37
-
38
-
39
-
40
-
41
-
42
-
43
-
44
-
45
-
46
-
 47
47 -
 48
48 -
 49
49 -
 50
50 -
 51
51 -
 52
52 -
 53
53 -
 54
54 -
 55
55 -
 56
56 -
 57
57 -
58
-
59
-
60
-
61
-
62
-
63
-
64
-
65
-
66
-
67
-
68
-
69
-
70
-
71
-
72
-
73
-
74
-
75
-
76
-
77
-
78
-
79
-
80
-
81
-
82
-
83
-
84
-
85
-
86
-
87
-
88
-
89
-
90
-
91
-
92
-
93
-
94
-
95
-
96
-
97
-
98
-
99
-
100
-
101
-
102
-
103
-
104
-
105
-
106
-
107
-
108
-
109
-
110
-
111
-
112
-
113
-
114
-
115
-
116
-
117
-
118
-
119
-
120
-
121
-
122
-
123
-
124
-
125
-
126
-
127
-
128
-
129
-
130
-
131
-
132
-
133
-
134
-
135
-
136
-
137
-
138
-
139
-
140
-
141
-
142
-
143
-
144
-
145
-
146
-
147
-
148
-
149
-
150
-
151
-
152
-
153
-
154
-
155
-
156
-
157
-
158
-
159
-
160
-
161
-
162
-
163
-
164
-
165
-
166
-
167
-
168
-
169
-
170
-
171
-
172
-
173
-
174
-
175
-
176
-
177
-
178
-
179
-
180
-
181
-
182
-
183
-
184
-
185
-
186
-
187
-
188
-
189
-
190
-
191
-
192
-
193
-
194
-
195
-
196
-
197
-
198
-
199
-
200
-
201
-
202
-
203
-
204
-
205
-
206
 |
 |
