Yamaha 01V96i Reference Manual - Page 26
Pairing Input Channels
 |
View all Yamaha 01V96i manuals
Add to My Manuals
Save this manual to your list of manuals |
Page 26 highlights
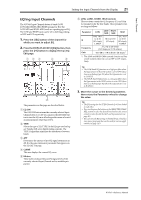
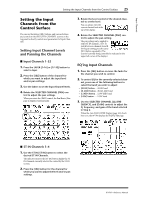
26 Input Channels If the check box is off, the parameter value currently being adjusted pops up. See page 21 for more information on EQ. Tip: • Pressing and holding down the button selected in Step 2 resets the corresponding band gain. • Pressing the SELECTED CHANNEL [HIGH] and [LOW] buttons simultaneously resets the Q, frequency and gain for each band. Pairing Input Channels On the 01V96i, you can pair adjacent odd-even Input Channels or counterpart channels on Layer 1 and Layer 2 that share the same physical fader. Faders and most parameters of paired channels are linked for stereo operation. Paired channels' linked parameters and non-linked parameters (that are available for independent control) are listed below: Linked parameters Non-linked parameters [SEL] buttons Input patches Faders Insert patches Channel on/off Output patches Insert on/off Comp insert position Solo on/off Phase Solo Safe Aux on/off Delay on/off Delay time* Aux Send level Delay feedback Aux Sends as Pre or Post Delay mix Gate Routing Comp settings Pan, Follow Pan EQ settings Surround pan Fader group Aux Send pan Mute group Fade time Balance Attenuators** Recall Safe * You can set this parameter for each channel independently if the GANG button is turned off on the /INS/DLY | DLY page. ** You can set this parameter for each channel independently on the EQ | ATT page, but the paired channel settings are linked on the EQ | Edit and View pages. Note: You cannot pair an ST IN channel 1-4 with an Input Channel. To pair channels, or to cancel channel pairs, you can use the [SEL] buttons on the top panel or access the Pair/Grup pages. 01V96i-Reference Manual
-
 1
1 -
2
-
3
-
4
-
5
-
6
-
7
-
8
-
9
-
10
-
11
-
12
-
13
-
14
-
15
-
16
-
17
-
18
-
19
-
20
-
 21
21 -
 22
22 -
 23
23 -
 24
24 -
 25
25 -
 26
26 -
 27
27 -
 28
28 -
 29
29 -
 30
30 -
 31
31 -
32
-
33
-
34
-
35
-
36
-
37
-
38
-
39
-
40
-
41
-
42
-
43
-
44
-
45
-
46
-
47
-
48
-
49
-
50
-
51
-
52
-
53
-
54
-
55
-
56
-
57
-
58
-
59
-
60
-
61
-
62
-
63
-
64
-
65
-
66
-
67
-
68
-
69
-
70
-
71
-
72
-
73
-
74
-
75
-
76
-
77
-
78
-
79
-
80
-
81
-
82
-
83
-
84
-
85
-
86
-
87
-
88
-
89
-
90
-
91
-
92
-
93
-
94
-
95
-
96
-
97
-
98
-
99
-
100
-
101
-
102
-
103
-
104
-
105
-
106
-
107
-
108
-
109
-
110
-
111
-
112
-
113
-
114
-
115
-
116
-
117
-
118
-
119
-
120
-
121
-
122
-
123
-
124
-
125
-
126
-
127
-
128
-
129
-
130
-
131
-
132
-
133
-
134
-
135
-
136
-
137
-
138
-
139
-
140
-
141
-
142
-
143
-
144
-
145
-
146
-
147
-
148
-
149
-
150
-
151
-
152
-
153
-
154
-
155
-
156
-
157
-
158
-
159
-
160
-
161
-
162
-
163
-
164
-
165
-
166
-
167
-
168
-
169
-
170
-
171
-
172
-
173
-
174
-
175
-
176
-
177
-
178
-
179
-
180
-
181
-
182
-
183
-
184
-
185
-
186
 |
 |
