Yamaha 01V96i Reference Manual - Page 28
Naming Input Channels, Press the DISPLAY ACCESS [PATCH] button
 |
View all Yamaha 01V96i manuals
Add to My Manuals
Save this manual to your list of manuals |
Page 28 highlights
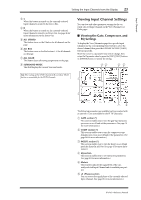
28 Input Channels 4. To cancel a pair, move the cursor to the desired channel's STEREO button, then press [ENTER]. Tip: You can also create or cancel a pair of Output Channels in the same way on the Pair/Grup | Output page (see page 33). Naming Input Channels By default, Input Channels are named CH1, CH2, etc. You can change these names if desired. For example, it may be helpful for mixdown if you name a particular Input Channel with the type of musical instrument connected to the corresponding input jack. 1. Press the DISPLAY ACCESS [PATCH] button repeatedly until the Patch | IN Name page appears. 13 2 01V96i-Reference Manual You can specify Short names in the center column (1) and Long (full) names in the right column (2). When the Name Input Auto Copy check box (3) is on, the first four characters of a newly-entered Long name are automatically copied to the Short name. On the other hand, a newly-entered Short name is automatically added to the beginning of the Long name. You can reset all channel names to their default names by moving the cursor to the INITIALIZE button, then pressing [ENTER]. 2. Move the cursor to a name you wish to change, then press [ENTER]. The Title Edit window appears, enabling you to enter a name. 3. Edit the name, move the cursor to the OK but- ton, then press [ENTER]. The new name is now effective. Tip: The edited name is stored in the Input Patch library.
-
 1
1 -
2
-
3
-
4
-
5
-
6
-
7
-
8
-
9
-
10
-
11
-
12
-
13
-
14
-
15
-
16
-
17
-
18
-
19
-
20
-
21
-
22
-
 23
23 -
 24
24 -
 25
25 -
 26
26 -
 27
27 -
 28
28 -
 29
29 -
 30
30 -
 31
31 -
 32
32 -
 33
33 -
34
-
35
-
36
-
37
-
38
-
39
-
40
-
41
-
42
-
43
-
44
-
45
-
46
-
47
-
48
-
49
-
50
-
51
-
52
-
53
-
54
-
55
-
56
-
57
-
58
-
59
-
60
-
61
-
62
-
63
-
64
-
65
-
66
-
67
-
68
-
69
-
70
-
71
-
72
-
73
-
74
-
75
-
76
-
77
-
78
-
79
-
80
-
81
-
82
-
83
-
84
-
85
-
86
-
87
-
88
-
89
-
90
-
91
-
92
-
93
-
94
-
95
-
96
-
97
-
98
-
99
-
100
-
101
-
102
-
103
-
104
-
105
-
106
-
107
-
108
-
109
-
110
-
111
-
112
-
113
-
114
-
115
-
116
-
117
-
118
-
119
-
120
-
121
-
122
-
123
-
124
-
125
-
126
-
127
-
128
-
129
-
130
-
131
-
132
-
133
-
134
-
135
-
136
-
137
-
138
-
139
-
140
-
141
-
142
-
143
-
144
-
145
-
146
-
147
-
148
-
149
-
150
-
151
-
152
-
153
-
154
-
155
-
156
-
157
-
158
-
159
-
160
-
161
-
162
-
163
-
164
-
165
-
166
-
167
-
168
-
169
-
170
-
171
-
172
-
173
-
174
-
175
-
176
-
177
-
178
-
179
-
180
-
181
-
182
-
183
-
184
-
185
-
186
 |
 |
