D-Link DGS-3324SR Product Manual - Page 220
Assert Messages, PIM-DM Interface Configuration, PIM Global Settings, PIM Interface Settings
 |
UPC - 790069262067
View all D-Link DGS-3324SR manuals
Add to My Manuals
Save this manual to your list of manuals |
Page 220 highlights
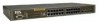
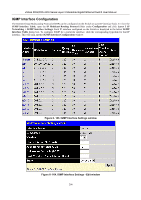
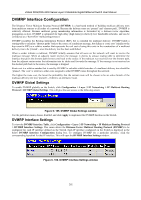
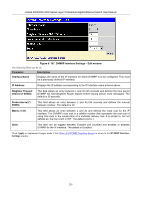
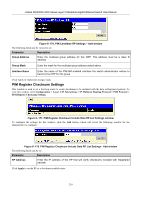
xStack DGS/DXS-3300 Series Layer 3 Stackable Gigabit Ethernet Switch User Manual When the latter occurs, the same packet may be sent twice, one type encapsulated, one not. The RP will detect this flaw and then return a Register Suppression message to the DR requesting it to discontinue sending encapsulated packets. Assert Messages At times on the PIM-SM enabled network, parallel paths are created from source to receiver, meaning some receivers will receive the same multicast packets twice. To improve this situation, Assert messages are sent from the receiving device to both multicast sources to determine which single router will send the receiver the necessary multicast data. The source with the shortest metric (hop count) will be elected as the primary multicast source. This metric value is included within the Assert message. PIM-DM Interface Configuration The Protocol Independent Multicast - Dense Mode (PIM-DM) protocol should be used in networks with a low delay (low latency) and high bandwidth as PIM-DM is optimized to guarantee delivery of multicast packets, not to reduce overhead. The PIM-DM multicast routing protocol is assumes that all downstream routers want to receive multicast messages and relies upon explicit prune messages from downstream routers to remove branches from the multicast delivery tree that do not contain multicast group members. PIM-DM has no explicit 'join' messages. It relies upon periodic flooding of multicast messages to all interfaces and then either waiting for a timer to expire (the Join/Prune Interval) or for the downstream routers to transmit explicit 'prune' messages indicating that there are no multicast members on their respective branches. PIM-DM then removes these branches ('prunes' them) from the multicast delivery tree. Because a member of a pruned branch of a multicast delivery tree may want to join a multicast delivery group (at some point in the future), the protocol periodically removes the 'prune' information from its database and floods multicast messages to all interfaces on that branch. The interval for removing 'prune' information is the Join/Prune Interval. PIM Global Settings To enable PIM globally on the Switch, go to Configuration > Layer 3 IP Networking > IP Multicast Routing Protocol > PIM Protocol > PIM Global Settings. This will give the user access to the following screen: Figure 6- 168. PIM Global Settings window Use the pull-down menu, choose Enabled, and click Apply to set the PIM function on the Switch. PIM Interface Settings To configure the settings for the PIM Protocol per IP interface, go to Configuration > Layer 3 IP Networking > IP Multicast Routing Protocol > PIM Protocol > PIM Interface Settings. This will give the user access to the following screen: Figure 6- 169. PIM Interface Settings window To configure an IP interface for PIM, click its corresponding link which will lead you to the following screen: 205
-
 1
1 -
2
-
3
-
4
-
5
-
6
-
7
-
8
-
9
-
10
-
11
-
12
-
13
-
14
-
15
-
16
-
17
-
18
-
19
-
20
-
21
-
22
-
23
-
24
-
25
-
26
-
27
-
28
-
29
-
30
-
31
-
32
-
33
-
34
-
35
-
36
-
37
-
38
-
39
-
40
-
41
-
42
-
43
-
44
-
45
-
46
-
47
-
48
-
49
-
50
-
51
-
52
-
53
-
54
-
55
-
56
-
57
-
58
-
59
-
60
-
61
-
62
-
63
-
64
-
65
-
66
-
67
-
68
-
69
-
70
-
71
-
72
-
73
-
74
-
75
-
76
-
77
-
78
-
79
-
80
-
81
-
82
-
83
-
84
-
85
-
86
-
87
-
88
-
89
-
90
-
91
-
92
-
93
-
94
-
95
-
96
-
97
-
98
-
99
-
100
-
101
-
102
-
103
-
104
-
105
-
106
-
107
-
108
-
109
-
110
-
111
-
112
-
113
-
114
-
115
-
116
-
117
-
118
-
119
-
120
-
121
-
122
-
123
-
124
-
125
-
126
-
127
-
128
-
129
-
130
-
131
-
132
-
133
-
134
-
135
-
136
-
137
-
138
-
139
-
140
-
141
-
142
-
143
-
144
-
145
-
146
-
147
-
148
-
149
-
150
-
151
-
152
-
153
-
154
-
155
-
156
-
157
-
158
-
159
-
160
-
161
-
162
-
163
-
164
-
165
-
166
-
167
-
168
-
169
-
170
-
171
-
172
-
173
-
174
-
175
-
176
-
177
-
178
-
179
-
180
-
181
-
182
-
183
-
184
-
185
-
186
-
187
-
188
-
189
-
190
-
191
-
192
-
193
-
194
-
195
-
196
-
197
-
198
-
199
-
200
-
201
-
202
-
203
-
204
-
205
-
206
-
207
-
208
-
209
-
210
-
211
-
212
-
213
-
214
-
 215
215 -
 216
216 -
 217
217 -
 218
218 -
 219
219 -
 220
220 -
 221
221 -
 222
222 -
 223
223 -
 224
224 -
 225
225 -
226
-
227
-
228
-
229
-
230
-
231
-
232
-
233
-
234
-
235
-
236
-
237
-
238
-
239
-
240
-
241
-
242
-
243
-
244
-
245
-
246
-
247
-
248
-
249
-
250
-
251
-
252
-
253
-
254
-
255
-
256
-
257
-
258
-
259
-
260
-
261
-
262
-
263
-
264
-
265
-
266
-
267
-
268
-
269
-
270
-
271
-
272
-
273
-
274
-
275
-
276
-
277
-
278
-
279
-
280
-
281
-
282
-
283
-
284
-
285
-
286
-
287
-
288
-
289
-
290
-
291
-
292
-
293
-
294
-
295
-
296
-
297
-
298
-
299
-
300
-
301
-
302
-
303
-
304
-
305
-
306
-
307
-
308
-
309
-
310
-
311
-
312
-
313
-
314
-
315
-
316
-
317
-
318
-
319
-
320
-
321
-
322
-
323
-
324
-
325
-
326
-
327
-
328
-
329
-
330
-
331
-
332
-
333
-
334
-
335
-
336
-
337
-
338
-
339
-
340
-
341
-
342
-
343
-
344
-
345
-
346
-
347
-
348
-
349
-
350
-
351
-
352
-
353
-
354
-
355
-
356
-
357
-
358
-
359
-
360
-
361
-
362
-
363
-
364
-
365
-
366
-
367
-
368
-
369
-
370
-
371
-
372
-
373
-
374
-
375
-
376
-
377
-
378
-
379
-
380
-
381
-
382
-
383
-
384
-
385
-
386
-
387
-
388
-
389
-
390
-
391
-
392
 |
 |