IBM 84885BU User Manual - Page 39
Replacing, cover
 |
View all IBM 84885BU manuals
Add to My Manuals
Save this manual to your list of manuals |
Page 39 highlights
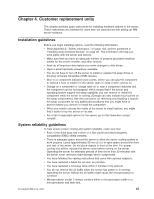
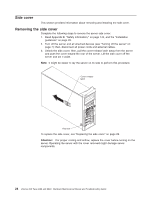
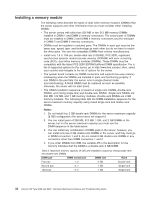
Replacing the side cover If you removed the support bracket or bezel, reinstall it before you replace the side cover (see "Removing and installing the support bracket" on page 32 and "Replacing the bezel" on page 31). Note: The rear adapter retaining bracket rests against the server side cover. You might find it easier to lay the server on its side to replace the side cover. Complete the following steps to replace the side cover: 1. Before installing the cover, check that all cables, adapters, and other components are installed and seated correctly and that you have not left loose tools or parts inside the server 2. Make sure that the cover-release latch is in the unlocked (opened) position. 3. Insert the tabs inside the cover into the slots on the server chassis. 4. Make sure that each tab on the side cover is in its corresponding slot. 5. Close the cover-release latch to secure the side cover in place. 6. Lock the side cover. Chapter 4. Customer replacement units 29
-
 1
1 -
2
-
3
-
4
-
5
-
6
-
7
-
8
-
9
-
10
-
11
-
12
-
13
-
14
-
15
-
16
-
17
-
18
-
19
-
20
-
21
-
22
-
23
-
24
-
25
-
26
-
27
-
28
-
29
-
30
-
31
-
32
-
33
-
 34
34 -
 35
35 -
 36
36 -
 37
37 -
 38
38 -
 39
39 -
 40
40 -
 41
41 -
 42
42 -
 43
43 -
 44
44 -
45
-
46
-
47
-
48
-
49
-
50
-
51
-
52
-
53
-
54
-
55
-
56
-
57
-
58
-
59
-
60
-
61
-
62
-
63
-
64
-
65
-
66
-
67
-
68
-
69
-
70
-
71
-
72
-
73
-
74
-
75
-
76
-
77
-
78
-
79
-
80
-
81
-
82
-
83
-
84
-
85
-
86
-
87
-
88
-
89
-
90
-
91
-
92
-
93
-
94
-
95
-
96
-
97
-
98
-
99
-
100
-
101
-
102
-
103
-
104
-
105
-
106
-
107
-
108
-
109
-
110
-
111
-
112
-
113
-
114
-
115
-
116
-
117
-
118
-
119
-
120
-
121
-
122
-
123
-
124
-
125
-
126
-
127
-
128
-
129
-
130
-
131
-
132
-
133
-
134
-
135
-
136
-
137
-
138
-
139
-
140
-
141
-
142
-
143
-
144
-
145
-
146
-
147
-
148
-
149
-
150
-
151
-
152
-
153
-
154
-
155
-
156
-
157
-
158
-
159
-
160
-
161
-
162
-
163
-
164
-
165
-
166
-
167
-
168
-
169
-
170
-
171
-
172
-
173
-
174
-
175
-
176
-
177
-
178
-
179
-
180
-
181
-
182
-
183
-
184
-
185
-
186
-
187
-
188
-
189
-
190
-
191
-
192
-
193
-
194
-
195
-
196
-
197
-
198
-
199
-
200
 |
 |