IBM 84885BU User Manual - Page 45
Important
 |
View all IBM 84885BU manuals
Add to My Manuals
Save this manual to your list of manuals |
Page 45 highlights
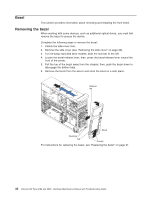
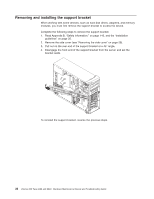
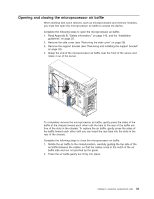
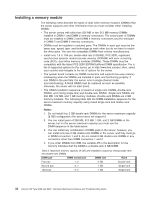
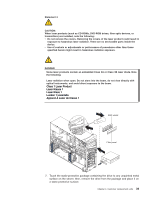
v The DIMM options that are available for the server are 256 MB, 512 MB, 1 GB, and 2 GB memory modules. The server supports a minimum of 256 MB and a maximum of 8 MB (when using 2 GB double-rank DIMMs) of system memory. Important: Although the server supports a maximum of 8 GB of system memory, some Microsoft® Windows® operating systems recognize and support only a lesser amount of system memory, as shown in the following table. Windows operating system Windows Server 2003, Web Edition Windows Server 2003, Standard Edition Maximum memory supported 2 GB 4 GB v The memory controller in the server provides Chipkill™ memory protection if the DIMMs are 1 GB or larger, or if the server is populated with 512 MB x4 DIMMs. Chipkill memory protection is a technology that protects the server from a single chip failure on a DIMM. v The amount of usable memory is reduced depending on the system configuration. A certain amount of memory must be reserved for system resources. The BIOS displays the total amount of installed memory and the amount of configured memory. Complete the following steps to install a DIMM: 1. Read Appendix B, "Safety information," on page 143, and the "Installation guidelines" on page 25. 2. Turn off the server and peripheral devices, and disconnect the power cords and all external cables. 3. Remove the side cover (see "Removing the side cover" on page 28). 4. Remove the support bracket (see "Removing and installing the support bracket" on page 32). 5. Open the microprocessor air baffle (see "Opening and closing the microprocessor air baffle" on page 33). 6. Locate the DIMM connectors on the system board (see "System board option connectors" on page 85). Determine the connectors into which you will install the DIMMs. Chapter 4. Customer replacement units 35
-
 1
1 -
2
-
3
-
4
-
5
-
6
-
7
-
8
-
9
-
10
-
11
-
12
-
13
-
14
-
15
-
16
-
17
-
18
-
19
-
20
-
21
-
22
-
23
-
24
-
25
-
26
-
27
-
28
-
29
-
30
-
31
-
32
-
33
-
34
-
35
-
36
-
37
-
38
-
39
-
 40
40 -
 41
41 -
 42
42 -
 43
43 -
 44
44 -
 45
45 -
 46
46 -
 47
47 -
 48
48 -
 49
49 -
 50
50 -
51
-
52
-
53
-
54
-
55
-
56
-
57
-
58
-
59
-
60
-
61
-
62
-
63
-
64
-
65
-
66
-
67
-
68
-
69
-
70
-
71
-
72
-
73
-
74
-
75
-
76
-
77
-
78
-
79
-
80
-
81
-
82
-
83
-
84
-
85
-
86
-
87
-
88
-
89
-
90
-
91
-
92
-
93
-
94
-
95
-
96
-
97
-
98
-
99
-
100
-
101
-
102
-
103
-
104
-
105
-
106
-
107
-
108
-
109
-
110
-
111
-
112
-
113
-
114
-
115
-
116
-
117
-
118
-
119
-
120
-
121
-
122
-
123
-
124
-
125
-
126
-
127
-
128
-
129
-
130
-
131
-
132
-
133
-
134
-
135
-
136
-
137
-
138
-
139
-
140
-
141
-
142
-
143
-
144
-
145
-
146
-
147
-
148
-
149
-
150
-
151
-
152
-
153
-
154
-
155
-
156
-
157
-
158
-
159
-
160
-
161
-
162
-
163
-
164
-
165
-
166
-
167
-
168
-
169
-
170
-
171
-
172
-
173
-
174
-
175
-
176
-
177
-
178
-
179
-
180
-
181
-
182
-
183
-
184
-
185
-
186
-
187
-
188
-
189
-
190
-
191
-
192
-
193
-
194
-
195
-
196
-
197
-
198
-
199
-
200
 |
 |
