Ricoh 1160L User Guide - Page 111
Automatic Document Feeder Rubber Pad Replacement, Open the Control Panel Cover.
 |
View all Ricoh 1160L manuals
Add to My Manuals
Save this manual to your list of manuals |
Page 111 highlights
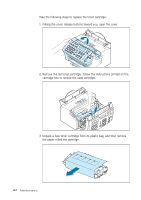
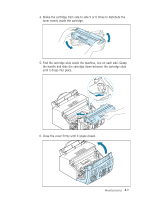
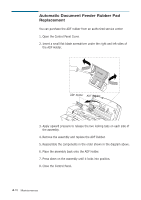
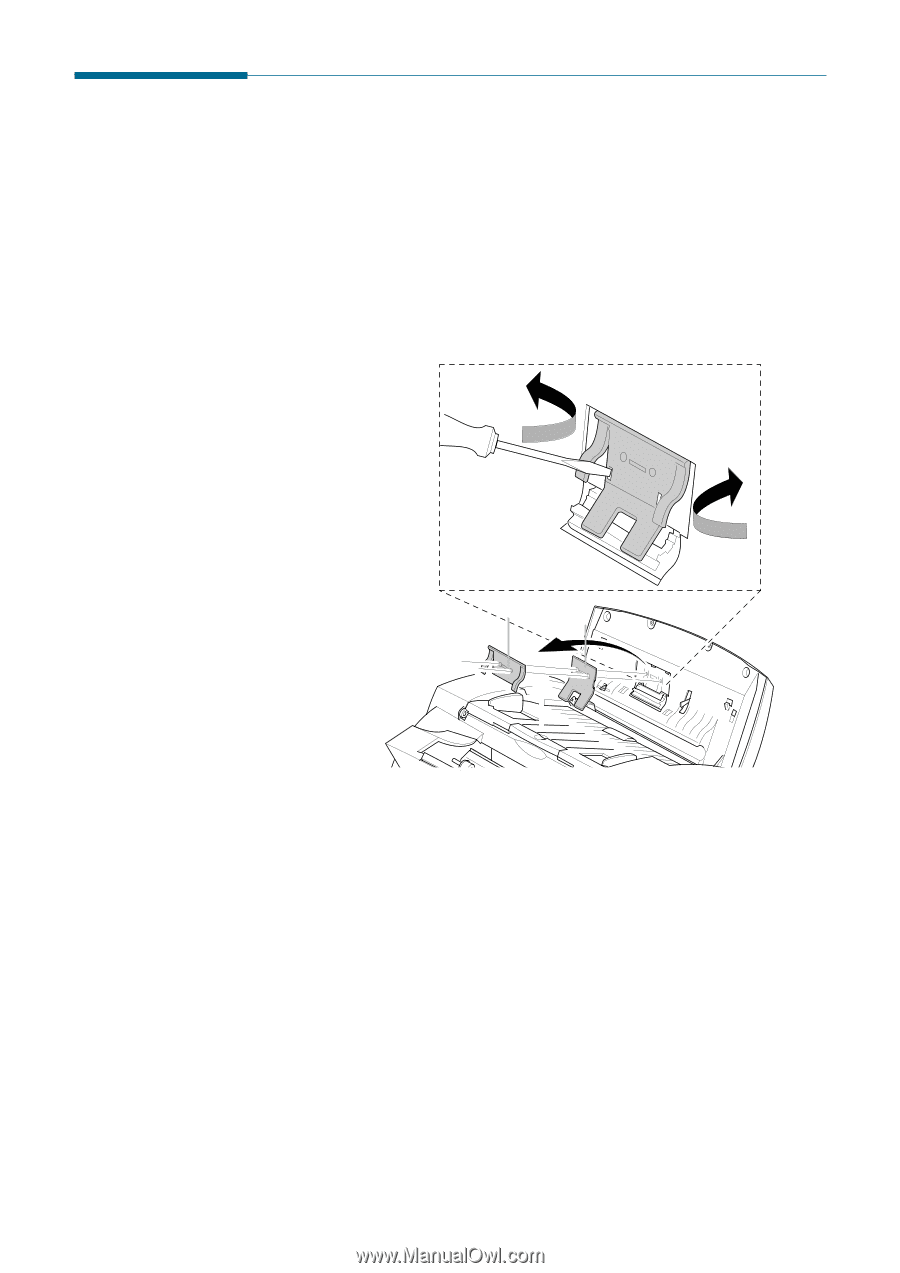
Automatic Document Feeder Rubber Pad Replacement You can purchase the ADF rubber from an authorized service center 1. Open the Control Panel Cover. 2. Insert a small flat blade screwdriver under the right and left sides of the ADF Holder. ADF Holder ADF Rubber 3. Apply upward pressure to release the two locking tabs on each side of the assembly. 4. Remove the assembly and replace the ADF Rubber. 5. Reassemble the components in the order shown in the diagram above. 6. Place the assembly back onto the ADF Holder. 7. Press down on the assembly until it locks into position. 8. Close the Control Panel. 4.10 Maintenance
-
 1
1 -
2
-
3
-
4
-
5
-
6
-
7
-
8
-
9
-
10
-
11
-
12
-
13
-
14
-
15
-
16
-
17
-
18
-
19
-
20
-
21
-
22
-
23
-
24
-
25
-
26
-
27
-
28
-
29
-
30
-
31
-
32
-
33
-
34
-
35
-
36
-
37
-
38
-
39
-
40
-
41
-
42
-
43
-
44
-
45
-
46
-
47
-
48
-
49
-
50
-
51
-
52
-
53
-
54
-
55
-
56
-
57
-
58
-
59
-
60
-
61
-
62
-
63
-
64
-
65
-
66
-
67
-
68
-
69
-
70
-
71
-
72
-
73
-
74
-
75
-
76
-
77
-
78
-
79
-
80
-
81
-
82
-
83
-
84
-
85
-
86
-
87
-
88
-
89
-
90
-
91
-
92
-
93
-
94
-
95
-
96
-
97
-
98
-
99
-
100
-
101
-
102
-
103
-
104
-
105
-
 106
106 -
 107
107 -
 108
108 -
 109
109 -
 110
110 -
 111
111 -
 112
112 -
 113
113 -
 114
114 -
 115
115 -
 116
116 -
117
-
118
-
119
-
120
-
121
-
122
-
123
-
124
-
125
-
126
-
127
-
128
-
129
-
130
-
131
-
132
-
133
-
134
-
135
-
136
-
137
-
138
-
139
-
140
-
141
-
142
-
143
-
144
-
145
 |
 |
4.
10
Maintenance
Automatic Document Feeder Rubber Pad
Replacement
You can purchase the ADF rubber from an authorized service center
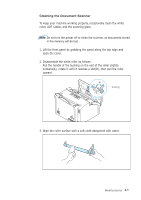
1. Open the Control Panel Cover.
2. Insert a small flat blade screwdriver under the right and left sides of
the ADF Holder.
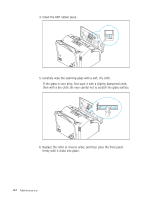
3. Apply upward pressure to release the two locking tabs on each side of
the assembly.
4. Remove the assembly and replace the ADF Rubber.
5. Reassemble the components in the order shown in the diagram above.
6. Place the assembly back onto the ADF Holder.
7. Press down on the assembly until it locks into position.
8. Close the Control Panel.
ADF Holder
ADF Rubber