Ricoh 1160L User Guide - Page 23
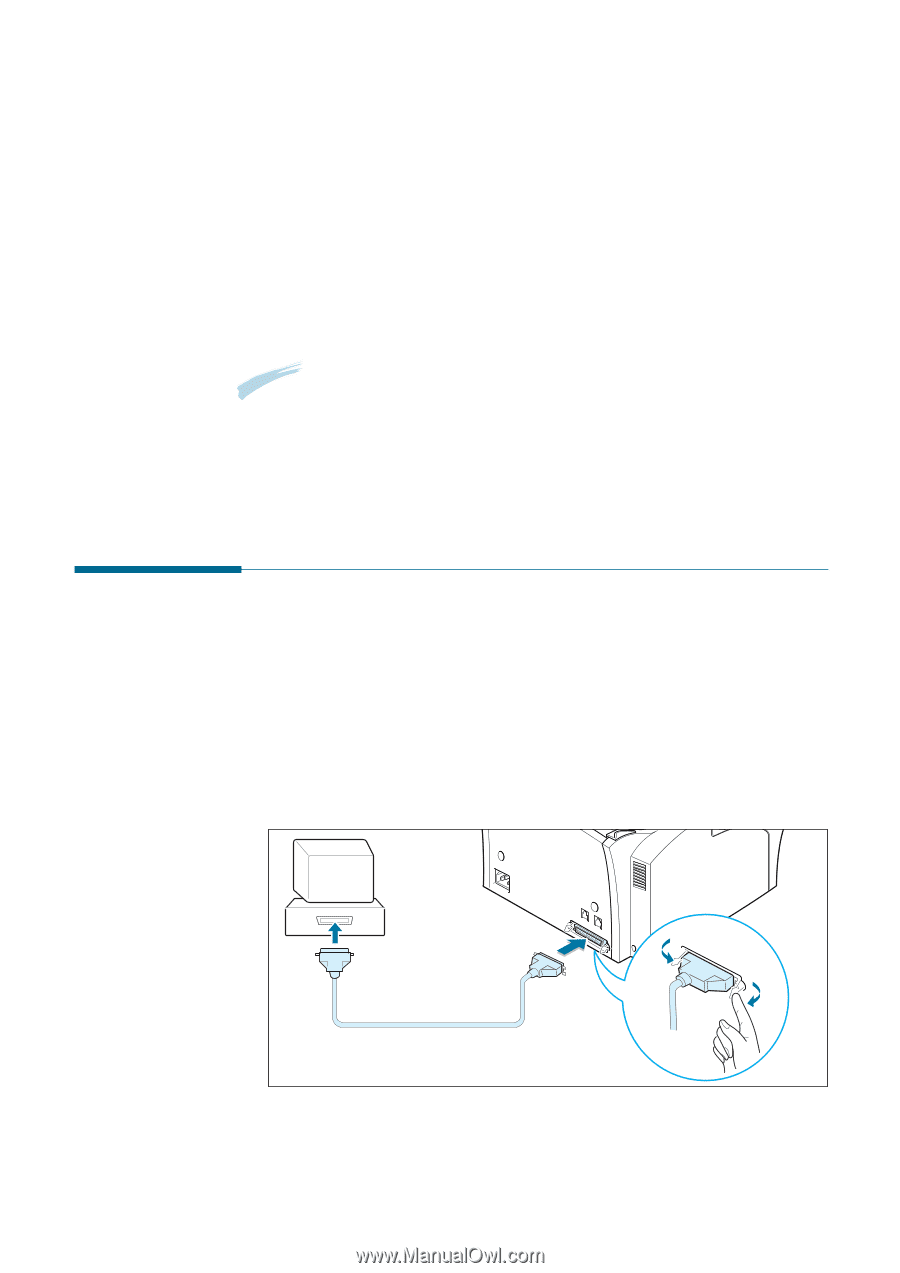
Connecting to the Computer (MFP model only), To Connect to a Wall Jack that Has Two Phone Lines - supplies
 |
View all Ricoh 1160L manuals
Add to My Manuals
Save this manual to your list of manuals |
Page 23 highlights
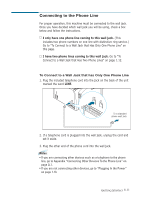
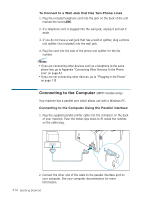
To Connect to a Wall Jack that Has Two Phone Lines 1. Plug the included telephone cord into the jack on the back of the unit marked the word LINE. 2. If a telephone cord is plugged into the wall jack, unplug it and set it aside. 3. If you do not have a wall jack that has a built-in splitter, plug a phone unit splitter (not included) into the wall jack. 4. Plug the cord into the side of the phone unit splitter for the fax number. Notes: • If you are connecting other devices such as a telephone to the same phone line, go to Appendix "Connecting Other Devices To the Phone Line" on page A.1. • If you are not connecting other devices, go to "Plugging In the Power" on page 1.13. Connecting to the Computer (MFP model only) Your machine has a parallel port which allows use with a Windows PC. Connecting to the Computer Using the Parallel interface 1. Plug the supplied parallel printer cable into the connector on the back of your machine. Push the metal clips down to fit inside the notches on the cable plug. 2. Connect the other end of the cable to the parallel interface port on your computer. See your computer documentation for more information. 1.12 Getting Started
-
 1
1 -
2
-
3
-
4
-
5
-
6
-
7
-
8
-
9
-
10
-
11
-
12
-
13
-
14
-
15
-
16
-
17
-
 18
18 -
 19
19 -
 20
20 -
 21
21 -
 22
22 -
 23
23 -
 24
24 -
 25
25 -
 26
26 -
 27
27 -
 28
28 -
29
-
30
-
31
-
32
-
33
-
34
-
35
-
36
-
37
-
38
-
39
-
40
-
41
-
42
-
43
-
44
-
45
-
46
-
47
-
48
-
49
-
50
-
51
-
52
-
53
-
54
-
55
-
56
-
57
-
58
-
59
-
60
-
61
-
62
-
63
-
64
-
65
-
66
-
67
-
68
-
69
-
70
-
71
-
72
-
73
-
74
-
75
-
76
-
77
-
78
-
79
-
80
-
81
-
82
-
83
-
84
-
85
-
86
-
87
-
88
-
89
-
90
-
91
-
92
-
93
-
94
-
95
-
96
-
97
-
98
-
99
-
100
-
101
-
102
-
103
-
104
-
105
-
106
-
107
-
108
-
109
-
110
-
111
-
112
-
113
-
114
-
115
-
116
-
117
-
118
-
119
-
120
-
121
-
122
-
123
-
124
-
125
-
126
-
127
-
128
-
129
-
130
-
131
-
132
-
133
-
134
-
135
-
136
-
137
-
138
-
139
-
140
-
141
-
142
-
143
-
144
-
145
 |
 |