Dell PowerConnect Brocade M6505 Brocade 7.1.0 Web Tools Administrator's Guide - Page 133
Setting the default zoning mode, Zoning management
 |
View all Dell PowerConnect Brocade M6505 manuals
Add to My Manuals
Save this manual to your list of manuals |
Page 133 highlights
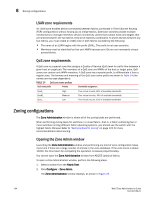
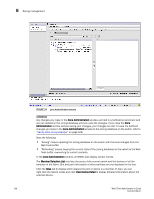
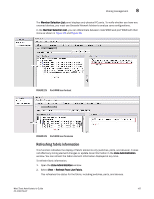
Zoning management 8 Setting the default zoning mode The default zoning mode has two options: • All Access-All devices within the fabric can communicate with all other devices. • No Access-Devices in the fabric cannot access any other device in the fabric. NOTE You should not change the default zone mode from No Access to All Access if there is no effective zone configuration and more than 120 devices are connected to the fabric. Web Tools supports default zoning on switches running firmware v5.1.0 or later. Default zoning on legacy switches (switches running firmware versions prior to v 5.1.0) are not supported. Legacy switches can use default zoning; however, they cannot manipulate the default zone or default configuration. To set the default zoning mode, perform the following steps. 1. Open the Zone Administration window (refer to "Opening the Zone Admin window" on page 104). 2. Select Zoning Actions > Set Default Mode, and then select the access mode. Zoning management You can monitor and manage basic and traffic isolation zoning through the Web Tools Zone Administration window. The information in the Zone Administration window is collected from the selected switch. If the FCS policy is activated in the fabric, zoning can be administered only from the primary FCS switch. If the selected switch has an Advanced Zoning license installed, but is not the primary FCS switch, the Zone Admin option is displayed, but not activated. You must be logged into the switch using a user name with one of the following roles associated with it to make changes to the zoning: zoneAdmin, admin, fabricAdmin, or any user-defined role with modify rights. All other roles allow only a view or read-only access. Most of the zoning operations are disabled in read-only mode. A snapshot is taken of all the zoning configurations at the time you launch the Zone Administration window; this information is not updated automatically by Web Tools. To update this information, refer to "Refreshing Zone Administration window information" on page 108. When you log in to a virtual switch, or select a virtual switch using the drop-down list under Fabric Tree section in the Switch Explorer window, only the ports that are associated with the Virtual Fabric ID you selected are displayed in the member selection list, as shown in Figure 24. You can use the Add Other button to add ports of other switches in the fabric. Web Tools Administrator's Guide 105 53-1002756-01
-
 1
1 -
2
-
3
-
4
-
5
-
6
-
7
-
8
-
9
-
10
-
11
-
12
-
13
-
14
-
15
-
16
-
17
-
18
-
19
-
20
-
21
-
22
-
23
-
24
-
25
-
26
-
27
-
28
-
29
-
30
-
31
-
32
-
33
-
34
-
35
-
36
-
37
-
38
-
39
-
40
-
41
-
42
-
43
-
44
-
45
-
46
-
47
-
48
-
49
-
50
-
51
-
52
-
53
-
54
-
55
-
56
-
57
-
58
-
59
-
60
-
61
-
62
-
63
-
64
-
65
-
66
-
67
-
68
-
69
-
70
-
71
-
72
-
73
-
74
-
75
-
76
-
77
-
78
-
79
-
80
-
81
-
82
-
83
-
84
-
85
-
86
-
87
-
88
-
89
-
90
-
91
-
92
-
93
-
94
-
95
-
96
-
97
-
98
-
99
-
100
-
101
-
102
-
103
-
104
-
105
-
106
-
107
-
108
-
109
-
110
-
111
-
112
-
113
-
114
-
115
-
116
-
117
-
118
-
119
-
120
-
121
-
122
-
123
-
124
-
125
-
126
-
127
-
 128
128 -
 129
129 -
 130
130 -
 131
131 -
 132
132 -
 133
133 -
 134
134 -
 135
135 -
 136
136 -
 137
137 -
 138
138 -
139
-
140
-
141
-
142
-
143
-
144
-
145
-
146
-
147
-
148
-
149
-
150
-
151
-
152
-
153
-
154
-
155
-
156
-
157
-
158
-
159
-
160
-
161
-
162
-
163
-
164
-
165
-
166
-
167
-
168
-
169
-
170
-
171
-
172
-
173
-
174
-
175
-
176
-
177
-
178
-
179
-
180
-
181
-
182
-
183
-
184
-
185
-
186
-
187
-
188
-
189
-
190
-
191
-
192
-
193
-
194
-
195
-
196
-
197
-
198
-
199
-
200
-
201
-
202
-
203
-
204
-
205
-
206
-
207
-
208
-
209
-
210
-
211
-
212
-
213
-
214
-
215
-
216
-
217
-
218
-
219
-
220
-
221
-
222
-
223
-
224
-
225
-
226
-
227
-
228
-
229
-
230
-
231
-
232
-
233
-
234
-
235
-
236
-
237
-
238
-
239
-
240
-
241
-
242
-
243
-
244
-
245
-
246
-
247
-
248
-
249
-
250
-
251
-
252
-
253
-
254
-
255
-
256
-
257
-
258
-
259
-
260
-
261
-
262
-
263
-
264
-
265
-
266
-
267
-
268
 |
 |