Dell PowerConnect Brocade M6505 Brocade 7.1.0 Web Tools Administrator's Guide - Page 144
Creating zone configurations, Adding or removing zone configuration members
 |
View all Dell PowerConnect Brocade M6505 manuals
Add to My Manuals
Save this manual to your list of manuals |
Page 144 highlights
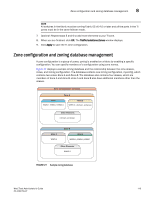
8 Zone configuration and zoning database management Creating zone configurations To create a zone configuration, perform the following steps. After creating a zone configuration, you must explicitly enable it for it to take effect. For information on enabling the configuration, refer to "Enabling zone configurations" on page 118. NOTE Any changes made to the currently enabled configuration does not display until you re-enable the configuration. To create zone configurations, perform the following steps. 1. Open the Zone Administration window as described in "Opening the Zone Admin window" on page 104. 2. Select a format to display zoning members in the Member Selection List as described in "Selecting a zoning view" on page 109. 3. Select the Zone Config tab and click New Zone Config. 4. In the Create New Config dialog box, enter a name for the new configuration and click OK. The new configuration displays in the Name list. 5. Expand the Member Selection List to view the nested elements. The choices available in the list depend on the selection made in the View menu. 6. Select an element in the Member Selection List that you want to include in your configuration. The right arrow becomes active. 7. Click the right arrow to add configuration members. Selected members are moved to the Config Members window. 8. Repeat steps 6 and 7 to add more elements to your configuration. 9. Select Zoning Actions > Save Config to save the configuration changes. Adding or removing zone configuration members For information on enabling the configuration, refer to "Enabling zone configurations" on page 118. To add or remove members of a zone configuration, perform the following steps. NOTE You can make changes to a configuration that is currently enabled; however, changes do not display until you re-enable the configuration. To configure the zone members, perform the following steps. 1. Open the Zone Administration window as described in "Opening the Zone Admin window" on page 104. 2. Select the Zone Config tab. 3. Select the configuration you want to modify from the Name list. 4. Click an element in the Member Selection list that you want to include in your configuration or select the element in the Config Members list that you want to delete. 116 Web Tools Administrator's Guide 53-1002756-01
-
 1
1 -
2
-
3
-
4
-
5
-
6
-
7
-
8
-
9
-
10
-
11
-
12
-
13
-
14
-
15
-
16
-
17
-
18
-
19
-
20
-
21
-
22
-
23
-
24
-
25
-
26
-
27
-
28
-
29
-
30
-
31
-
32
-
33
-
34
-
35
-
36
-
37
-
38
-
39
-
40
-
41
-
42
-
43
-
44
-
45
-
46
-
47
-
48
-
49
-
50
-
51
-
52
-
53
-
54
-
55
-
56
-
57
-
58
-
59
-
60
-
61
-
62
-
63
-
64
-
65
-
66
-
67
-
68
-
69
-
70
-
71
-
72
-
73
-
74
-
75
-
76
-
77
-
78
-
79
-
80
-
81
-
82
-
83
-
84
-
85
-
86
-
87
-
88
-
89
-
90
-
91
-
92
-
93
-
94
-
95
-
96
-
97
-
98
-
99
-
100
-
101
-
102
-
103
-
104
-
105
-
106
-
107
-
108
-
109
-
110
-
111
-
112
-
113
-
114
-
115
-
116
-
117
-
118
-
119
-
120
-
121
-
122
-
123
-
124
-
125
-
126
-
127
-
128
-
129
-
130
-
131
-
132
-
133
-
134
-
135
-
136
-
137
-
138
-
 139
139 -
 140
140 -
 141
141 -
 142
142 -
 143
143 -
 144
144 -
 145
145 -
 146
146 -
 147
147 -
 148
148 -
 149
149 -
150
-
151
-
152
-
153
-
154
-
155
-
156
-
157
-
158
-
159
-
160
-
161
-
162
-
163
-
164
-
165
-
166
-
167
-
168
-
169
-
170
-
171
-
172
-
173
-
174
-
175
-
176
-
177
-
178
-
179
-
180
-
181
-
182
-
183
-
184
-
185
-
186
-
187
-
188
-
189
-
190
-
191
-
192
-
193
-
194
-
195
-
196
-
197
-
198
-
199
-
200
-
201
-
202
-
203
-
204
-
205
-
206
-
207
-
208
-
209
-
210
-
211
-
212
-
213
-
214
-
215
-
216
-
217
-
218
-
219
-
220
-
221
-
222
-
223
-
224
-
225
-
226
-
227
-
228
-
229
-
230
-
231
-
232
-
233
-
234
-
235
-
236
-
237
-
238
-
239
-
240
-
241
-
242
-
243
-
244
-
245
-
246
-
247
-
248
-
249
-
250
-
251
-
252
-
253
-
254
-
255
-
256
-
257
-
258
-
259
-
260
-
261
-
262
-
263
-
264
-
265
-
266
-
267
-
268
 |
 |