Dell PowerConnect Brocade M6505 Brocade 7.1.0 Web Tools Administrator's Guide - Page 198
User-defined roles, Guidelines and restrictions
 |
View all Dell PowerConnect Brocade M6505 manuals
Add to My Manuals
Save this manual to your list of manuals |
Page 198 highlights
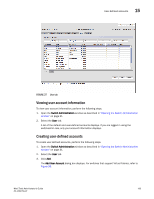
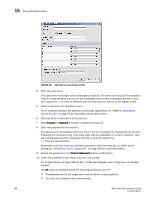
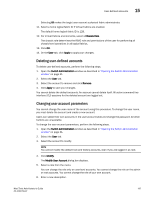
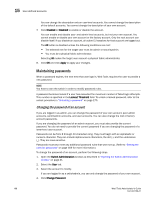
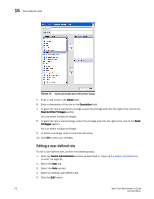
15 User-defined roles 1. Open the Switch Administration window as described in "Opening the Switch Administration window" on page 31. 2. Select the User tab. 3. Select the account. 4. Click Expire Password. If the button is unavailable, the password is already expired. 5. Click Apply to save your changes. Unlocking a password To unlock a password, perform the following steps. 1. Open the Switch Administration window as described in "Opening the Switch Administration window" on page 31. 2. Select the User tab. 3. Select the account. 4. Click Unlock Password. If the button is unavailable, the password is already unlocked or was not locked out. 5. Click Apply to save your changes. Displaying roles and assigned logical fabrics You can display user role assignments for logical fabrics. 1. Open the Switch Administration window as described in "Opening the Switch Administration window" on page 31. 2. Select the User tab. 3. Select an account. 4. Select Show Role and VF. The role mapping for that user displays. User-defined roles User-defined role provides the ability to create roles dynamically on the switch. The default roles like Root, Factory, Admin, User, SwitchAdmin, ZoneAdmin, FabricAdmin, BasicSwitchAdmin, SecurityAdmin and Operator are defined by giving different permissions for different features,or by restricting access to various features. The default roles cannot be edited for assigning different privileges. However, user-defined roles provide the ability to create new roles and define permissions for the RBAC classes. Guidelines and restrictions Follow these guidelines and restrictions when creating and configuring user-defined roles: 170 Web Tools Administrator's Guide 53-1002756-01
-
 1
1 -
2
-
3
-
4
-
5
-
6
-
7
-
8
-
9
-
10
-
11
-
12
-
13
-
14
-
15
-
16
-
17
-
18
-
19
-
20
-
21
-
22
-
23
-
24
-
25
-
26
-
27
-
28
-
29
-
30
-
31
-
32
-
33
-
34
-
35
-
36
-
37
-
38
-
39
-
40
-
41
-
42
-
43
-
44
-
45
-
46
-
47
-
48
-
49
-
50
-
51
-
52
-
53
-
54
-
55
-
56
-
57
-
58
-
59
-
60
-
61
-
62
-
63
-
64
-
65
-
66
-
67
-
68
-
69
-
70
-
71
-
72
-
73
-
74
-
75
-
76
-
77
-
78
-
79
-
80
-
81
-
82
-
83
-
84
-
85
-
86
-
87
-
88
-
89
-
90
-
91
-
92
-
93
-
94
-
95
-
96
-
97
-
98
-
99
-
100
-
101
-
102
-
103
-
104
-
105
-
106
-
107
-
108
-
109
-
110
-
111
-
112
-
113
-
114
-
115
-
116
-
117
-
118
-
119
-
120
-
121
-
122
-
123
-
124
-
125
-
126
-
127
-
128
-
129
-
130
-
131
-
132
-
133
-
134
-
135
-
136
-
137
-
138
-
139
-
140
-
141
-
142
-
143
-
144
-
145
-
146
-
147
-
148
-
149
-
150
-
151
-
152
-
153
-
154
-
155
-
156
-
157
-
158
-
159
-
160
-
161
-
162
-
163
-
164
-
165
-
166
-
167
-
168
-
169
-
170
-
171
-
172
-
173
-
174
-
175
-
176
-
177
-
178
-
179
-
180
-
181
-
182
-
183
-
184
-
185
-
186
-
187
-
188
-
189
-
190
-
191
-
192
-
 193
193 -
 194
194 -
 195
195 -
 196
196 -
 197
197 -
 198
198 -
 199
199 -
 200
200 -
 201
201 -
 202
202 -
 203
203 -
204
-
205
-
206
-
207
-
208
-
209
-
210
-
211
-
212
-
213
-
214
-
215
-
216
-
217
-
218
-
219
-
220
-
221
-
222
-
223
-
224
-
225
-
226
-
227
-
228
-
229
-
230
-
231
-
232
-
233
-
234
-
235
-
236
-
237
-
238
-
239
-
240
-
241
-
242
-
243
-
244
-
245
-
246
-
247
-
248
-
249
-
250
-
251
-
252
-
253
-
254
-
255
-
256
-
257
-
258
-
259
-
260
-
261
-
262
-
263
-
264
-
265
-
266
-
267
-
268
 |
 |