Dell PowerConnect Brocade M6505 Brocade 7.1.0 Web Tools Administrator's Guide - Page 60
Configuring Netstat Auto Refresh, Configuring a syslog IP address, Removing a syslog IP address
 |
View all Dell PowerConnect Brocade M6505 manuals
Add to My Manuals
Save this manual to your list of manuals |
Page 60 highlights
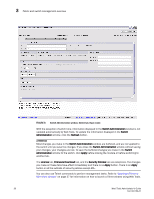
3 Configuring Netstat Auto Refresh Configuring Netstat Auto Refresh The Netstat Performance window displays the details about Ethernet management port statistics like the Interface, MTU, Met, RX-OK, RX-ERR, RX-DRP, RX-OVR, TX-OK, TX-ERR, TX-DRP, TX-OVR, and Flag. To configure Auto Refresh, perform the following steps. 1. Open the Switch Administration window as described in "Opening the Switch Administration window" on page 31. 2. Select the Network tab. 3. Click Netstat Performance. 4. Select the Auto Refresh check box to automatically refresh the port details. Clear the check box to disable auto refresh. 5. When enabled, enter the interval time in seconds in the Auto-Refresh Interval field. The port details are automatically refreshed, based on the configured time interval. The minimum value is 15 seconds. Configuring a syslog IP address The syslog IP represents the IP address of the server that is running the syslog process. The syslog daemon reads and forwards system messages to the appropriate log files or users, depending on the system configuration. When one or more IP addresses are configured, the switch forwards all error log entries to the syslog on the specified servers. Up to six servers are supported. Refer to Fabric OS Administrator's Guide for more information on configuring the syslog daemon. To configure a syslog IP address, perform the following steps. 1. Open the Switch Administration window as described in "Opening the Switch Administration window" on page 31. 2. Select the Network tab. 3. In the Syslog IP's Configuration section, in the New IP field, enter an IP address in either IPv4 or IPv6 format. 4. Click Add. The new IP address displays in the Syslog IP area. 5. Click Apply. Removing a syslog IP address To remove a syslog IP address, perform the following steps. 1. Open the Switch Administration window as described in "Opening the Switch Administration window" on page 31. 2. Select the Network tab. 3. Select a syslog IP in the table and click Remove. 32 Web Tools Administrator's Guide 53-1002756-01
-
 1
1 -
2
-
3
-
4
-
5
-
6
-
7
-
8
-
9
-
10
-
11
-
12
-
13
-
14
-
15
-
16
-
17
-
18
-
19
-
20
-
21
-
22
-
23
-
24
-
25
-
26
-
27
-
28
-
29
-
30
-
31
-
32
-
33
-
34
-
35
-
36
-
37
-
38
-
39
-
40
-
41
-
42
-
43
-
44
-
45
-
46
-
47
-
48
-
49
-
50
-
51
-
52
-
53
-
54
-
 55
55 -
 56
56 -
 57
57 -
 58
58 -
 59
59 -
 60
60 -
 61
61 -
 62
62 -
 63
63 -
 64
64 -
 65
65 -
66
-
67
-
68
-
69
-
70
-
71
-
72
-
73
-
74
-
75
-
76
-
77
-
78
-
79
-
80
-
81
-
82
-
83
-
84
-
85
-
86
-
87
-
88
-
89
-
90
-
91
-
92
-
93
-
94
-
95
-
96
-
97
-
98
-
99
-
100
-
101
-
102
-
103
-
104
-
105
-
106
-
107
-
108
-
109
-
110
-
111
-
112
-
113
-
114
-
115
-
116
-
117
-
118
-
119
-
120
-
121
-
122
-
123
-
124
-
125
-
126
-
127
-
128
-
129
-
130
-
131
-
132
-
133
-
134
-
135
-
136
-
137
-
138
-
139
-
140
-
141
-
142
-
143
-
144
-
145
-
146
-
147
-
148
-
149
-
150
-
151
-
152
-
153
-
154
-
155
-
156
-
157
-
158
-
159
-
160
-
161
-
162
-
163
-
164
-
165
-
166
-
167
-
168
-
169
-
170
-
171
-
172
-
173
-
174
-
175
-
176
-
177
-
178
-
179
-
180
-
181
-
182
-
183
-
184
-
185
-
186
-
187
-
188
-
189
-
190
-
191
-
192
-
193
-
194
-
195
-
196
-
197
-
198
-
199
-
200
-
201
-
202
-
203
-
204
-
205
-
206
-
207
-
208
-
209
-
210
-
211
-
212
-
213
-
214
-
215
-
216
-
217
-
218
-
219
-
220
-
221
-
222
-
223
-
224
-
225
-
226
-
227
-
228
-
229
-
230
-
231
-
232
-
233
-
234
-
235
-
236
-
237
-
238
-
239
-
240
-
241
-
242
-
243
-
244
-
245
-
246
-
247
-
248
-
249
-
250
-
251
-
252
-
253
-
254
-
255
-
256
-
257
-
258
-
259
-
260
-
261
-
262
-
263
-
264
-
265
-
266
-
267
-
268
 |
 |