Dell PowerConnect Brocade M6505 Brocade 7.1.0 Web Tools Administrator's Guide - Page 157
Marginal, Con Switch Status Policy, Switch Status Policy dialog box
 |
View all Dell PowerConnect Brocade M6505 manuals
Add to My Manuals
Save this manual to your list of manuals |
Page 157 highlights
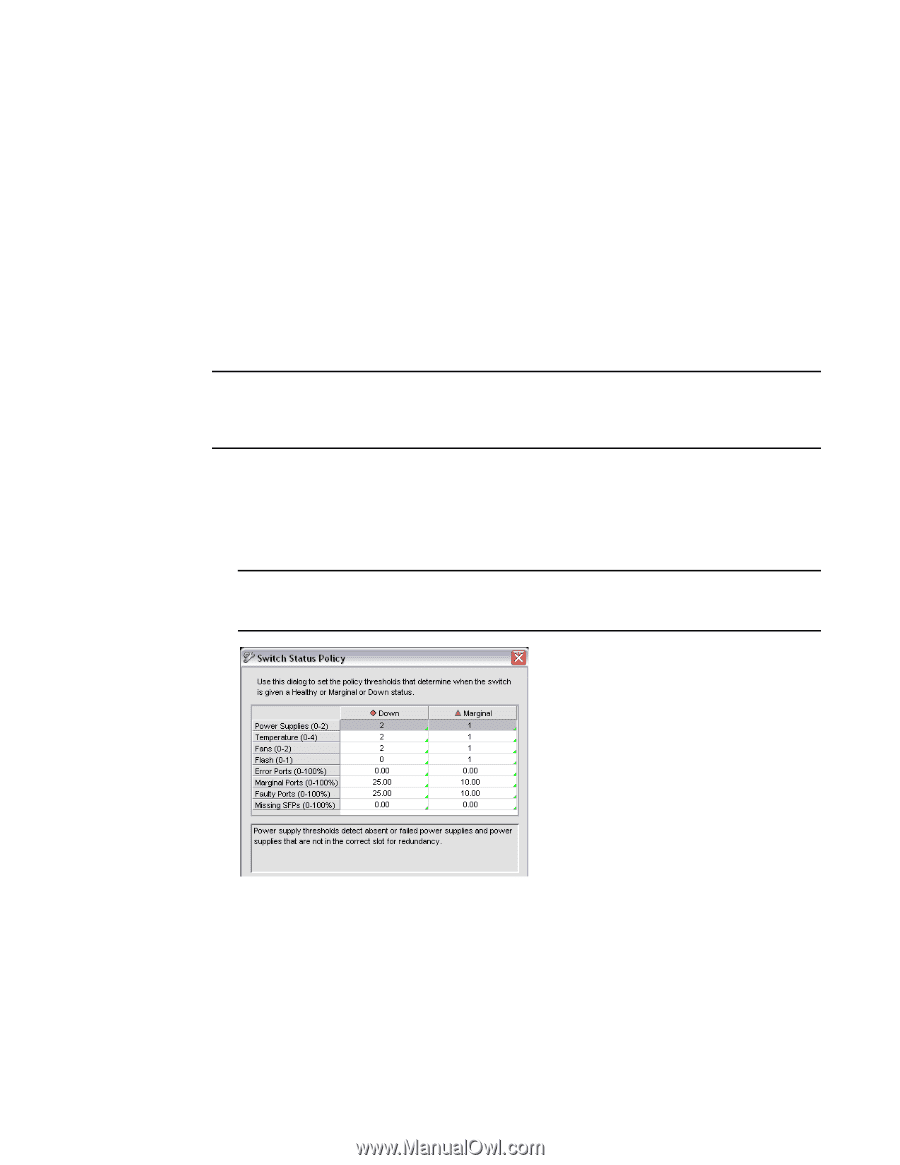
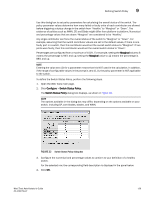
Defining Switch Policy 9 Use this dialog box to set policy parameters for calculating the overall status of the switch. The policy parameter values determine how many failed or faulty units of each contributor are allowed before triggering a status change in the switch from "Healthy" to "Marginal" or "Down". The existence of policies such as WWN, CP, and Blade might differ from platform to platform. Numerical and percentage values that are above "Marginal" are considered to be "Healthy." Any single contributor can force the overall status of the switch to "Marginal" or "Down". For example, assuming that the switch contributor values are set to the default values, if there is one faulty port in a switch, then this contributor would set the overall switch status to "Marginal". If two ports were faulty, then this contributor would set the overall switch status to "Down". Percentages are configured from a maximum of 100%. For example, setting the Marginal value to 6 means the percentage is 94% and up; setting the Marginal value to 12 means the percentage is 88% and up. NOTE Entering the value zero (0) for a parameter means that it is NOT used in the calculation. In addition, if the range of configurable values in the prompt is zero (0..0), the policy parameter is NOT applicable to the switch. To define the Switch Status Policy, perform the following steps. 1. Open the Web Tools main page. 2. Click Configure > Switch Status Policy. The Switch Status Policy dialog box displays, as shown in Figure 32. NOTE The options available in the dialog box may differ, depending on the options available on your switch, including CP, core blades, blades, and WWN. FIGURE 32 Switch Status Policy dialog box 3. Configure the numerical and percentage values to conform to your definition of a healthy switch. For the selected row, the corresponding field description is displayed in the panel below. 4. Click OK. Web Tools Administrator's Guide 129 53-1002756-01
-
 1
1 -
2
-
3
-
4
-
5
-
6
-
7
-
8
-
9
-
10
-
11
-
12
-
13
-
14
-
15
-
16
-
17
-
18
-
19
-
20
-
21
-
22
-
23
-
24
-
25
-
26
-
27
-
28
-
29
-
30
-
31
-
32
-
33
-
34
-
35
-
36
-
37
-
38
-
39
-
40
-
41
-
42
-
43
-
44
-
45
-
46
-
47
-
48
-
49
-
50
-
51
-
52
-
53
-
54
-
55
-
56
-
57
-
58
-
59
-
60
-
61
-
62
-
63
-
64
-
65
-
66
-
67
-
68
-
69
-
70
-
71
-
72
-
73
-
74
-
75
-
76
-
77
-
78
-
79
-
80
-
81
-
82
-
83
-
84
-
85
-
86
-
87
-
88
-
89
-
90
-
91
-
92
-
93
-
94
-
95
-
96
-
97
-
98
-
99
-
100
-
101
-
102
-
103
-
104
-
105
-
106
-
107
-
108
-
109
-
110
-
111
-
112
-
113
-
114
-
115
-
116
-
117
-
118
-
119
-
120
-
121
-
122
-
123
-
124
-
125
-
126
-
127
-
128
-
129
-
130
-
131
-
132
-
133
-
134
-
135
-
136
-
137
-
138
-
139
-
140
-
141
-
142
-
143
-
144
-
145
-
146
-
147
-
148
-
149
-
150
-
151
-
 152
152 -
 153
153 -
 154
154 -
 155
155 -
 156
156 -
 157
157 -
 158
158 -
 159
159 -
 160
160 -
 161
161 -
 162
162 -
163
-
164
-
165
-
166
-
167
-
168
-
169
-
170
-
171
-
172
-
173
-
174
-
175
-
176
-
177
-
178
-
179
-
180
-
181
-
182
-
183
-
184
-
185
-
186
-
187
-
188
-
189
-
190
-
191
-
192
-
193
-
194
-
195
-
196
-
197
-
198
-
199
-
200
-
201
-
202
-
203
-
204
-
205
-
206
-
207
-
208
-
209
-
210
-
211
-
212
-
213
-
214
-
215
-
216
-
217
-
218
-
219
-
220
-
221
-
222
-
223
-
224
-
225
-
226
-
227
-
228
-
229
-
230
-
231
-
232
-
233
-
234
-
235
-
236
-
237
-
238
-
239
-
240
-
241
-
242
-
243
-
244
-
245
-
246
-
247
-
248
-
249
-
250
-
251
-
252
-
253
-
254
-
255
-
256
-
257
-
258
-
259
-
260
-
261
-
262
-
263
-
264
-
265
-
266
-
267
-
268
 |
 |