Dell PowerEdge M710 Web Tools Administrator’s Guide - Page 242
Setting the rules for passwords, Change Password, Set User Account Password, Confirm Password, Apply
 |
View all Dell PowerEdge M710 manuals
Add to My Manuals
Save this manual to your list of manuals |
Page 242 highlights
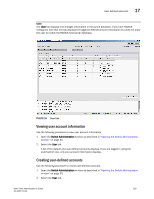
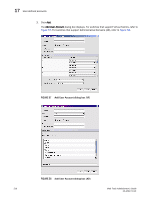
17 User-defined accounts DRAFT: BROCADE CONFIDENTIAL 3. Select the account to modify. If you are logged in as a switchadmin, you can only change the password of your own account. 4. Click Change Password. The Set User Account Password dialog box displays. 5. Enter the current password of the account. This step is required only if you are changing the password of your own or a peer admin account. 6. Enter the new password of the account. The new password must have at least one character different from the old password. 7. Retype the new password in the Confirm Password field. 8. Click OK. 9. Click Apply to save your changes. Setting the rules for passwords Use the following procedure to set rules for passwords. 1. Open the Switch Administration window as described in "Opening the Switch Administration window" on page 35. 2. Select the User tab. 3. Click Set Password Rule. The Configure Password Rule dialog box displays. 4. Fill out the dialog box for the password rules you want to enforce. The available options are: • Minimum number of days (0-999) before you can change the password again • Number of days (0-999) before a password expires • Number of password changes before you can reuse a password • Minimum password length (8-40 characters) • Minimum number of uppercase and lowercase characters required • Minimum number of digits and punctuation characters required • Number of characters that can be repeated in the password • Number of failed login attempts (0-999) before the password is locked from further change attempts, and the amount of time the password is locked (0-99999 minutes) • Number of days to warn user before password expiration (0-999) 5. Select whether to enable or disable the lockout administration features. If you select to disable the lockout administration, the user is never locked out of the system. 6. Click OK to close the dialog box. 7. Click Apply to save your changes. 214 Web Tools Administrator's Guide 53-1001772-01
-
 1
1 -
2
-
3
-
4
-
5
-
6
-
7
-
8
-
9
-
10
-
11
-
12
-
13
-
14
-
15
-
16
-
17
-
18
-
19
-
20
-
21
-
22
-
23
-
24
-
25
-
26
-
27
-
28
-
29
-
30
-
31
-
32
-
33
-
34
-
35
-
36
-
37
-
38
-
39
-
40
-
41
-
42
-
43
-
44
-
45
-
46
-
47
-
48
-
49
-
50
-
51
-
52
-
53
-
54
-
55
-
56
-
57
-
58
-
59
-
60
-
61
-
62
-
63
-
64
-
65
-
66
-
67
-
68
-
69
-
70
-
71
-
72
-
73
-
74
-
75
-
76
-
77
-
78
-
79
-
80
-
81
-
82
-
83
-
84
-
85
-
86
-
87
-
88
-
89
-
90
-
91
-
92
-
93
-
94
-
95
-
96
-
97
-
98
-
99
-
100
-
101
-
102
-
103
-
104
-
105
-
106
-
107
-
108
-
109
-
110
-
111
-
112
-
113
-
114
-
115
-
116
-
117
-
118
-
119
-
120
-
121
-
122
-
123
-
124
-
125
-
126
-
127
-
128
-
129
-
130
-
131
-
132
-
133
-
134
-
135
-
136
-
137
-
138
-
139
-
140
-
141
-
142
-
143
-
144
-
145
-
146
-
147
-
148
-
149
-
150
-
151
-
152
-
153
-
154
-
155
-
156
-
157
-
158
-
159
-
160
-
161
-
162
-
163
-
164
-
165
-
166
-
167
-
168
-
169
-
170
-
171
-
172
-
173
-
174
-
175
-
176
-
177
-
178
-
179
-
180
-
181
-
182
-
183
-
184
-
185
-
186
-
187
-
188
-
189
-
190
-
191
-
192
-
193
-
194
-
195
-
196
-
197
-
198
-
199
-
200
-
201
-
202
-
203
-
204
-
205
-
206
-
207
-
208
-
209
-
210
-
211
-
212
-
213
-
214
-
215
-
216
-
217
-
218
-
219
-
220
-
221
-
222
-
223
-
224
-
225
-
226
-
227
-
228
-
229
-
230
-
231
-
232
-
233
-
234
-
235
-
236
-
 237
237 -
 238
238 -
 239
239 -
 240
240 -
 241
241 -
 242
242 -
 243
243 -
 244
244 -
 245
245 -
 246
246 -
 247
247 -
248
-
249
-
250
-
251
-
252
-
253
-
254
-
255
-
256
-
257
-
258
-
259
-
260
-
261
-
262
-
263
-
264
-
265
-
266
-
267
-
268
-
269
-
270
-
271
-
272
-
273
-
274
-
275
-
276
-
277
-
278
-
279
-
280
-
281
-
282
-
283
-
284
-
285
-
286
-
287
-
288
-
289
-
290
-
291
-
292
-
293
-
294
-
295
-
296
-
297
-
298
-
299
-
300
-
301
-
302
-
303
-
304
-
305
-
306
-
307
-
308
-
309
-
310
 |
 |
