Dell PowerEdge M710 Web Tools Administrator’s Guide - Page 296
Enabling and disabling a LAG, Enabling and disabling LLDP, Enabling and disabling QoS priority-based
 |
View all Dell PowerEdge M710 manuals
Add to My Manuals
Save this manual to your list of manuals |
Page 296 highlights
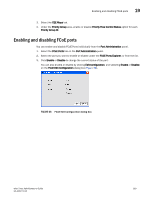
DRAFT: BROCADE CONFIDENTIAL 19 Enabling and disabling a LAG 1. Select the CEE Interfaces tab on the Port Administration panel. 2. Under the CEE Interface Explorer, select the port you want to enable or disable. 3. Select the General tab. This tab is normally pre-selected. You can follow either of the following options to enable or disable the interface: • Click Enable Interface or Disable Interface to enable or disable the interface, as desired. • Click Edit Configuration to open the CEE Edit Configuration dialog box. Select Enable or Disable for the Status field to enable or disable the interface. Enabling and disabling a LAG To enable or disable a LAG, perform the following steps. 1. Select the CEE tab on the Switch Administration panel. 2. Select the Link Aggregation tab. 3. Click Add. The LAG Configuration dialog box displays. 4. Change the Status to Administratively Up or Administratively Down. Enabling and disabling LLDP To enable or disable LLDP on a CEE interface, perform the following steps. 1. Select the CEE Interfaces tab on the Port Administration panel. 2. Under the CEE Interface Explorer, select the port. 3. Select the General tab. 4. Click Edit Configuration. The CEE Edit Configuration dialog box displays. 5. For the LLDP Status option, select Enable or Disable. Enabling and disabling QoS priority-based flow control Priority-based flow control (PFC) can be used to control network congestion. PFC can be used to selectively pause lower priority traffic classes to ensure that high priority and delay-sensitive traffic are not affected by network congestion. For example, if a large storage transfer is monopolizing the network and causing congestion, PFC can be used to pause the storage transfer so other traffic may use the network. To enable or disable PFC, perform the following steps. 1. Select the CEE tab on the Switch Administration panel. 2. Select the QoS tab. 268 Web Tools Administrator's Guide 53-1001772-01
-
 1
1 -
2
-
3
-
4
-
5
-
6
-
7
-
8
-
9
-
10
-
11
-
12
-
13
-
14
-
15
-
16
-
17
-
18
-
19
-
20
-
21
-
22
-
23
-
24
-
25
-
26
-
27
-
28
-
29
-
30
-
31
-
32
-
33
-
34
-
35
-
36
-
37
-
38
-
39
-
40
-
41
-
42
-
43
-
44
-
45
-
46
-
47
-
48
-
49
-
50
-
51
-
52
-
53
-
54
-
55
-
56
-
57
-
58
-
59
-
60
-
61
-
62
-
63
-
64
-
65
-
66
-
67
-
68
-
69
-
70
-
71
-
72
-
73
-
74
-
75
-
76
-
77
-
78
-
79
-
80
-
81
-
82
-
83
-
84
-
85
-
86
-
87
-
88
-
89
-
90
-
91
-
92
-
93
-
94
-
95
-
96
-
97
-
98
-
99
-
100
-
101
-
102
-
103
-
104
-
105
-
106
-
107
-
108
-
109
-
110
-
111
-
112
-
113
-
114
-
115
-
116
-
117
-
118
-
119
-
120
-
121
-
122
-
123
-
124
-
125
-
126
-
127
-
128
-
129
-
130
-
131
-
132
-
133
-
134
-
135
-
136
-
137
-
138
-
139
-
140
-
141
-
142
-
143
-
144
-
145
-
146
-
147
-
148
-
149
-
150
-
151
-
152
-
153
-
154
-
155
-
156
-
157
-
158
-
159
-
160
-
161
-
162
-
163
-
164
-
165
-
166
-
167
-
168
-
169
-
170
-
171
-
172
-
173
-
174
-
175
-
176
-
177
-
178
-
179
-
180
-
181
-
182
-
183
-
184
-
185
-
186
-
187
-
188
-
189
-
190
-
191
-
192
-
193
-
194
-
195
-
196
-
197
-
198
-
199
-
200
-
201
-
202
-
203
-
204
-
205
-
206
-
207
-
208
-
209
-
210
-
211
-
212
-
213
-
214
-
215
-
216
-
217
-
218
-
219
-
220
-
221
-
222
-
223
-
224
-
225
-
226
-
227
-
228
-
229
-
230
-
231
-
232
-
233
-
234
-
235
-
236
-
237
-
238
-
239
-
240
-
241
-
242
-
243
-
244
-
245
-
246
-
247
-
248
-
249
-
250
-
251
-
252
-
253
-
254
-
255
-
256
-
257
-
258
-
259
-
260
-
261
-
262
-
263
-
264
-
265
-
266
-
267
-
268
-
269
-
270
-
271
-
272
-
273
-
274
-
275
-
276
-
277
-
278
-
279
-
280
-
281
-
282
-
283
-
284
-
285
-
286
-
287
-
288
-
289
-
290
-
 291
291 -
 292
292 -
 293
293 -
 294
294 -
 295
295 -
 296
296 -
 297
297 -
 298
298 -
 299
299 -
 300
300 -
 301
301 -
302
-
303
-
304
-
305
-
306
-
307
-
308
-
309
-
310
 |
 |
