Dell PowerEdge M710 Web Tools Administrator’s Guide - Page 268
Manually creating an SA, Peer IP Address
 |
View all Dell PowerEdge M710 manuals
Add to My Manuals
Save this manual to your list of manuals |
Page 268 highlights
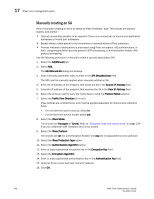
DRAFT: BROCADE CONFIDENTIAL 17 IPsec over management ports Manually creating an SA Part of manually creating an SA is to select an IPsec Protection Type. The choices are discard, bypass, and protect: • Discard causes data packets to be rejected if there is an invalid pair of source and destination addresses or invalid port addresses. • Bypass allows a data packet to be transmitted or received without IPsec protection. • Process indicates a data packet is processed using IPsec encryption, IKE authentication, or both, using encapsulation security protocol (ESP) processing, or authentication header (AH) protocol processing. Use the following procedure to manually create a security association (SA). 1. Select the SA(Manual) tab. 2. Select Add. The Add Manual-SA dialog box displays. 3. Enter a security parameter index number in the SPI (Hexadecimal) field. The SPI must be manually applied when manually adding an SA. 4. Enter the IP address of the endpoint that sends the SA in the Source IP Address field. 5. Enter the IP address of the endpoint that receives the SA in the Peer IP Address field. 6. Select the protocol used to carry the transmission using the Protocol Name selector. 7. Select the Traffic Flow Direction (in or out). IPsec policies are unidirectional, and must be applied separately to inbound and outbound flows. - For the flow from peer to source, select in. - For the flow from source to peer select out. 8. Select the IPsec Mode. The choices are Transport or Tunnel. Refer to "Transport mode and tunnel mode" on page 229 if you are unfamiliar with Transport and Tunnel modes. 9. Select the IPsec Protocol. The choices are ah (for authentication header) and esp (for encapsulated security protocol). 10. Select the IPsec Protection Type option. 11. Select the Authentication Algorithm option. 12. Enter or copy a generated encryption key in the Encryption Key field. 13. Select the Encryption Algorithm. 14. Enter or copy a generated authentication key in the Authentication Key field. 15. Optional: Enter a local and peer tunnel IP address. 16. Click OK. 240 Web Tools Administrator's Guide 53-1001772-01
-
 1
1 -
2
-
3
-
4
-
5
-
6
-
7
-
8
-
9
-
10
-
11
-
12
-
13
-
14
-
15
-
16
-
17
-
18
-
19
-
20
-
21
-
22
-
23
-
24
-
25
-
26
-
27
-
28
-
29
-
30
-
31
-
32
-
33
-
34
-
35
-
36
-
37
-
38
-
39
-
40
-
41
-
42
-
43
-
44
-
45
-
46
-
47
-
48
-
49
-
50
-
51
-
52
-
53
-
54
-
55
-
56
-
57
-
58
-
59
-
60
-
61
-
62
-
63
-
64
-
65
-
66
-
67
-
68
-
69
-
70
-
71
-
72
-
73
-
74
-
75
-
76
-
77
-
78
-
79
-
80
-
81
-
82
-
83
-
84
-
85
-
86
-
87
-
88
-
89
-
90
-
91
-
92
-
93
-
94
-
95
-
96
-
97
-
98
-
99
-
100
-
101
-
102
-
103
-
104
-
105
-
106
-
107
-
108
-
109
-
110
-
111
-
112
-
113
-
114
-
115
-
116
-
117
-
118
-
119
-
120
-
121
-
122
-
123
-
124
-
125
-
126
-
127
-
128
-
129
-
130
-
131
-
132
-
133
-
134
-
135
-
136
-
137
-
138
-
139
-
140
-
141
-
142
-
143
-
144
-
145
-
146
-
147
-
148
-
149
-
150
-
151
-
152
-
153
-
154
-
155
-
156
-
157
-
158
-
159
-
160
-
161
-
162
-
163
-
164
-
165
-
166
-
167
-
168
-
169
-
170
-
171
-
172
-
173
-
174
-
175
-
176
-
177
-
178
-
179
-
180
-
181
-
182
-
183
-
184
-
185
-
186
-
187
-
188
-
189
-
190
-
191
-
192
-
193
-
194
-
195
-
196
-
197
-
198
-
199
-
200
-
201
-
202
-
203
-
204
-
205
-
206
-
207
-
208
-
209
-
210
-
211
-
212
-
213
-
214
-
215
-
216
-
217
-
218
-
219
-
220
-
221
-
222
-
223
-
224
-
225
-
226
-
227
-
228
-
229
-
230
-
231
-
232
-
233
-
234
-
235
-
236
-
237
-
238
-
239
-
240
-
241
-
242
-
243
-
244
-
245
-
246
-
247
-
248
-
249
-
250
-
251
-
252
-
253
-
254
-
255
-
256
-
257
-
258
-
259
-
260
-
261
-
262
-
 263
263 -
 264
264 -
 265
265 -
 266
266 -
 267
267 -
 268
268 -
 269
269 -
 270
270 -
 271
271 -
 272
272 -
 273
273 -
274
-
275
-
276
-
277
-
278
-
279
-
280
-
281
-
282
-
283
-
284
-
285
-
286
-
287
-
288
-
289
-
290
-
291
-
292
-
293
-
294
-
295
-
296
-
297
-
298
-
299
-
300
-
301
-
302
-
303
-
304
-
305
-
306
-
307
-
308
-
309
-
310
 |
 |
