Epson Stylus Pro 5500 User Manual - Page 103
Troubleshooting, Make sure your paper is loaded with the printable side facing the correct way.
 |
View all Epson Stylus Pro 5500 manuals
Add to My Manuals
Save this manual to your list of manuals |
Page 103 highlights
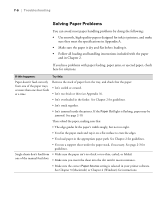
7-2 | Troubleshooting If this happens: Try this: Your printout has horizontal • Make sure your paper is loaded with the printable side in the correct orientation. or vertical banding. The printable side should be face-down in the tray or front manual feed slot; face up in the rear manual feed slot. • Make sure the Media Type setting for your print job matches the paper you're using and the paper tray levers are set correctly. See Chapter 2 for more information. • Run a cleaning cycle. See page 6-1 for instructions. • Align the print head. See page 6-7 for instructions. • Check the Ink Out light to see if one of the cartridges is low on ink; then replace the cartridge. See page 6-5 for instructions. • Try using Automatic mode. See page 3-2 (Macintosh) or page 4-1 (Windows) for instructions. Your printout is faint, blurry, or grainy, or colors are incorrect or missing. • Make sure the Media Type setting for your print job matches the paper you're using and the paper tray levers are set correctly. See Chapter 2 for more information. • Make sure your paper is loaded with the printable side facing the correct way. The printable side should be face-down in the trays or front manual feed slot; face-up in the rear manual feed slot. • Make sure the paper is not damp or damaged in any way. • Try using Automatic mode, setting the Quality/Speed slider to Quality, make sure the Ink setting is set to Color for color images, and your application is set for color printing. See page 3-2 (Macintosh) or page 4-1 (Windows) for instructions. If you're printing a high-resolution image, also turn off PhotoEnhance and check if you're using a special effect that alters image colors, such as Sepia. • Run a cleaning cycle. See page 6-1 for instructions. • Check the Ink Out light to see if one of the cartridges is low on ink; then replace the cartridge. See page 6-5 for instructions. • Align the print head. See page 6-7 for instructions. 7-2
-
 1
1 -
2
-
3
-
4
-
5
-
6
-
7
-
8
-
9
-
10
-
11
-
12
-
13
-
14
-
15
-
16
-
17
-
18
-
19
-
20
-
21
-
22
-
23
-
24
-
25
-
26
-
27
-
28
-
29
-
30
-
31
-
32
-
33
-
34
-
35
-
36
-
37
-
38
-
39
-
40
-
41
-
42
-
43
-
44
-
45
-
46
-
47
-
48
-
49
-
50
-
51
-
52
-
53
-
54
-
55
-
56
-
57
-
58
-
59
-
60
-
61
-
62
-
63
-
64
-
65
-
66
-
67
-
68
-
69
-
70
-
71
-
72
-
73
-
74
-
75
-
76
-
77
-
78
-
79
-
80
-
81
-
82
-
83
-
84
-
85
-
86
-
87
-
88
-
89
-
90
-
91
-
92
-
93
-
94
-
95
-
96
-
97
-
 98
98 -
 99
99 -
 100
100 -
 101
101 -
 102
102 -
 103
103 -
 104
104 -
 105
105 -
 106
106 -
 107
107 -
 108
108 -
109
-
110
-
111
-
112
-
113
-
114
-
115
-
116
-
117
-
118
-
119
-
120
 |
 |