Epson Stylus Pro 5500 User Manual - Page 33
Connecting to an Optional Interface Card, Set any DIP switches and jumpers on the card
 |
View all Epson Stylus Pro 5500 manuals
Add to My Manuals
Save this manual to your list of manuals |
Page 33 highlights
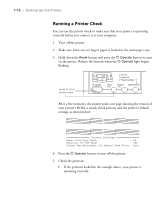
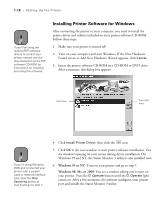
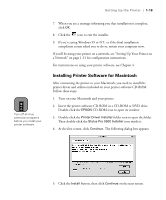
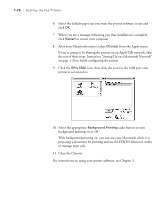
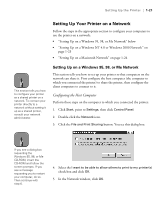
1-16 | Setting Up the Printer Note Before you install an optional interface card, see the documentation that comes with the card for setup information. Caution Don't install the interface card when the printer is connected to an electrical outlet. Doing so may damage the printer. Connecting to an Optional Interface Card The optional interface cards listed below let you use your printer on a FireWire interface or a network. The Ethernet card automatically detects the protocols on your network, so you can print from Windows 95, 98, Me, 2000, or NT 4.0, or a Macintosh on an AppleTalk network. The following optional interface cards are available: Interface card Part number 10/100 BaseT Ethernet Type B interface card C823632A IEEE-1394 FireWire Type B interface card C823722 To install an optional interface card, follow these steps: 1. Turn off the printer and unplug the power cord from the electrical outlet. 2. Disconnect any interface cables, if necessary. 3. Set any DIP switches and jumpers on the card, if necessary. See the interface card's documentation for details. 4. Use a Phillips screwdriver to remove the two screws securing the optional interface cover, then lift off the cover. Keep the screws so you can use them if you remove the interface card and replace the cover. 1-16
-
 1
1 -
2
-
3
-
4
-
5
-
6
-
7
-
8
-
9
-
10
-
11
-
12
-
13
-
14
-
15
-
16
-
17
-
18
-
19
-
20
-
21
-
22
-
23
-
24
-
25
-
26
-
27
-
 28
28 -
 29
29 -
 30
30 -
 31
31 -
 32
32 -
 33
33 -
 34
34 -
 35
35 -
 36
36 -
 37
37 -
 38
38 -
39
-
40
-
41
-
42
-
43
-
44
-
45
-
46
-
47
-
48
-
49
-
50
-
51
-
52
-
53
-
54
-
55
-
56
-
57
-
58
-
59
-
60
-
61
-
62
-
63
-
64
-
65
-
66
-
67
-
68
-
69
-
70
-
71
-
72
-
73
-
74
-
75
-
76
-
77
-
78
-
79
-
80
-
81
-
82
-
83
-
84
-
85
-
86
-
87
-
88
-
89
-
90
-
91
-
92
-
93
-
94
-
95
-
96
-
97
-
98
-
99
-
100
-
101
-
102
-
103
-
104
-
105
-
106
-
107
-
108
-
109
-
110
-
111
-
112
-
113
-
114
-
115
-
116
-
117
-
118
-
119
-
120
 |
 |