Epson Stylus Pro 5500 User Manual - Page 92
Running the Print Head Alignment Utility, Premium Glossy Photo Paper, or
 |
View all Epson Stylus Pro 5500 manuals
Add to My Manuals
Save this manual to your list of manuals |
Page 92 highlights
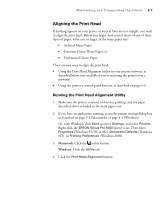
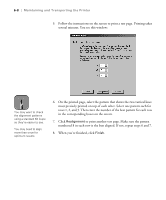
Maintaining and Transporting the Printer | 6-7 Aligning the Print Head If banding appears on your prints, or vertical lines are not straight, you need to align the print head. Before you begin, load several sheets of one of these types of paper, letter-size or larger, in the main paper tray: • Archival Matte Paper • Premium Glossy Photo Paper, or • Professional Glossy Paper There are two ways to align the print head: • Using the Print Head Alignment utility in your printer software, as described below (not available if you're accessing the printer over a network) • Using the printer's control panel buttons, as described on page 6-9 Running the Print Head Alignment Utility 1. Make sure the printer is turned on but not printing, and the paper described above is loaded in the main paper tray. 2. If you have an application running, access the printer settings dialog box as described on page 3-2 (Macintosh) or page 4-1 (Windows). Or, with Windows, click Start, point to Settings, and select Printers. Right-click the EPSON Stylus Pro 5500 printer icon. Then select Properties (Windows 95, 98, or Me), Document Defaults (Windows NT), or Printing Preferences (Windows 2000). 3. Macintosh: Click the utility button. Windows: Click the Utility tab. 4. Click the Print Head Alignment button. 6-7
-
 1
1 -
2
-
3
-
4
-
5
-
6
-
7
-
8
-
9
-
10
-
11
-
12
-
13
-
14
-
15
-
16
-
17
-
18
-
19
-
20
-
21
-
22
-
23
-
24
-
25
-
26
-
27
-
28
-
29
-
30
-
31
-
32
-
33
-
34
-
35
-
36
-
37
-
38
-
39
-
40
-
41
-
42
-
43
-
44
-
45
-
46
-
47
-
48
-
49
-
50
-
51
-
52
-
53
-
54
-
55
-
56
-
57
-
58
-
59
-
60
-
61
-
62
-
63
-
64
-
65
-
66
-
67
-
68
-
69
-
70
-
71
-
72
-
73
-
74
-
75
-
76
-
77
-
78
-
79
-
80
-
81
-
82
-
83
-
84
-
85
-
86
-
 87
87 -
 88
88 -
 89
89 -
 90
90 -
 91
91 -
 92
92 -
 93
93 -
 94
94 -
 95
95 -
 96
96 -
 97
97 -
98
-
99
-
100
-
101
-
102
-
103
-
104
-
105
-
106
-
107
-
108
-
109
-
110
-
111
-
112
-
113
-
114
-
115
-
116
-
117
-
118
-
119
-
120
 |
 |