Epson Stylus Pro 5500 User Manual - Page 49
Setting the Paper Tray Levers
 |
View all Epson Stylus Pro 5500 manuals
Add to My Manuals
Save this manual to your list of manuals |
Page 49 highlights
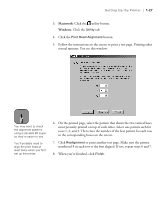
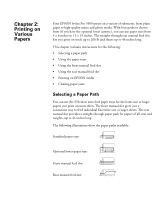
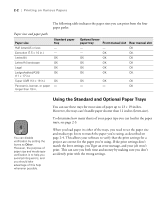
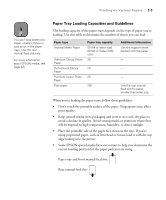
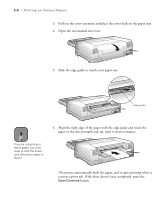
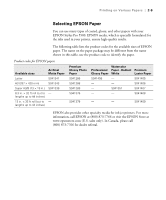
2-4 | Printing on Various Papers • Load paper before you send your print job. If the paper runs out during a print job, you can have the printer automatically switch to the other tray. (The paper size and media type levers must be set the same for both trays, or the levers must be set to Other on the lower tray. See the next section for instructions.) • Always choose the correct Media Type setting in your printer software before you send your print job. • Press the Eject/Continue button if you need to remove a sheet of paper. • To keep your printouts looking their best, store them in a resealable plastic bag or other airtight covering. Note For any papers not on this list, set the lever to Other. Setting the Paper Tray Levers For best printing results, you need to set the media type and paper size levers correctly when you load paper. You should also use the media type and paper size cards to identify the paper loaded in each tray. This helps all users to be aware of what's in the printer at a glance, and also prevents anyone from inadvertently changing the lever positions. The following table identifies the media type settings for EPSON media and similar papers: Media type lever settings Paper Plain paper Archival Matte Paper Premium Glossy Photo Paper Professional Glossy Paper Premium Luster Photo Paper Use only if ink smears Use for unlisted papers Media type lever setting Plain Paper Archival Matte Paper Premium Semigloss Photo Paper Glossy Paper - Photo Weight Premium Luster Photo Paper Thick Paper Other 2-4
-
 1
1 -
2
-
3
-
4
-
5
-
6
-
7
-
8
-
9
-
10
-
11
-
12
-
13
-
14
-
15
-
16
-
17
-
18
-
19
-
20
-
21
-
22
-
23
-
24
-
25
-
26
-
27
-
28
-
29
-
30
-
31
-
32
-
33
-
34
-
35
-
36
-
37
-
38
-
39
-
40
-
41
-
42
-
43
-
 44
44 -
 45
45 -
 46
46 -
 47
47 -
 48
48 -
 49
49 -
 50
50 -
 51
51 -
 52
52 -
 53
53 -
 54
54 -
55
-
56
-
57
-
58
-
59
-
60
-
61
-
62
-
63
-
64
-
65
-
66
-
67
-
68
-
69
-
70
-
71
-
72
-
73
-
74
-
75
-
76
-
77
-
78
-
79
-
80
-
81
-
82
-
83
-
84
-
85
-
86
-
87
-
88
-
89
-
90
-
91
-
92
-
93
-
94
-
95
-
96
-
97
-
98
-
99
-
100
-
101
-
102
-
103
-
104
-
105
-
106
-
107
-
108
-
109
-
110
-
111
-
112
-
113
-
114
-
115
-
116
-
117
-
118
-
119
-
120
 |
 |