Epson Stylus Pro 5500 User Manual - Page 19
Installing the Optional Lower Paper Cassette, Setting Up the Printer
 |
View all Epson Stylus Pro 5500 manuals
Add to My Manuals
Save this manual to your list of manuals |
Page 19 highlights
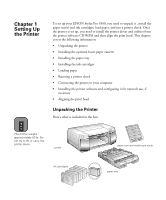
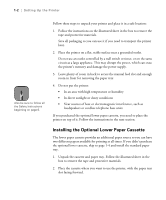
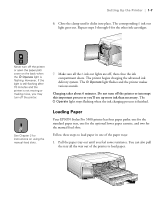
1-2 | Setting Up the Printer Note Also be sure to follow all the Safety Instructions beginning on page 6. Follow these steps to unpack your printer and place it in a safe location: 1. Follow the instructions on the illustrated sheet in the box to remove the tape and protective materials. Save all packaging so you can use it if you need to transport the printer later. 2. Place the printer on a flat, stable surface near a grounded outlet. Do not use an outlet controlled by a wall switch or timer, or on the same circuit as a large appliance. This may disrupt the power, which can erase the printer's memory and damage the power supply. 3. Leave plenty of room in back to access the manual feed slot and enough room in front for removing the paper tray. 4. Do not put the printer: • In an area with high temperature or humidity • In direct sunlight or dusty conditions • Near sources of heat or electromagnetic interference, such as loudspeakers or cordless telephone base units If you purchased the optional lower paper cassette, you need to place the printer on top of it. Follow the instructions in the next section. Installing the Optional Lower Paper Cassette The lower paper cassette provides an additional paper source so you can have two different papers available for printing at all times. If you didn't purchase the optional lower cassette, skip to page 1-4 and install the standard paper tray. 1. Unpack the cassette and paper tray. Follow the illustrated sheet in the box to remove the tape and protective materials. 2. Place the cassette where you want to use the printer, with the paper tray slot facing forward. 1-2
-
 1
1 -
2
-
3
-
4
-
5
-
6
-
7
-
8
-
9
-
10
-
11
-
12
-
13
-
 14
14 -
 15
15 -
 16
16 -
 17
17 -
 18
18 -
 19
19 -
 20
20 -
 21
21 -
 22
22 -
 23
23 -
 24
24 -
25
-
26
-
27
-
28
-
29
-
30
-
31
-
32
-
33
-
34
-
35
-
36
-
37
-
38
-
39
-
40
-
41
-
42
-
43
-
44
-
45
-
46
-
47
-
48
-
49
-
50
-
51
-
52
-
53
-
54
-
55
-
56
-
57
-
58
-
59
-
60
-
61
-
62
-
63
-
64
-
65
-
66
-
67
-
68
-
69
-
70
-
71
-
72
-
73
-
74
-
75
-
76
-
77
-
78
-
79
-
80
-
81
-
82
-
83
-
84
-
85
-
86
-
87
-
88
-
89
-
90
-
91
-
92
-
93
-
94
-
95
-
96
-
97
-
98
-
99
-
100
-
101
-
102
-
103
-
104
-
105
-
106
-
107
-
108
-
109
-
110
-
111
-
112
-
113
-
114
-
115
-
116
-
117
-
118
-
119
-
120
 |
 |