Epson Stylus Pro 5500 User Manual - Page 88
Cleaning the Print Head Using the Control Panel, Examining the Nozzle Check Pattern
 |
View all Epson Stylus Pro 5500 manuals
Add to My Manuals
Save this manual to your list of manuals |
Page 88 highlights
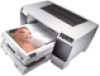
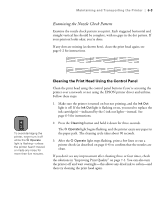
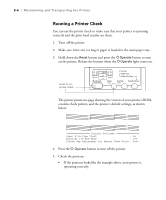
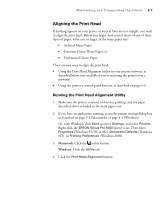
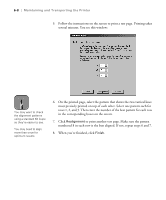
Maintaining and Transporting the Printer | 6-3 Examining the Nozzle Check Pattern Examine the nozzle check pattern you print. Each staggered horizontal and straight vertical line should be complete, with no gaps in the dot pattern. If your printout looks okay, you're done. If any dots are missing (as shown here), clean the print head again; see page 6-2 for instructions. Caution To avoid damaging the printer, never turn it off while the P Operate light is flashing-unless the printer hasn't moved or made any noise for more than five minutes. Cleaning the Print Head Using the Control Panel Clean the print head using the control panel buttons if you're accessing the printer over a network or not using the EPSON printer driver and utilities. Follow these steps: 1. Make sure the printer is turned on but not printing, and the Ink Out light is off. If the Ink Out light is flashing or on, you need to replace the ink cartridge(s)-indicated by the H ink out lights-instead. See page 6-5 for instructions. 2. Press the Cleaning button and hold it down for three seconds. The P Operate light begins flashing, and the printer ejects any paper in the paper path. The cleaning cycle takes about 90 seconds. 3. After the P Operate light stops flashing, print a few lines or run a printer check (as described on page 6-4) to confirm that the nozzles are clean. If you don't see any improvement after cleaning three or four times, check the solutions in "Improving Print Quality" on page 7-1. You can also turn the printer off and wait overnight-this allows any dried ink to soften-and then try cleaning the print head again. 6-3
-
 1
1 -
2
-
3
-
4
-
5
-
6
-
7
-
8
-
9
-
10
-
11
-
12
-
13
-
14
-
15
-
16
-
17
-
18
-
19
-
20
-
21
-
22
-
23
-
24
-
25
-
26
-
27
-
28
-
29
-
30
-
31
-
32
-
33
-
34
-
35
-
36
-
37
-
38
-
39
-
40
-
41
-
42
-
43
-
44
-
45
-
46
-
47
-
48
-
49
-
50
-
51
-
52
-
53
-
54
-
55
-
56
-
57
-
58
-
59
-
60
-
61
-
62
-
63
-
64
-
65
-
66
-
67
-
68
-
69
-
70
-
71
-
72
-
73
-
74
-
75
-
76
-
77
-
78
-
79
-
80
-
81
-
82
-
 83
83 -
 84
84 -
 85
85 -
 86
86 -
 87
87 -
 88
88 -
 89
89 -
 90
90 -
 91
91 -
 92
92 -
 93
93 -
94
-
95
-
96
-
97
-
98
-
99
-
100
-
101
-
102
-
103
-
104
-
105
-
106
-
107
-
108
-
109
-
110
-
111
-
112
-
113
-
114
-
115
-
116
-
117
-
118
-
119
-
120
 |
 |