Epson Stylus Pro 5500 User Manual - Page 32
Connecting to a Parallel Port (Windows Only
 |
View all Epson Stylus Pro 5500 manuals
Add to My Manuals
Save this manual to your list of manuals |
Page 32 highlights
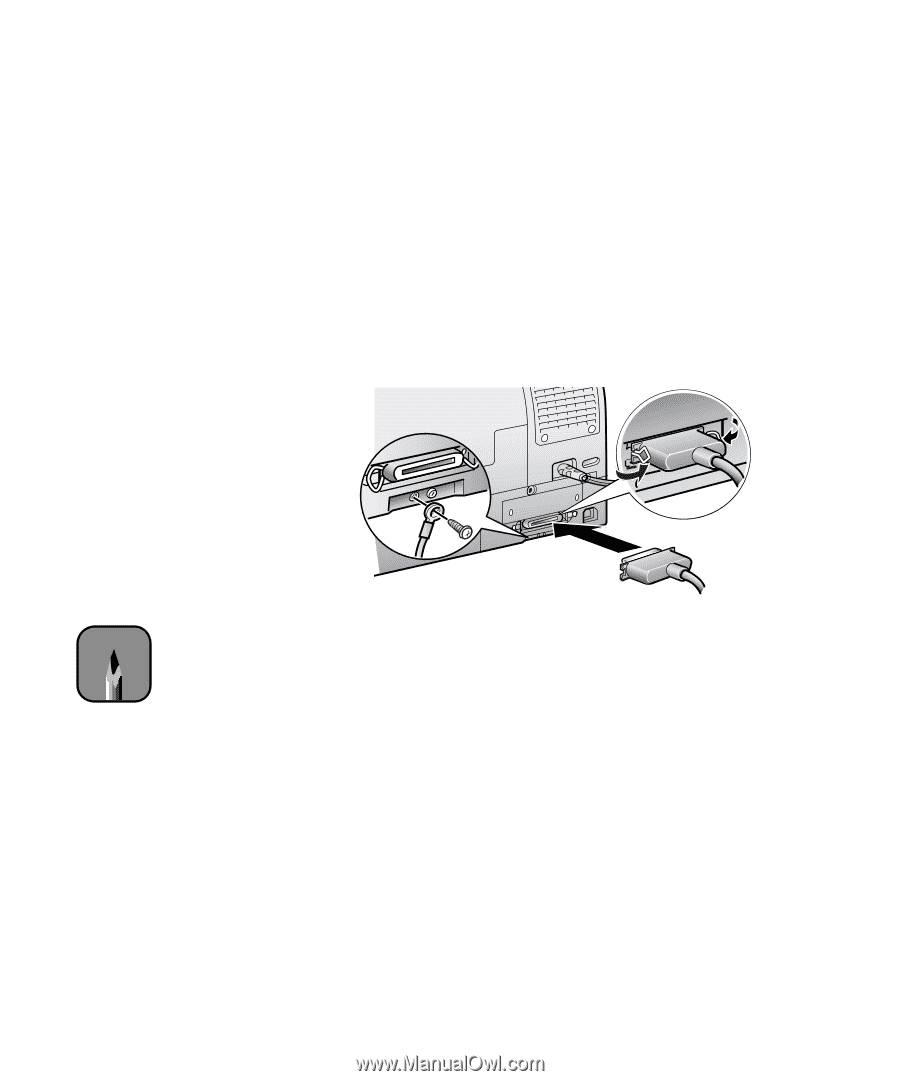
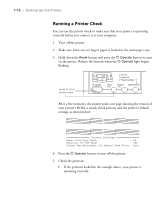
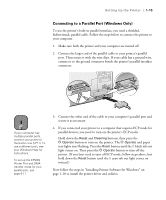
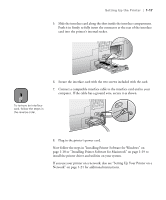
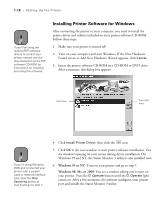
Setting Up the Printer | 1-15 Connecting to a Parallel Port (Windows Only) To use the printer's built-in parallel interface, you need a shielded, bidirectional, parallel cable. Follow the steps below to connect the printer to your computer. 1. Make sure both the printer and your computer are turned off. 2. Connect the larger end of the parallel cable to your printer's parallel port. Then secure it with the wire clips. If your cable has a ground wire, connect it to the ground connector beside the printer's parallel interface connector. Note If your computer has multiple parallel ports, connect your printer to the built-in one (LPT1). To use a different port, see your Windows Help for instructions. To set up the EPSON Printer Port and DMA transfer mode for your parallel port, see page 6-11. 3. Connect the other end of the cable to your computer's parallel port and secure it as necessary. 4. If you connected your printer to a computer that requires ECP mode for parallel devices, you need to turn on the printer's ECP mode. Hold down the Reset and Cleaning buttons, then press the P Operate button to turn on the printer. The P Operate and paper tray lights start flashing. Press the Reset button until the H black ink out light comes on. Then press the P Operate button to turn off the printer. (If you later need to turn off ECP mode, follow steps above, but hold down the Reset button until the H cyan ink out light comes on instead.) Now follow the steps in "Installing Printer Software for Windows" on page 1-18 to install the printer driver and utilities. 1-15
-
 1
1 -
2
-
3
-
4
-
5
-
6
-
7
-
8
-
9
-
10
-
11
-
12
-
13
-
14
-
15
-
16
-
17
-
18
-
19
-
20
-
21
-
22
-
23
-
24
-
25
-
26
-
 27
27 -
 28
28 -
 29
29 -
 30
30 -
 31
31 -
 32
32 -
 33
33 -
 34
34 -
 35
35 -
 36
36 -
 37
37 -
38
-
39
-
40
-
41
-
42
-
43
-
44
-
45
-
46
-
47
-
48
-
49
-
50
-
51
-
52
-
53
-
54
-
55
-
56
-
57
-
58
-
59
-
60
-
61
-
62
-
63
-
64
-
65
-
66
-
67
-
68
-
69
-
70
-
71
-
72
-
73
-
74
-
75
-
76
-
77
-
78
-
79
-
80
-
81
-
82
-
83
-
84
-
85
-
86
-
87
-
88
-
89
-
90
-
91
-
92
-
93
-
94
-
95
-
96
-
97
-
98
-
99
-
100
-
101
-
102
-
103
-
104
-
105
-
106
-
107
-
108
-
109
-
110
-
111
-
112
-
113
-
114
-
115
-
116
-
117
-
118
-
119
-
120
 |
 |