Epson SureColor S50670 User Manual - Page 107
Printable area - S70670/S50670, Positioning Media of Different Widths
 |
View all Epson SureColor S50670 manuals
Add to My Manuals
Save this manual to your list of manuals |
Page 107 highlights
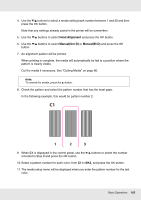
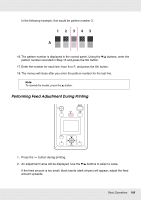
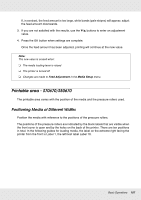
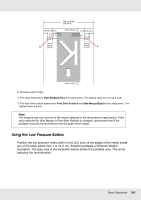
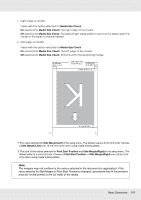
If, in contrast, the feed amount is too large, white bands (pale stripes) will appear; adjust the feed amount downwards. 3. If you are not satisfied with the results, use the d/u buttons to enter an adjustment value. 4. Press the Z button when settings are complete. Once the feed amount has been adjusted, printing will continue at the new value. Note: The new value is erased when: ❏ The media loading lever is raised ❏ The printer is turned off ❏ Changes are made to Feed Adjustment in the Media Setup menu. Printable area - S70670/S50670 The printable area varies with the position of the media and the pressure rollers used. Positioning Media of Different Widths Position the media with reference to the positions of the pressure rollers. The positions of the pressure rollers are indicated by the black labels that are visible when the front cover is open and by the holes on the back of the printer. There are ten positions in total. In the following guides for loading media, the label on the extreme right facing the printer from the front is Label 1, the leftmost label Label 10. Basic Operations 107
-
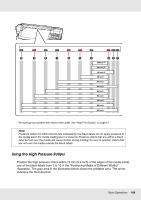
 1
1 -
2
-
3
-
4
-
5
-
6
-
7
-
8
-
9
-
10
-
11
-
12
-
13
-
14
-
15
-
16
-
17
-
18
-
19
-
20
-
21
-
22
-
23
-
24
-
25
-
26
-
27
-
28
-
29
-
30
-
31
-
32
-
33
-
34
-
35
-
36
-
37
-
38
-
39
-
40
-
41
-
42
-
43
-
44
-
45
-
46
-
47
-
48
-
49
-
50
-
51
-
52
-
53
-
54
-
55
-
56
-
57
-
58
-
59
-
60
-
61
-
62
-
63
-
64
-
65
-
66
-
67
-
68
-
69
-
70
-
71
-
72
-
73
-
74
-
75
-
76
-
77
-
78
-
79
-
80
-
81
-
82
-
83
-
84
-
85
-
86
-
87
-
88
-
89
-
90
-
91
-
92
-
93
-
94
-
95
-
96
-
97
-
98
-
99
-
100
-
101
-
 102
102 -
 103
103 -
 104
104 -
 105
105 -
 106
106 -
 107
107 -
 108
108 -
 109
109 -
 110
110 -
 111
111 -
 112
112 -
113
-
114
-
115
-
116
-
117
-
118
-
119
-
120
-
121
-
122
-
123
-
124
-
125
-
126
-
127
-
128
-
129
-
130
-
131
-
132
-
133
-
134
-
135
-
136
-
137
-
138
-
139
-
140
-
141
-
142
-
143
-
144
-
145
-
146
-
147
-
148
-
149
-
150
-
151
-
152
-
153
-
154
-
155
-
156
-
157
-
158
-
159
-
160
-
161
-
162
-
163
-
164
-
165
-
166
-
167
-
168
-
169
-
170
-
171
-
172
-
173
-
174
-
175
-
176
-
177
-
178
-
179
-
180
-
181
-
182
-
183
-
184
-
185
-
186
-
187
-
188
-
189
-
190
-
191
-
192
 |
 |
