Epson SureColor S50670 User Manual - Page 121
Regular Maintenance, All Nozzles, Selected Nozzles, Proceed
 |
View all Epson SureColor S50670 manuals
Add to My Manuals
Save this manual to your list of manuals |
Page 121 highlights
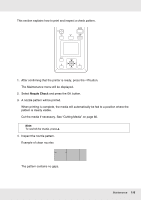
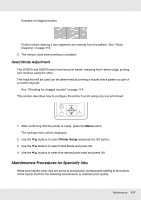
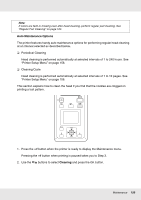
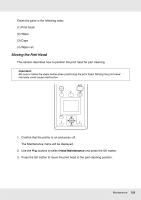
3. Choose the nozzles to be cleaned. All Nozzles Choose this option if all patterns in the printed nozzle check results contain faint or missing segments. If you select All Nozzles, proceed to Step 5. Selected Nozzles Choose this option if only some of the numbered patterns (nozzle arrays) in the printed nozzle check results contained faint or missing segments. You can select multiple nozzle arrays. 4. Choose the nozzle arrays to be cleaned. ❏ Use the d/u buttons to choose the nozzle arrays with faint or missing segments in the nozzle check pattern and press the Z button. ❏ After selecting the arrays you wish to clean, select Proceed and press the Z button. 5. Select a cleaning level and press the Z button. Head cleaning will be performed. The menu will close when cleaning is complete. Print a nozzle pattern and inspect the results to determine whether the problem has been resolved. See "Checking for clogged nozzles" on page 114. If you paused the printer in Step 1, printing will resume when head cleaning is complete; check the printout to confirm whether the problem has been resolved. Regular Maintenance The printer requires regular part cleaning and part replacement to maintain print quality; the maintenance schedule depends on the frequency with which the printer is used. Failure to perform appropriate maintenance will shorten product life. This guide comes with a check sheet so that you can tell at a glance when maintenance was last performed. Print the check sheet to help schedule maintenance. See "Cleaning Check Sheet" on page 141 and "Regular Replacement Check Sheet" on page 142. Maintenance 121
-
 1
1 -
2
-
3
-
4
-
5
-
6
-
7
-
8
-
9
-
10
-
11
-
12
-
13
-
14
-
15
-
16
-
17
-
18
-
19
-
20
-
21
-
22
-
23
-
24
-
25
-
26
-
27
-
28
-
29
-
30
-
31
-
32
-
33
-
34
-
35
-
36
-
37
-
38
-
39
-
40
-
41
-
42
-
43
-
44
-
45
-
46
-
47
-
48
-
49
-
50
-
51
-
52
-
53
-
54
-
55
-
56
-
57
-
58
-
59
-
60
-
61
-
62
-
63
-
64
-
65
-
66
-
67
-
68
-
69
-
70
-
71
-
72
-
73
-
74
-
75
-
76
-
77
-
78
-
79
-
80
-
81
-
82
-
83
-
84
-
85
-
86
-
87
-
88
-
89
-
90
-
91
-
92
-
93
-
94
-
95
-
96
-
97
-
98
-
99
-
100
-
101
-
102
-
103
-
104
-
105
-
106
-
107
-
108
-
109
-
110
-
111
-
112
-
113
-
114
-
115
-
 116
116 -
 117
117 -
 118
118 -
 119
119 -
 120
120 -
 121
121 -
 122
122 -
 123
123 -
 124
124 -
 125
125 -
 126
126 -
127
-
128
-
129
-
130
-
131
-
132
-
133
-
134
-
135
-
136
-
137
-
138
-
139
-
140
-
141
-
142
-
143
-
144
-
145
-
146
-
147
-
148
-
149
-
150
-
151
-
152
-
153
-
154
-
155
-
156
-
157
-
158
-
159
-
160
-
161
-
162
-
163
-
164
-
165
-
166
-
167
-
168
-
169
-
170
-
171
-
172
-
173
-
174
-
175
-
176
-
177
-
178
-
179
-
180
-
181
-
182
-
183
-
184
-
185
-
186
-
187
-
188
-
189
-
190
-
191
-
192
 |
 |