Epson SureColor S50670 User Manual - Page 75
Using the Auto, Keep the right edge of the media parallel with the scale markings on the two labels
 |
View all Epson SureColor S50670 manuals
Add to My Manuals
Save this manual to your list of manuals |
Page 75 highlights
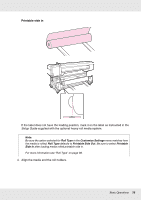
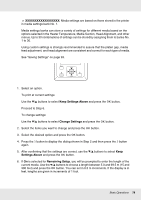
Keep the right edge of the media parallel with the scale markings on the two labels on the right side of the after heater. 15. Lower the media loading lever to hold the media in place. To print immediately, proceed to Step 16. For information on loading the media into the auto take-up reel unit, see "Using the Auto Take-up Reel Unit" on page 82. Note: If you would prefer to print from the very start of the roll, press the u button in the control panel to rewind the media slightly. Be sure, however, to stop rewinding before the leading edge of the media is over the cutter groove (on the pressure roller side). 16. Attach the media holding plates at either side of the media. Basic Operations 75
-
 1
1 -
2
-
3
-
4
-
5
-
6
-
7
-
8
-
9
-
10
-
11
-
12
-
13
-
14
-
15
-
16
-
17
-
18
-
19
-
20
-
21
-
22
-
23
-
24
-
25
-
26
-
27
-
28
-
29
-
30
-
31
-
32
-
33
-
34
-
35
-
36
-
37
-
38
-
39
-
40
-
41
-
42
-
43
-
44
-
45
-
46
-
47
-
48
-
49
-
50
-
51
-
52
-
53
-
54
-
55
-
56
-
57
-
58
-
59
-
60
-
61
-
62
-
63
-
64
-
65
-
66
-
67
-
68
-
69
-
 70
70 -
 71
71 -
 72
72 -
 73
73 -
 74
74 -
 75
75 -
 76
76 -
 77
77 -
 78
78 -
 79
79 -
 80
80 -
81
-
82
-
83
-
84
-
85
-
86
-
87
-
88
-
89
-
90
-
91
-
92
-
93
-
94
-
95
-
96
-
97
-
98
-
99
-
100
-
101
-
102
-
103
-
104
-
105
-
106
-
107
-
108
-
109
-
110
-
111
-
112
-
113
-
114
-
115
-
116
-
117
-
118
-
119
-
120
-
121
-
122
-
123
-
124
-
125
-
126
-
127
-
128
-
129
-
130
-
131
-
132
-
133
-
134
-
135
-
136
-
137
-
138
-
139
-
140
-
141
-
142
-
143
-
144
-
145
-
146
-
147
-
148
-
149
-
150
-
151
-
152
-
153
-
154
-
155
-
156
-
157
-
158
-
159
-
160
-
161
-
162
-
163
-
164
-
165
-
166
-
167
-
168
-
169
-
170
-
171
-
172
-
173
-
174
-
175
-
176
-
177
-
178
-
179
-
180
-
181
-
182
-
183
-
184
-
185
-
186
-
187
-
188
-
189
-
190
-
191
-
192
 |
 |
Basic Operations
75
Keep the right edge of the media parallel with the scale markings on the two labels on
the right side of the after heater.
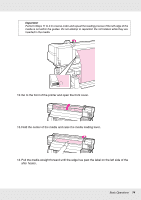
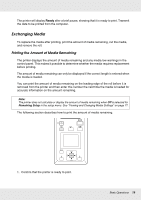
15.Lower the media loading lever to hold the media in place.
To print immediately, proceed to Step 16.
For information on loading the media into the auto take-up reel unit, see
“Using the Auto
Take-up Reel Unit” on page 82.
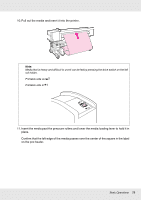
16.Attach the media holding plates at either side of the media.
Note:
If you would prefer to print from the very start of the roll, press the
u
button in the control
panel to rewind the media slightly.
Be sure, however, to stop rewinding before the leading edge of the media is over the cutter
groove (on the pressure roller side).