Epson SureColor S50670 User Manual - Page 48
holes. Next, adjust the position until the white line is visible in the square window and, First
 |
View all Epson SureColor S50670 manuals
Add to My Manuals
Save this manual to your list of manuals |
Page 48 highlights
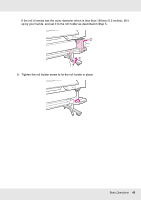
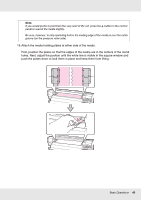
Note: If you would prefer to print from the very start of the roll, press the u button in the control panel to rewind the media slightly. Be sure, however, to stop rewinding before the leading edge of the media is over the cutter groove (on the pressure roller side). 19. Attach the media holding plates at either side of the media. First, position the plates so that the edges of the media are in the centers of the round holes. Next, adjust the position until the white line is visible in the square window and push the plates down to lock them in place and keep them from lifting. Basic Operations 48
-
 1
1 -
2
-
3
-
4
-
5
-
6
-
7
-
8
-
9
-
10
-
11
-
12
-
13
-
14
-
15
-
16
-
17
-
18
-
19
-
20
-
21
-
22
-
23
-
24
-
25
-
26
-
27
-
28
-
29
-
30
-
31
-
32
-
33
-
34
-
35
-
36
-
37
-
38
-
39
-
40
-
41
-
42
-
 43
43 -
 44
44 -
 45
45 -
 46
46 -
 47
47 -
 48
48 -
 49
49 -
 50
50 -
 51
51 -
 52
52 -
 53
53 -
54
-
55
-
56
-
57
-
58
-
59
-
60
-
61
-
62
-
63
-
64
-
65
-
66
-
67
-
68
-
69
-
70
-
71
-
72
-
73
-
74
-
75
-
76
-
77
-
78
-
79
-
80
-
81
-
82
-
83
-
84
-
85
-
86
-
87
-
88
-
89
-
90
-
91
-
92
-
93
-
94
-
95
-
96
-
97
-
98
-
99
-
100
-
101
-
102
-
103
-
104
-
105
-
106
-
107
-
108
-
109
-
110
-
111
-
112
-
113
-
114
-
115
-
116
-
117
-
118
-
119
-
120
-
121
-
122
-
123
-
124
-
125
-
126
-
127
-
128
-
129
-
130
-
131
-
132
-
133
-
134
-
135
-
136
-
137
-
138
-
139
-
140
-
141
-
142
-
143
-
144
-
145
-
146
-
147
-
148
-
149
-
150
-
151
-
152
-
153
-
154
-
155
-
156
-
157
-
158
-
159
-
160
-
161
-
162
-
163
-
164
-
165
-
166
-
167
-
168
-
169
-
170
-
171
-
172
-
173
-
174
-
175
-
176
-
177
-
178
-
179
-
180
-
181
-
182
-
183
-
184
-
185
-
186
-
187
-
188
-
189
-
190
-
191
-
192
 |
 |

Basic Operations
48
19.Attach the media holding plates at either side of the media.
First, position the plates so that the edges of the media are in the centers of the round
holes. Next, adjust the position until the white line is visible in the square window and
push the plates down to lock them in place and keep them from lifting.
Note:
If you would prefer to print from the very start of the roll, press the
u
button in the control
panel to rewind the media slightly.
Be sure, however, to stop rewinding before the leading edge of the media is over the cutter
groove (on the pressure roller side).