Epson SureColor S50670 User Manual - Page 154
to 30 media setting bank number, Parameter, Explanation
 |
View all Epson SureColor S50670 manuals
Add to My Manuals
Save this manual to your list of manuals |
Page 154 highlights
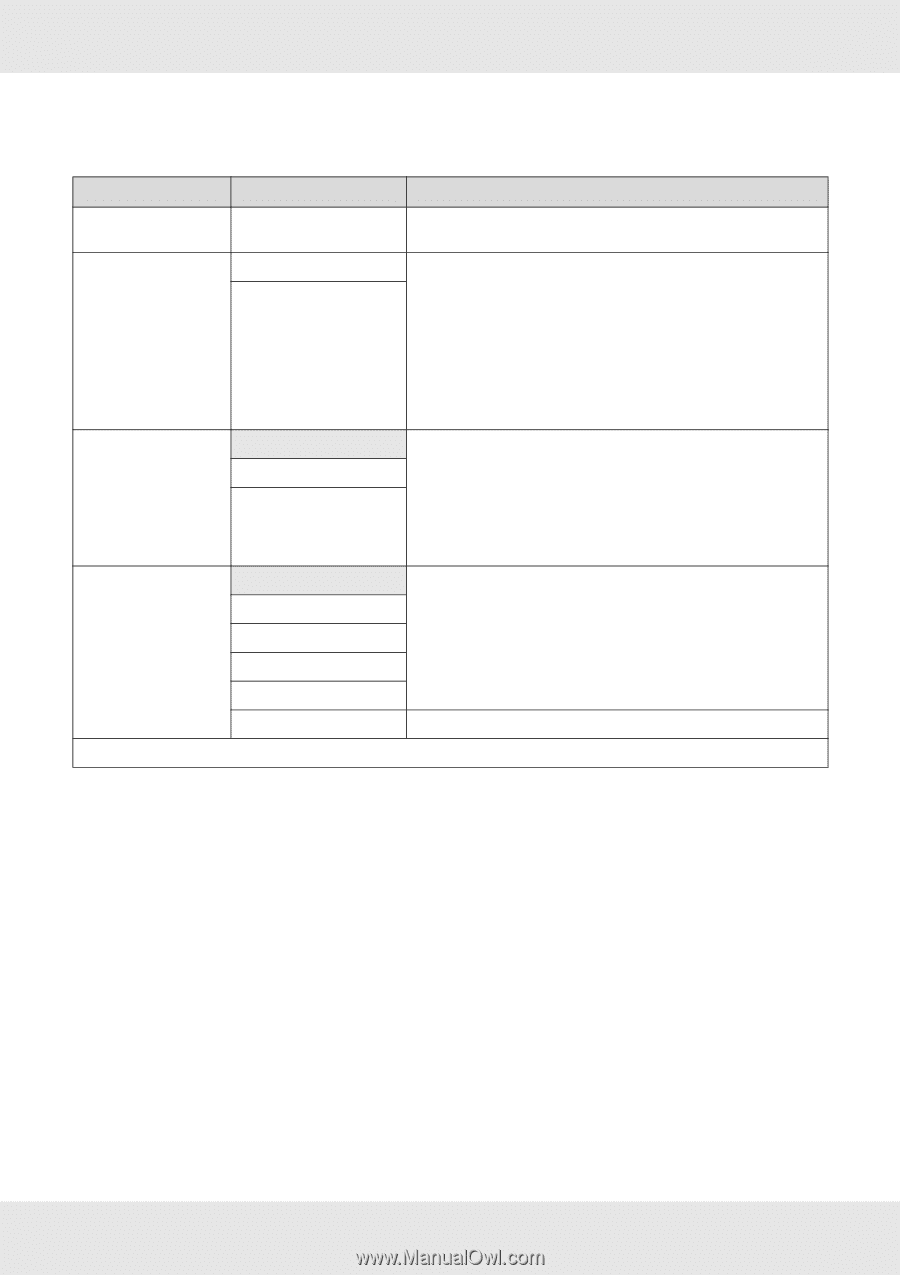
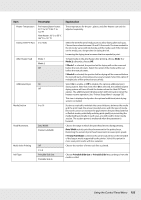
1 to 30 (media setting bank number) Item Setting Name Feed Adjustment Platen Gap Head Alignment Heating & Drying Parameter Auto Manual 1.5 2.0 2.5 Auto(Uni-D) Auto(Bi-D) Auto(Dual Head)1 Manual(Uni-D) Manual(Bi-D) Manual(Dual Head)1 Explanation Assign the media setting bank a name up to 22 half-size characters long. Using distinctive names makes it easier to select banks for use. Use this option if banding (horizontal banding, lines, or strips of uneven color) persists after head cleaning and head alignment have been performed. Auto feed adjustment adjusts the feed automatically using data collected by a sensor while a test pattern is printed. See "Feed Adjustment" on page 94. In manual feed adjustment, the user visually inspects print results and enters the adjustment value by hand. See "Feed Adjustment (Manual Feed Adjustment)" on page 103. Choose the platen gap (the distance between the print head and the media). The default setting of 1.5 is recommended in most situations. Choose 2.0 if printout is scratched or smudged. Select 2.5 only if print results are still smudged when 2.0 is selected. Choosing a larger gap than required may result in ink stains inside the printer, reduced print quality, or shorter product life. Select Head Alignment to align print head when print results seem grainy or out of focus. Auto adjustment aligns the head automatically using data collected by a sensor while a test pattern is printed. See "Head Alignment" on page 96. In manual adjustment, you need to check the pattern and enter the optimum adjustment value for alignment. See "Correcting Print Misalignment (Head Alignment)" on page 101. Using the Control Panel Menu 154
-
 1
1 -
2
-
3
-
4
-
5
-
6
-
7
-
8
-
9
-
10
-
11
-
12
-
13
-
14
-
15
-
16
-
17
-
18
-
19
-
20
-
21
-
22
-
23
-
24
-
25
-
26
-
27
-
28
-
29
-
30
-
31
-
32
-
33
-
34
-
35
-
36
-
37
-
38
-
39
-
40
-
41
-
42
-
43
-
44
-
45
-
46
-
47
-
48
-
49
-
50
-
51
-
52
-
53
-
54
-
55
-
56
-
57
-
58
-
59
-
60
-
61
-
62
-
63
-
64
-
65
-
66
-
67
-
68
-
69
-
70
-
71
-
72
-
73
-
74
-
75
-
76
-
77
-
78
-
79
-
80
-
81
-
82
-
83
-
84
-
85
-
86
-
87
-
88
-
89
-
90
-
91
-
92
-
93
-
94
-
95
-
96
-
97
-
98
-
99
-
100
-
101
-
102
-
103
-
104
-
105
-
106
-
107
-
108
-
109
-
110
-
111
-
112
-
113
-
114
-
115
-
116
-
117
-
118
-
119
-
120
-
121
-
122
-
123
-
124
-
125
-
126
-
127
-
128
-
129
-
130
-
131
-
132
-
133
-
134
-
135
-
136
-
137
-
138
-
139
-
140
-
141
-
142
-
143
-
144
-
145
-
146
-
147
-
148
-
 149
149 -
 150
150 -
 151
151 -
 152
152 -
 153
153 -
 154
154 -
 155
155 -
 156
156 -
 157
157 -
 158
158 -
 159
159 -
160
-
161
-
162
-
163
-
164
-
165
-
166
-
167
-
168
-
169
-
170
-
171
-
172
-
173
-
174
-
175
-
176
-
177
-
178
-
179
-
180
-
181
-
182
-
183
-
184
-
185
-
186
-
187
-
188
-
189
-
190
-
191
-
192
 |
 |