Epson SureColor S50670 User Manual - Page 21
buttons media feed buttons, button maintenance button
 |
View all Epson SureColor S50670 manuals
Add to My Manuals
Save this manual to your list of manuals |
Page 21 highlights
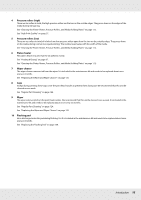
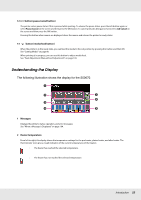
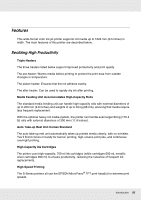
4 Display Displays the printer's status, menus, error messages, and so on. See "Understanding the Display" on page 22. 5 Menu button Press this button to display menus. See "Using the Control Panel Menu" on page 147. 6 y button (back button) Press this button to exit to the previous menu when options are displayed. See "Menu Operations" on page 147. 7 l/r buttons (left and right arrow buttons) Use to position the cursor when performing such tasks as entering a Setting Name or IP Address in the setup menu. 8 u/d buttons (media feed buttons) When media is loaded, you can press the d to feed the media and u to rewind. Keep the d button pressed to feed the media. Keep the u button pressed to rewind the media. Note that when the u button is used to rewind, the media will stop when its edge reaches the starting print position. Rewind can be resumed by releasing the button and then pressing it again. When the menus are displayed, these buttons can be used to select menu items and options. See "Menu Operations" on page 147. 9 OK button Pressing this button when a menu item is highlighted displays options for the selected item. Pressing this button when an option is highlighted selects the highlighted item or performs the selected operation. 10 button (heating and drying button) Pressing this button displays the Heating & Drying menu, where you can adjust the Heater Temperature. If the optional additional print drying system is attached, you can also adjust Additional Dryer settings. These options can be adjusted during printing. See "The Media Setup Menu" on page 152. 11 # button (maintenance button) Pressing this button displays the Maintenance menu, which contains such items as Nozzle Check, Cleaning, Head Washing, Head Maintenance, and Waste Ink Counter. This button is disabled during printing. See "The Maintenance Menu" on page 159. Introduction 21
-
 1
1 -
2
-
3
-
4
-
5
-
6
-
7
-
8
-
9
-
10
-
11
-
12
-
13
-
14
-
15
-
 16
16 -
 17
17 -
 18
18 -
 19
19 -
 20
20 -
 21
21 -
 22
22 -
 23
23 -
 24
24 -
 25
25 -
 26
26 -
27
-
28
-
29
-
30
-
31
-
32
-
33
-
34
-
35
-
36
-
37
-
38
-
39
-
40
-
41
-
42
-
43
-
44
-
45
-
46
-
47
-
48
-
49
-
50
-
51
-
52
-
53
-
54
-
55
-
56
-
57
-
58
-
59
-
60
-
61
-
62
-
63
-
64
-
65
-
66
-
67
-
68
-
69
-
70
-
71
-
72
-
73
-
74
-
75
-
76
-
77
-
78
-
79
-
80
-
81
-
82
-
83
-
84
-
85
-
86
-
87
-
88
-
89
-
90
-
91
-
92
-
93
-
94
-
95
-
96
-
97
-
98
-
99
-
100
-
101
-
102
-
103
-
104
-
105
-
106
-
107
-
108
-
109
-
110
-
111
-
112
-
113
-
114
-
115
-
116
-
117
-
118
-
119
-
120
-
121
-
122
-
123
-
124
-
125
-
126
-
127
-
128
-
129
-
130
-
131
-
132
-
133
-
134
-
135
-
136
-
137
-
138
-
139
-
140
-
141
-
142
-
143
-
144
-
145
-
146
-
147
-
148
-
149
-
150
-
151
-
152
-
153
-
154
-
155
-
156
-
157
-
158
-
159
-
160
-
161
-
162
-
163
-
164
-
165
-
166
-
167
-
168
-
169
-
170
-
171
-
172
-
173
-
174
-
175
-
176
-
177
-
178
-
179
-
180
-
181
-
182
-
183
-
184
-
185
-
186
-
187
-
188
-
189
-
190
-
191
-
192
 |
 |