HP LaserJet MFP M72625-M72630 User Guide - Page 59
Tray 1 (MP), see Tray 1 MP.
 |
View all HP LaserJet MFP M72625-M72630 manuals
Add to My Manuals
Save this manual to your list of manuals |
Page 59 highlights
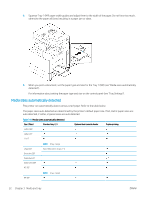
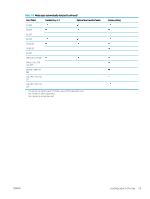
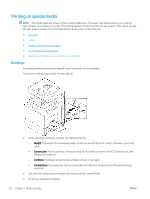
8. Fix the paper length guide using the locking switch. Release the locking switch to load a different sized paper. 1 Locking switch 9. Insert the tray back into the printer. When you print a document, set the paper type and size for the tray. For information about setting the paper type and size on the control panel (see "Tray Settings"). NOTE: ● If you experience problems with paper feeding, check whether the paper meets the media specifications (see "Print media specifications"). Then, try placing one sheet at a time in Tray 1 (MP) (see "Tray 1 (MP)"). ● The standard tray and optional dual cassette feeder can automatically detect various-sized paper (see "Media sizes automatically detected"). Check if the paper size and type in the tray are detected or not. If you want to set the paper size and type or if the printer cannot detect them, you can set the size and type directly in the confirmation window. Tray 1 (MP) Tray 1 (MP) can hold special sizes and types of print material, such as postcards, note cards, and envelopes. It is useful for single page printing on colored paper. ENWW Loading paper in the tray 49
-
 1
1 -
2
-
3
-
4
-
5
-
6
-
7
-
8
-
9
-
10
-
11
-
12
-
13
-
14
-
15
-
16
-
17
-
18
-
19
-
20
-
21
-
22
-
23
-
24
-
25
-
26
-
27
-
28
-
29
-
30
-
31
-
32
-
33
-
34
-
35
-
36
-
37
-
38
-
39
-
40
-
41
-
42
-
43
-
44
-
45
-
46
-
47
-
48
-
49
-
50
-
51
-
52
-
53
-
 54
54 -
 55
55 -
 56
56 -
 57
57 -
 58
58 -
 59
59 -
 60
60 -
 61
61 -
 62
62 -
 63
63 -
 64
64 -
65
-
66
-
67
-
68
-
69
-
70
-
71
-
72
-
73
-
74
-
75
-
76
-
77
-
78
-
79
-
80
-
81
-
82
-
83
-
84
-
85
-
86
-
87
-
88
-
89
-
90
-
91
-
92
-
93
-
94
-
95
-
96
-
97
-
98
-
99
-
100
-
101
-
102
-
103
-
104
-
105
-
106
-
107
-
108
-
109
-
110
-
111
-
112
-
113
-
114
-
115
-
116
-
117
-
118
-
119
-
120
-
121
-
122
-
123
-
124
-
125
-
126
-
127
-
128
-
129
-
130
-
131
-
132
-
133
-
134
-
135
-
136
-
137
-
138
-
139
-
140
-
141
-
142
-
143
-
144
-
145
-
146
-
147
-
148
-
149
-
150
-
151
-
152
-
153
-
154
-
155
-
156
-
157
-
158
-
159
-
160
-
161
-
162
-
163
-
164
-
165
-
166
-
167
-
168
-
169
-
170
-
171
-
172
-
173
 |
 |
