HP LaserJet MFP M72625-M72630 User Guide - Page 91
Scanning and sending through email, Understanding the Scan to Email screen, Scan More s
 |
View all HP LaserJet MFP M72625-M72630 manuals
Add to My Manuals
Save this manual to your list of manuals |
Page 91 highlights
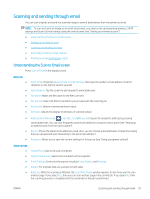
Scanning and sending through email You can scan originals and send the scanned image to several destinations from the printer by email. NOTE: To scan and send an image as an email attachment, you need to set up network parameters, SMTP settings and Scan to Email settings using the control panel (see "Setting up an email account"). ● Understanding the Scan to Email screen ● Setting up an email account ● Scanning and sending an email ● Resending to the last email address ● Printing an email confirmation report Understanding the Scan to Email screen Press Scan to Email in the display screen. Basic tab ● Send To Me: Press the Advanced tab > Email Settings, then type the sender's email address. Click the checkbox on the right to send to yourself. Input Address: Tap the screen to add recipient's email addresses. File Name: Makes the file name for the file to be sent. File Format: Select the file format before you proceed with the scanning job. Resolution: Selects scanning resolution value. Darkness: Adjusts the degree of darkness of scanned output. ● Address Book (Favorite ( ), All, ABC, 123/!@#, Server): Inputs the recipient's address by pressing stored addresses. You can save frequently used email addresses using the control panel (see "Setting up an address book from the control panel"). ● Recent: Shows the latest email addresses used. Also, you can choose email addresses instead of pressing the pop-up keyboard (see "Resending to the last email address"). ● Programs: Allows you to save the current settings for future use (see "Using a programs setting"). Advanced tab ● Original Size: Selects the size of originals. ● Original Orientation: Selects the orientation of the originals. ● Email Settings: Enter the information including From, Subject, and Message. ● Duplex: For originals that are scanned on both sides. ● Build Job: After the scanning is finished, the Scan More Pages window appears to ask if you want to scan another page. If you select Yes, then you can scan another page in the current job. If you select No, then the scanning process is completed and the remainder of the job is performed. ENWW Scanning and sending through email 81
-
 1
1 -
2
-
3
-
4
-
5
-
6
-
7
-
8
-
9
-
10
-
11
-
12
-
13
-
14
-
15
-
16
-
17
-
18
-
19
-
20
-
21
-
22
-
23
-
24
-
25
-
26
-
27
-
28
-
29
-
30
-
31
-
32
-
33
-
34
-
35
-
36
-
37
-
38
-
39
-
40
-
41
-
42
-
43
-
44
-
45
-
46
-
47
-
48
-
49
-
50
-
51
-
52
-
53
-
54
-
55
-
56
-
57
-
58
-
59
-
60
-
61
-
62
-
63
-
64
-
65
-
66
-
67
-
68
-
69
-
70
-
71
-
72
-
73
-
74
-
75
-
76
-
77
-
78
-
79
-
80
-
81
-
82
-
83
-
84
-
85
-
 86
86 -
 87
87 -
 88
88 -
 89
89 -
 90
90 -
 91
91 -
 92
92 -
 93
93 -
 94
94 -
 95
95 -
 96
96 -
97
-
98
-
99
-
100
-
101
-
102
-
103
-
104
-
105
-
106
-
107
-
108
-
109
-
110
-
111
-
112
-
113
-
114
-
115
-
116
-
117
-
118
-
119
-
120
-
121
-
122
-
123
-
124
-
125
-
126
-
127
-
128
-
129
-
130
-
131
-
132
-
133
-
134
-
135
-
136
-
137
-
138
-
139
-
140
-
141
-
142
-
143
-
144
-
145
-
146
-
147
-
148
-
149
-
150
-
151
-
152
-
153
-
154
-
155
-
156
-
157
-
158
-
159
-
160
-
161
-
162
-
163
-
164
-
165
-
166
-
167
-
168
-
169
-
170
-
171
-
172
-
173
 |
 |
