HP LaserJet MFP M72625-M72630 User Guide - Page 77
Understanding the copy screen, Basic tab, Advanced tab, Image tab, Original Size
 |
View all HP LaserJet MFP M72625-M72630 manuals
Add to My Manuals
Save this manual to your list of manuals |
Page 77 highlights
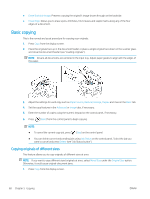
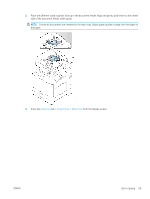
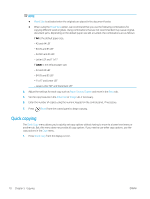
Understanding the copy screen When you press Copy from the display screen, the Copy screen appears which has several tabs and lots of copying options. All the options are grouped by features so that you can configure your selections easily. If a different screen is displayed, press (Home) to go to the home display screen. ● Basic tab ● Advanced tab ● Image tab Basic tab ● Copies: Enters the number of copies. Paper Source: Selects the paper source tray. Reduce/Enlarge: Reduces or enlarges the size of a copied image. Duplex: Sets the printer to print copies on both sides of the paper. Output: Sets the printer's various output options. Darkness: Adjusts the brightness level to make a copy for easier reading, when the original contains faint markings and dark images. Programs: Allows you to save the current settings for future use. Advanced tab ● Original Size: Selects the actual paper size of the originals. ● Original Orientation: Selects the orientation of the originals. ● N-Up: Prints 2 or more original images, reduced to fit onto one sheet of paper. ● ID Copy: Prints 2-sided originals on one sheet of paper. This feature is helpful for copying a small-sized item, such as a business card. ● Book Copy: Allows you to copy the left or/and right pages of book on separate output paper. ● Booklet: Allows you to create booklets. ● Watermark: Allows you to print a watermark on printouts. ● Stamp: Allows you to print with some information such as date and time. ● Build Job: After the scanning is finished, the Scan More Pages window appears to ask if you want to scan another page. If you select Yes, then you can scan another page in the current job. If you select No, then the scanning process is completed and the remainder of the job is performed. Image tab ● Original Type: Improves the copy quality by selecting the original's type for the current copy job. ● Adjust Background: Prints an image with a lighter background. ENWW Understanding the copy screen 67
-
 1
1 -
2
-
3
-
4
-
5
-
6
-
7
-
8
-
9
-
10
-
11
-
12
-
13
-
14
-
15
-
16
-
17
-
18
-
19
-
20
-
21
-
22
-
23
-
24
-
25
-
26
-
27
-
28
-
29
-
30
-
31
-
32
-
33
-
34
-
35
-
36
-
37
-
38
-
39
-
40
-
41
-
42
-
43
-
44
-
45
-
46
-
47
-
48
-
49
-
50
-
51
-
52
-
53
-
54
-
55
-
56
-
57
-
58
-
59
-
60
-
61
-
62
-
63
-
64
-
65
-
66
-
67
-
68
-
69
-
70
-
71
-
 72
72 -
 73
73 -
 74
74 -
 75
75 -
 76
76 -
 77
77 -
 78
78 -
 79
79 -
 80
80 -
 81
81 -
 82
82 -
83
-
84
-
85
-
86
-
87
-
88
-
89
-
90
-
91
-
92
-
93
-
94
-
95
-
96
-
97
-
98
-
99
-
100
-
101
-
102
-
103
-
104
-
105
-
106
-
107
-
108
-
109
-
110
-
111
-
112
-
113
-
114
-
115
-
116
-
117
-
118
-
119
-
120
-
121
-
122
-
123
-
124
-
125
-
126
-
127
-
128
-
129
-
130
-
131
-
132
-
133
-
134
-
135
-
136
-
137
-
138
-
139
-
140
-
141
-
142
-
143
-
144
-
145
-
146
-
147
-
148
-
149
-
150
-
151
-
152
-
153
-
154
-
155
-
156
-
157
-
158
-
159
-
160
-
161
-
162
-
163
-
164
-
165
-
166
-
167
-
168
-
169
-
170
-
171
-
172
-
173
 |
 |
