HP LaserJet MFP M72625-M72630 User Guide - Page 68
Tray Settings, Setting the paper size, Setting the tray confirmation message
 |
View all HP LaserJet MFP M72625-M72630 manuals
Add to My Manuals
Save this manual to your list of manuals |
Page 68 highlights
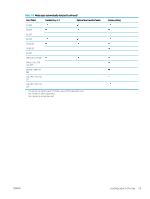
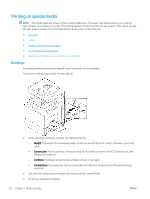
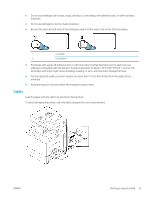
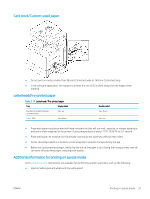
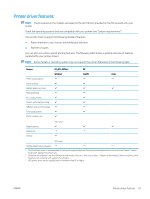
Tray Settings After loading paper in the paper tray, set the paper size and type using the display screen. For computer printing, select the paper size and type in the application program you use on your computer (see "Opening printing preferences"). NOTE: The paper setting in the printer and driver should match to print without a paper mismatch error. ● You change the paper setting set in the printer using WebUI. If your printer is connected to the network, you can set the printer's setting WebUI. ● You can set it using Machine Setup > Tray Settings > Settings > select the tray you want > Paper Size or Paper Type on the control panel. ● Setting the paper size ● Setting the paper type ● Setting the tray confirmation message ● Auto tray switch ● Auto continue ● Paper substitution ● Tray protection ● Tray priority setting Setting the paper size 1. Press Machine Setup > Tray Settings > Settings > select the tray you want from the display screen. 2. Press Paper Size and select the paper size. NOTE: If there is no required size paper or you need to use custom size paper, press the Custom Size button to set the paper size. You can also set and save the custom size using Custom Size. You can select the custom size whenever you need it. 3. Press (Back) to save the selection. Setting the paper type 1. Press Machine Setup > Tray Settings > Settings > select the tray you want from the display screen. 2. Press Paper Type and select the paper type. 3. Press (Back) to save the selection. Setting the tray confirmation message When you load paper into a tray, you can set the confirmation message to appear automatically; or not at all. This printer can detect some paper sizes and types automatically. If you want to set the paper size and type, or the printer cannot detect them, you can set the size and type directly in the confirmation window. 58 Chapter 3 Media and tray ENWW
-
 1
1 -
2
-
3
-
4
-
5
-
6
-
7
-
8
-
9
-
10
-
11
-
12
-
13
-
14
-
15
-
16
-
17
-
18
-
19
-
20
-
21
-
22
-
23
-
24
-
25
-
26
-
27
-
28
-
29
-
30
-
31
-
32
-
33
-
34
-
35
-
36
-
37
-
38
-
39
-
40
-
41
-
42
-
43
-
44
-
45
-
46
-
47
-
48
-
49
-
50
-
51
-
52
-
53
-
54
-
55
-
56
-
57
-
58
-
59
-
60
-
61
-
62
-
 63
63 -
 64
64 -
 65
65 -
 66
66 -
 67
67 -
 68
68 -
 69
69 -
 70
70 -
 71
71 -
 72
72 -
 73
73 -
74
-
75
-
76
-
77
-
78
-
79
-
80
-
81
-
82
-
83
-
84
-
85
-
86
-
87
-
88
-
89
-
90
-
91
-
92
-
93
-
94
-
95
-
96
-
97
-
98
-
99
-
100
-
101
-
102
-
103
-
104
-
105
-
106
-
107
-
108
-
109
-
110
-
111
-
112
-
113
-
114
-
115
-
116
-
117
-
118
-
119
-
120
-
121
-
122
-
123
-
124
-
125
-
126
-
127
-
128
-
129
-
130
-
131
-
132
-
133
-
134
-
135
-
136
-
137
-
138
-
139
-
140
-
141
-
142
-
143
-
144
-
145
-
146
-
147
-
148
-
149
-
150
-
151
-
152
-
153
-
154
-
155
-
156
-
157
-
158
-
159
-
160
-
161
-
162
-
163
-
164
-
165
-
166
-
167
-
168
-
169
-
170
-
171
-
172
-
173
 |
 |
