Lexmark X422 X422 MFP User's Reference - Page 155
Home screen, Buttons, Using the MFP control panel and menus
 |
View all Lexmark X422 manuals
Add to My Manuals
Save this manual to your list of manuals |
Page 155 highlights
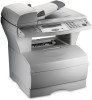
Using the MFP control panel and menus Home screen Once the MFP is turned on, the LCD shows the following screen which is referred to as the Home screen: Press any button on the left to begin. Ready Date/Time The top two lines direct you to press any button to the left. The buttons to the left are the Administration button, which has a key icon on it, and the Copy, Fax, E-mail, and Print/Profiles buttons. The last three lines on the Home screen are used for status messages. If you cannot see a complete message, you can use the left and right arrow buttons to move through the entire message. For more information on buttons, see Buttons as follows. Buttons Use the control panel buttons to open a menu, scroll through a list of values, make a selection to change settings, and respond to messages. Use the numbered buttons to specify the number of copies, to enter shortcuts or your personal identification number (PIN) after you send a confidential print job from the print driver, or to dial phone numbers for faxes. A confidential job is one type of job from the Print and Hold jobs. For more information, see Print Held Jobs-using the Print and Hold function. The following table includes descriptions or the function of each button. See the illustration on page 154 of the control panel to identify the placement of the buttons: Button Administration (key) Note: A key icon is molded into it. Copy Fax E-mail Print/Profiles Function Press to access the administration menus. These menus are only available when the MFP is in the Ready state. Press to access the Copy menus. If the Home screen is displayed, press a number to access the Copy menus, too. Press Start to launch a copy. Press to access the Fax menus. Press to access the E-mail menus. Press to access the Print/Profile menus. Understanding the MFP control panel 155
-
 1
1 -
2
-
3
-
4
-
5
-
6
-
7
-
8
-
9
-
10
-
11
-
12
-
13
-
14
-
15
-
16
-
17
-
18
-
19
-
20
-
21
-
22
-
23
-
24
-
25
-
26
-
27
-
28
-
29
-
30
-
31
-
32
-
33
-
34
-
35
-
36
-
37
-
38
-
39
-
40
-
41
-
42
-
43
-
44
-
45
-
46
-
47
-
48
-
49
-
50
-
51
-
52
-
53
-
54
-
55
-
56
-
57
-
58
-
59
-
60
-
61
-
62
-
63
-
64
-
65
-
66
-
67
-
68
-
69
-
70
-
71
-
72
-
73
-
74
-
75
-
76
-
77
-
78
-
79
-
80
-
81
-
82
-
83
-
84
-
85
-
86
-
87
-
88
-
89
-
90
-
91
-
92
-
93
-
94
-
95
-
96
-
97
-
98
-
99
-
100
-
101
-
102
-
103
-
104
-
105
-
106
-
107
-
108
-
109
-
110
-
111
-
112
-
113
-
114
-
115
-
116
-
117
-
118
-
119
-
120
-
121
-
122
-
123
-
124
-
125
-
126
-
127
-
128
-
129
-
130
-
131
-
132
-
133
-
134
-
135
-
136
-
137
-
138
-
139
-
140
-
141
-
142
-
143
-
144
-
145
-
146
-
147
-
148
-
149
-
 150
150 -
 151
151 -
 152
152 -
 153
153 -
 154
154 -
 155
155 -
 156
156 -
 157
157 -
 158
158 -
 159
159 -
 160
160 -
161
-
162
-
163
-
164
-
165
-
166
-
167
-
168
-
169
-
170
-
171
-
172
-
173
-
174
-
175
-
176
-
177
-
178
-
179
-
180
-
181
-
182
-
183
-
184
-
185
-
186
-
187
-
188
-
189
-
190
-
191
-
192
-
193
-
194
-
195
-
196
-
197
-
198
-
199
-
200
-
201
-
202
-
203
-
204
-
205
-
206
-
207
-
208
-
209
-
210
-
211
-
212
-
213
-
214
-
215
-
216
-
217
-
218
-
219
-
220
-
221
-
222
-
223
-
224
-
225
-
226
-
227
-
228
-
229
-
230
-
231
-
232
-
233
-
234
-
235
-
236
-
237
-
238
-
239
-
240
-
241
-
242
-
243
-
244
-
245
-
246
-
247
-
248
-
249
-
250
 |
 |
