Netgear AC778AT User Manual - Page 118
Set the DNS Mode, DHCP lease time, Manual, DNS 1, Submit, Sign In, password
 |
View all Netgear AC778AT manuals
Add to My Manuals
Save this manual to your list of manuals |
Page 118 highlights
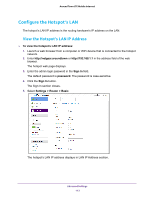
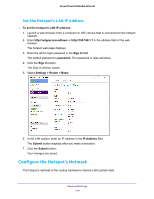
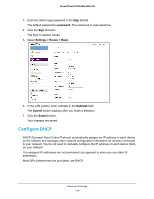
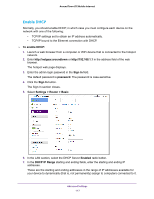
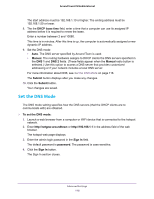
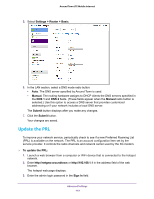
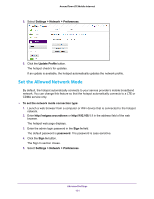
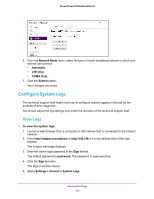
Around Town LTE Mobile Internet The start address must be 192.168.1.10 or higher. The ending address must be 192.168.1.50 or lower. 8. The the DHCP lease time field, enter a time that a computer can use its assigned IP address before it is required to renew the lease. Enter a number between 2 and 10080. This time is in minutes. After this time is up, the computer is automatically assigned a new dynamic IP address. 9. Set the DNS mode: • Auto. The DNS server specified by Around Town is used. • Manual. The routing hardware assigns to DHCP clients the DNS servers specified in the DNS 1 and DNS 2 fields. (These fields appear when the Manual radio button is selected.) Use this option to access a DNS server that provides customized addressing or if your network includes a local DNS server. For more information about DNS, see Set the DNS Mode on page 118. The Submit button displays after you make any changes. 10. Click the Submit button. Your changes are saved. Set the DNS Mode The DNS mode setting specifies how the DNS servers (that the DHCP clients are to communicate with) are obtained. To set the DNS mode: 1. Launch a web browser from a computer or WiFi device that is connected to the hotspot network. 2. Enter http://netgear.aroundtown or http://192.168.1.1 in the address field of the web browser. The hotspot web page displays. 3. Enter the admin login password in the Sign In field. The default password is password. The password is case-sensitive. 4. Click the Sign In button. The Sign In section closes. Advanced Settings 118
-
 1
1 -
2
-
3
-
4
-
5
-
6
-
7
-
8
-
9
-
10
-
11
-
12
-
13
-
14
-
15
-
16
-
17
-
18
-
19
-
20
-
21
-
22
-
23
-
24
-
25
-
26
-
27
-
28
-
29
-
30
-
31
-
32
-
33
-
34
-
35
-
36
-
37
-
38
-
39
-
40
-
41
-
42
-
43
-
44
-
45
-
46
-
47
-
48
-
49
-
50
-
51
-
52
-
53
-
54
-
55
-
56
-
57
-
58
-
59
-
60
-
61
-
62
-
63
-
64
-
65
-
66
-
67
-
68
-
69
-
70
-
71
-
72
-
73
-
74
-
75
-
76
-
77
-
78
-
79
-
80
-
81
-
82
-
83
-
84
-
85
-
86
-
87
-
88
-
89
-
90
-
91
-
92
-
93
-
94
-
95
-
96
-
97
-
98
-
99
-
100
-
101
-
102
-
103
-
104
-
105
-
106
-
107
-
108
-
109
-
110
-
111
-
112
-
 113
113 -
 114
114 -
 115
115 -
 116
116 -
 117
117 -
 118
118 -
 119
119 -
 120
120 -
 121
121 -
 122
122 -
 123
123 -
124
-
125
-
126
-
127
-
128
-
129
-
130
-
131
-
132
-
133
-
134
-
135
-
136
-
137
-
138
-
139
-
140
-
141
-
142
-
143
 |
 |
