Netgear GS516TP Software Administration Manual - Page 112
Policy Configuration, QoS > DiffServ > Advanced > Policy Configuration
 |
View all Netgear GS516TP manuals
Add to My Manuals
Save this manual to your list of manuals |
Page 112 highlights
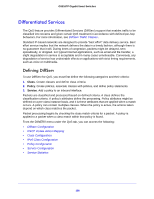
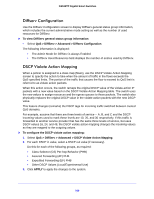
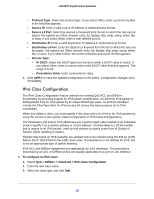
GS516TP Gigabit Smart Switches The switch supports only the Class Type value All, which means all the various match criteria defined for the class must be satisfied for a packet match. All signifies the logical AND of all the match criteria. 4. Click APPLY to save the class. Configuration changes take effect immediately. 5. To configure this class, proceed to To configure an IPv6 class: . To configure the class match criteria: 1. Select the name of the class in the IPv6 Class Configuration screen. 2. Click a class name (which is a hyperlink) for an existing class. When you click a class name, the configuration part of the Class Configuration screen is displayed. In this part of the screen, you define against which values traffic is checked when this class is applied. 3. To define the criteria to associate with a DiffServ class, select one or more of the following check boxes and enter the following data: • Match Every. Select All to add a match condition to the specified class definition whereby all packets are considered to belong to the class. In this case, no other field can be configured. • Protocol Type. Select a Layer 4 protocol. If you select Other, enter a protocol number in the field that appears. • Source Prefix/Length. Enter a valid source IPv6 prefix. A prefix is always specified with the prefix length. The valid range for a prefix is 0 to FFFF:FFFF:FFFF:FFFF:FFFF:FFFF:FFFF:FFFF. The valid range for a prefix length is 0-128. • Source L4 Port. Select a keyword for the known source Layer 4 ports. If you select Other, enter a protocol number in the field that appears. • Destination Prefix/Length. Enter a valid destination IPv6 prefix to compare against an IPv6 packet. A prefix is always specified with the prefix length. The valid range for a prefix is FFFF:FFFF:FFFF:FFFF:FFFF:FFFF:FFFF:FFFF. The valid range for a prefix length is 0-128. • Destination L4 Port. Select a known destination Layer 4 ports. If you select Other, enter a protocol number in the field that appears. • IP DSCP. Select a known DSCP value. If you select Other, enter a protocol number in the field that appears. 4. Click APPLY to save the class. Configuration changes take effect immediately. Policy Configuration Use the Policy Configuration screen to associate a collection of classes with one or more policy statements. After creating a policy, click the policy name to go to the Policy Configuration screen. To configure a DiffServ policy: 1. Select QoS > DiffServ > Advanced > Policy Configuration. 112
-
 1
1 -
2
-
3
-
4
-
5
-
6
-
7
-
8
-
9
-
10
-
11
-
12
-
13
-
14
-
15
-
16
-
17
-
18
-
19
-
20
-
21
-
22
-
23
-
24
-
25
-
26
-
27
-
28
-
29
-
30
-
31
-
32
-
33
-
34
-
35
-
36
-
37
-
38
-
39
-
40
-
41
-
42
-
43
-
44
-
45
-
46
-
47
-
48
-
49
-
50
-
51
-
52
-
53
-
54
-
55
-
56
-
57
-
58
-
59
-
60
-
61
-
62
-
63
-
64
-
65
-
66
-
67
-
68
-
69
-
70
-
71
-
72
-
73
-
74
-
75
-
76
-
77
-
78
-
79
-
80
-
81
-
82
-
83
-
84
-
85
-
86
-
87
-
88
-
89
-
90
-
91
-
92
-
93
-
94
-
95
-
96
-
97
-
98
-
99
-
100
-
101
-
102
-
103
-
104
-
105
-
106
-
 107
107 -
 108
108 -
 109
109 -
 110
110 -
 111
111 -
 112
112 -
 113
113 -
 114
114 -
 115
115 -
 116
116 -
 117
117 -
118
-
119
-
120
-
121
-
122
-
123
-
124
-
125
-
126
-
127
-
128
-
129
-
130
-
131
-
132
-
133
-
134
-
135
-
136
-
137
-
138
-
139
-
140
-
141
-
142
-
143
-
144
-
145
-
146
-
147
-
148
-
149
-
150
-
151
-
152
-
153
-
154
-
155
-
156
-
157
-
158
-
159
-
160
-
161
-
162
-
163
-
164
-
165
-
166
-
167
-
168
-
169
-
170
-
171
-
172
-
173
-
174
-
175
-
176
-
177
-
178
-
179
-
180
-
181
-
182
-
183
-
184
-
185
-
186
-
187
-
188
-
189
-
190
-
191
-
192
-
193
-
194
-
195
-
196
-
197
-
198
-
199
-
200
-
201
-
202
-
203
-
204
-
205
-
206
-
207
-
208
 |
 |