Netgear GS516TP Software Administration Manual - Page 76
MST Port Configuration, APPLY, DELETE, To con MST port settings
 |
View all Netgear GS516TP manuals
Add to My Manuals
Save this manual to your list of manuals |
Page 76 highlights
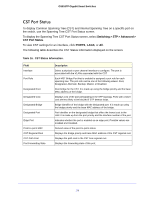
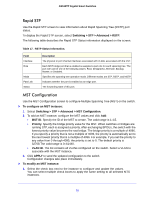
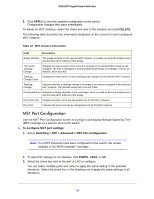
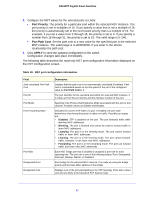
GS516TP Gigabit Smart Switches 2. Click APPLY to send the updated configuration to the switch. Configuration changes take place immediately. To delete an MST instance, select the check box next to the instance and click DELETE. The following table describes the information displayed on the screen for each configured MST instance. Table 18. MST Instance Information. Field Description Bridge Identifier The bridge identifier for the selected MST instance. It is made up using the bridge priority and the base MAC address of the bridge. Time Since Topology Change Displays the total amount of time since the topology of the selected MST instance last changed. The time is displayed in hour/minute/second format, for example, 5 hours, 10 minutes, and 4 seconds. Topology Displays the total number of times topology has changed for the selected MST instance. Change Count Topology Change Indicates whether a topology change is in progress on any port assigned to the selected MST instance. The possible values are True and False. Designated Root Displays the bridge identifier of the root bridge, which is made up from the bridge priority and the base MAC address of the bridge. Root Path Cost Displays the path cost to the designated root for this MST instance. Root Port Indicates the port to access the designated root for this MST instance. MST Port Configuration Use the MST Port Configuration screen to configure and display Multiple Spanning Tree (MST) settings on a specific port on the switch. To configure MST port settings: 1. Select Switching > STP > Advanced > MST Port Configuration. Note: If no MST instances have been configured on the switch, the screen displays a "No MSTs Available" message. 2. To view CST settings for an interface, click PORTS, LAGS, or All. 3. Select the check box next to the port or LAG to configure. You can select multiple ports and LAGs to apply the same setting to the selected interfaces. Select the check box in the heading row to apply the same settings to all interfaces. 76
-
 1
1 -
2
-
3
-
4
-
5
-
6
-
7
-
8
-
9
-
10
-
11
-
12
-
13
-
14
-
15
-
16
-
17
-
18
-
19
-
20
-
21
-
22
-
23
-
24
-
25
-
26
-
27
-
28
-
29
-
30
-
31
-
32
-
33
-
34
-
35
-
36
-
37
-
38
-
39
-
40
-
41
-
42
-
43
-
44
-
45
-
46
-
47
-
48
-
49
-
50
-
51
-
52
-
53
-
54
-
55
-
56
-
57
-
58
-
59
-
60
-
61
-
62
-
63
-
64
-
65
-
66
-
67
-
68
-
69
-
70
-
 71
71 -
 72
72 -
 73
73 -
 74
74 -
 75
75 -
 76
76 -
 77
77 -
 78
78 -
 79
79 -
 80
80 -
 81
81 -
82
-
83
-
84
-
85
-
86
-
87
-
88
-
89
-
90
-
91
-
92
-
93
-
94
-
95
-
96
-
97
-
98
-
99
-
100
-
101
-
102
-
103
-
104
-
105
-
106
-
107
-
108
-
109
-
110
-
111
-
112
-
113
-
114
-
115
-
116
-
117
-
118
-
119
-
120
-
121
-
122
-
123
-
124
-
125
-
126
-
127
-
128
-
129
-
130
-
131
-
132
-
133
-
134
-
135
-
136
-
137
-
138
-
139
-
140
-
141
-
142
-
143
-
144
-
145
-
146
-
147
-
148
-
149
-
150
-
151
-
152
-
153
-
154
-
155
-
156
-
157
-
158
-
159
-
160
-
161
-
162
-
163
-
164
-
165
-
166
-
167
-
168
-
169
-
170
-
171
-
172
-
173
-
174
-
175
-
176
-
177
-
178
-
179
-
180
-
181
-
182
-
183
-
184
-
185
-
186
-
187
-
188
-
189
-
190
-
191
-
192
-
193
-
194
-
195
-
196
-
197
-
198
-
199
-
200
-
201
-
202
-
203
-
204
-
205
-
206
-
207
-
208
 |
 |
