Netgear GS516TP Software Administration Manual - Page 165
HTTP File Upload, Upload File Types
 |
View all Netgear GS516TP manuals
Add to My Manuals
Save this manual to your list of manuals |
Page 165 highlights
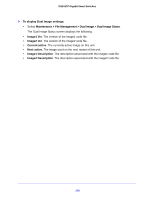
GS516TP Gigabit Smart Switches • DNS. The TFTP server address is a host name. 4. In the Server Address field, specify the IP address or host name of the TFTP server. The address you type must be in the format indicated by the TFTP server address type. 5. In the Transfer File Path field, specify the path on the TFTP server where you want to put the file. You can enter up to 32 characters. Include the backslash at the end of the path. A path name with a space is not accepted. Leave this field blank to save the file to the root TFTP directory. 6. In the Transfer File Name field, specify a destination file name for the file to upload. You can enter up to 32 characters. The transfer fails if you do not specify a file name. For a code transfer, use the .ros file extension. 7. Select the Start File Transfer check box to enable the file upload when you click APPLY 8. Click APPLY to begin the file transfer (upload). When the transfer actually begins, the last row of the table displays information about the progress of the file transfer. The screen refreshes automatically until the file transfer completes or fails. HTTP File Upload Use the HTTP File Upload screen to upload files of various types from the switch to the management system by using an HTTP session (for example, via your web browser). To upload a file from the switch to another system by using HTTP: 1. Select Maintenance > Upload > HTTP File Upload. 2. The File Type list displays the type of file that can be uploaded, which is the Text Configuration file. For more information, see Upload File Types . 3. Click APPLY. A window appears to allow you to open the text file on the management system or to save the image or text file to the management system. 165
-
 1
1 -
2
-
3
-
4
-
5
-
6
-
7
-
8
-
9
-
10
-
11
-
12
-
13
-
14
-
15
-
16
-
17
-
18
-
19
-
20
-
21
-
22
-
23
-
24
-
25
-
26
-
27
-
28
-
29
-
30
-
31
-
32
-
33
-
34
-
35
-
36
-
37
-
38
-
39
-
40
-
41
-
42
-
43
-
44
-
45
-
46
-
47
-
48
-
49
-
50
-
51
-
52
-
53
-
54
-
55
-
56
-
57
-
58
-
59
-
60
-
61
-
62
-
63
-
64
-
65
-
66
-
67
-
68
-
69
-
70
-
71
-
72
-
73
-
74
-
75
-
76
-
77
-
78
-
79
-
80
-
81
-
82
-
83
-
84
-
85
-
86
-
87
-
88
-
89
-
90
-
91
-
92
-
93
-
94
-
95
-
96
-
97
-
98
-
99
-
100
-
101
-
102
-
103
-
104
-
105
-
106
-
107
-
108
-
109
-
110
-
111
-
112
-
113
-
114
-
115
-
116
-
117
-
118
-
119
-
120
-
121
-
122
-
123
-
124
-
125
-
126
-
127
-
128
-
129
-
130
-
131
-
132
-
133
-
134
-
135
-
136
-
137
-
138
-
139
-
140
-
141
-
142
-
143
-
144
-
145
-
146
-
147
-
148
-
149
-
150
-
151
-
152
-
153
-
154
-
155
-
156
-
157
-
158
-
159
-
 160
160 -
 161
161 -
 162
162 -
 163
163 -
 164
164 -
 165
165 -
 166
166 -
 167
167 -
 168
168 -
 169
169 -
 170
170 -
171
-
172
-
173
-
174
-
175
-
176
-
177
-
178
-
179
-
180
-
181
-
182
-
183
-
184
-
185
-
186
-
187
-
188
-
189
-
190
-
191
-
192
-
193
-
194
-
195
-
196
-
197
-
198
-
199
-
200
-
201
-
202
-
203
-
204
-
205
-
206
-
207
-
208
 |
 |
