Netgear GS516TP Software Administration Manual - Page 34
DNS, DNS Configuration
 |
View all Netgear GS516TP manuals
Add to My Manuals
Save this manual to your list of manuals |
Page 34 highlights
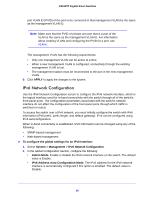
GS516TP Gigabit Smart Switches The SNTP Server Status table displays status information about the SNTP servers configured on your switch. The following table describes the SNTP status fields. Table 3. SNTP Server Status Table Fields Field Address Last Update Time Description Specifies all the existing server addresses. If no server configuration exists, a message saying "No SNTP server exists" flashes on the screen. Specifies the local date and time (UTC) of the server response, according to which the system clock was updated. DNS Use the DNS screens to configure information about DNS servers used by the network and DNS client settings for the switch. DNS Configuration Use this screen to configure global DNS settings and DNS server information. To configure the global DNS settings: 1. Select System > Management > DNS > DNS Configuration. 2. Specify whether to enable or disable the administrative status of the DNS client. • Enable. Allow the switch to send DNS queries to a DNS server to resolve a DNS domain name. The DNS is enabled by default. • Disable. Prevent the switch from sending DNS queries. 3. In the DNS Default Name field, enter a default DNS name to include in DNS queries. When the system is performing a lookup on an unqualified host name, this field is provided as the domain name. For example, if the default domain name is netgear.com and the host name to resolve is test, test.netgear.com is used in DNS resolution queries. 4. in the DNS Server field, enter an IP address representing the DNS server to which the switch sends DNS queries, and click ADD. The server appears in the DNS Server list. • Use standard IPv4 dot notation (from 1 through 158 characters). • You can specify up to eight DNS servers. • DNS server precedence is set according to the creation order. 5. Click APPLY to send the updated configuration to the switch. Configuration changes take effect immediately. Host Configuration Use this screen to manually map host names to IP addresses or to view Dynamic DNS mappings. 34
-
 1
1 -
2
-
3
-
4
-
5
-
6
-
7
-
8
-
9
-
10
-
11
-
12
-
13
-
14
-
15
-
16
-
17
-
18
-
19
-
20
-
21
-
22
-
23
-
24
-
25
-
26
-
27
-
28
-
 29
29 -
 30
30 -
 31
31 -
 32
32 -
 33
33 -
 34
34 -
 35
35 -
 36
36 -
 37
37 -
 38
38 -
 39
39 -
40
-
41
-
42
-
43
-
44
-
45
-
46
-
47
-
48
-
49
-
50
-
51
-
52
-
53
-
54
-
55
-
56
-
57
-
58
-
59
-
60
-
61
-
62
-
63
-
64
-
65
-
66
-
67
-
68
-
69
-
70
-
71
-
72
-
73
-
74
-
75
-
76
-
77
-
78
-
79
-
80
-
81
-
82
-
83
-
84
-
85
-
86
-
87
-
88
-
89
-
90
-
91
-
92
-
93
-
94
-
95
-
96
-
97
-
98
-
99
-
100
-
101
-
102
-
103
-
104
-
105
-
106
-
107
-
108
-
109
-
110
-
111
-
112
-
113
-
114
-
115
-
116
-
117
-
118
-
119
-
120
-
121
-
122
-
123
-
124
-
125
-
126
-
127
-
128
-
129
-
130
-
131
-
132
-
133
-
134
-
135
-
136
-
137
-
138
-
139
-
140
-
141
-
142
-
143
-
144
-
145
-
146
-
147
-
148
-
149
-
150
-
151
-
152
-
153
-
154
-
155
-
156
-
157
-
158
-
159
-
160
-
161
-
162
-
163
-
164
-
165
-
166
-
167
-
168
-
169
-
170
-
171
-
172
-
173
-
174
-
175
-
176
-
177
-
178
-
179
-
180
-
181
-
182
-
183
-
184
-
185
-
186
-
187
-
188
-
189
-
190
-
191
-
192
-
193
-
194
-
195
-
196
-
197
-
198
-
199
-
200
-
201
-
202
-
203
-
204
-
205
-
206
-
207
-
208
 |
 |
