Nokia 9000i Nokia 9000i User Guide in English - Page 12
SIM card contents, Installing the SIM card - battery
 |
View all Nokia 9000i manuals
Add to My Manuals
Save this manual to your list of manuals |
Page 12 highlights
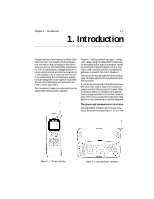
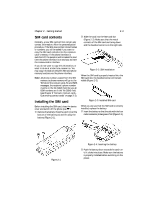
Chapter 2 - Getting started SIM card contents Normally, a new SIM card will not contain any contact information. After the personalization procedure, if the SIM does contain stored names or numbers, you will be asked if you want to copy the SIM card contents into the communicator's memory. If the phone interface is switched off, the question will be asked the next time the phone interface is on and you activate the communicator interface. If you do not want to copy this information, or want to do so at a later time, answer no. You may copy information between SIM and phone memory locations via the phone interface. Note: All phone numbers copied from the SIM memory to phone memory will go to the Tel field of the contact cards. To send SMS messages, the recipient's phone number must be in the Tel (GSM) field. Be sure all GSM numbers are in the Tel (GSM) field. (see Chapter 3 "Contacts: Contact cards Customizing contact cards" on page 3-3). Installing the SIM card Before installing the SIM card, close the device cover and switch off the phone (use ): • Remove the battery: Press the catch (1) at the bottom of the battery (2) and lift away the battery (Figure 2-1). 2-3 , Slide the card into the SIM card slot (Figure 2-2). Make sure that the metal contacts of the SIM card are facing down and the bevelled corner is on the right side. Figure 2-2: SIM installation When the SIM card is properly inserted into the SIM card slot, the bevelled corner will remain visible (Figure 2-3). Figure 2-3: Installed SIM card When you are sure that the SIM card is correctly installed, replace the battery: • Insert the battery so that the side with the four metal connector plates goes in first (Figure 2-4). Figure 2-1 Figure 2-4: Inserting the battery , Push the battery down towards the catch until it clicks into place. Make sure the battery is properly installed before switching on the power.
-
 1
1 -
2
-
3
-
4
-
5
-
6
-
 7
7 -
 8
8 -
 9
9 -
 10
10 -
 11
11 -
 12
12 -
 13
13 -
 14
14 -
 15
15 -
 16
16 -
 17
17 -
18
-
19
-
20
-
21
-
22
-
23
-
24
-
25
-
26
-
27
-
28
-
29
-
30
-
31
-
32
-
33
-
34
-
35
-
36
-
37
-
38
-
39
-
40
-
41
-
42
-
43
-
44
-
45
-
46
-
47
-
48
-
49
-
50
-
51
-
52
-
53
-
54
-
55
-
56
-
57
-
58
-
59
-
60
-
61
-
62
-
63
-
64
-
65
-
66
-
67
-
68
-
69
-
70
-
71
-
72
-
73
-
74
-
75
-
76
-
77
-
78
-
79
-
80
-
81
-
82
-
83
-
84
-
85
-
86
-
87
-
88
-
89
-
90
-
91
-
92
-
93
-
94
-
95
-
96
-
97
-
98
-
99
-
100
-
101
-
102
-
103
-
104
-
105
-
106
-
107
-
108
-
109
-
110
-
111
-
112
-
113
-
114
-
115
-
116
-
117
-
118
-
119
-
120
-
121
-
122
-
123
-
124
-
125
-
126
-
127
-
128
-
129
-
130
-
131
 |
 |
