Nokia 9000i Nokia 9000i User Guide in English - Page 72
Sending documents
 |
View all Nokia 9000i manuals
Add to My Manuals
Save this manual to your list of manuals |
Page 72 highlights
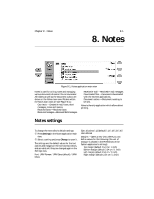
Chapter 8 - Notes 8-3 Received faxes and downloaded figures The contents of a received fax cannot be converted into text or edited. Opening a fax activates the fax viewer (see Chapter 5 "Fax: Received faxes" on page 5-5) and opening an image activates the image viewer (see Chapter 7 "Internet: Connecting to WWW - Navigating in WWW" on page 7-14). Note: A list of shortcuts is included in Chapter 2 "Getting started: Special features - Settings and Menus" on page 2-13. Special characters The special character key Chr (on the keyboard) is used to create letters that are not included in the keyboard. The character key can always be used when you are able to enter characters from the keyboard. The case of the inserted special character is determined by whether the Shift or Caps lock key has been pressed. To enter special characters from the character table: • Press and release the Chr key and a special character table opens on the screen. , Move the selection frame over the desired special character with the arrow keys, scroll buttons or by pressing a keyboard key. ƒ Press the Insert command button to close the character table and to insert the selected character to the left of the cursor. To insert special characters from the keyboard: Press and hold the Chr key while simultaneously pressing a key with a special character printed on the key as the third (green) character. The special key will be inserted on the display. Special characters can also be generated using certain unmarked keys which are associated with the special character, for example, "a". If you hold the Chr key down and press the "a" key, you will produce an "à". Continue to hold the Chr key and press the "a" key repeatedly to scroll through the list of characters associated with "a". Sending documents When you send a document in the Notes application, you can choose whether to send the document as a fax, e-mail or short message. • Open one of the document folders or subfolders. , Open one of your documents. ƒ Press the Print/Send command button to open a pop-up box listing printing and differ- ent sending options. „ Select the option you want and press Select. To print the file, select Print. The print commands view opens. Printing will be described in more detail in "Printing documents" on page 8-4. To send as a fax, select Send as fax. The fax contacts directory opens. The sending procedure from this point on is similar to that described in Chapter 5 "Fax: Sending faxes" on page 5-3. To send as a short message, select Send as SMS. The sending procedure is similar to that described in Chapter 6 "Short messages: Sending messages" on page 6-3. To send as e-mail, select Send as e-mail. The sending procedure is similar to that described in Chapter 7 "Internet: Sending e-mail" on page 7-6.
-
 1
1 -
2
-
3
-
4
-
5
-
6
-
7
-
8
-
9
-
10
-
11
-
12
-
13
-
14
-
15
-
16
-
17
-
18
-
19
-
20
-
21
-
22
-
23
-
24
-
25
-
26
-
27
-
28
-
29
-
30
-
31
-
32
-
33
-
34
-
35
-
36
-
37
-
38
-
39
-
40
-
41
-
42
-
43
-
44
-
45
-
46
-
47
-
48
-
49
-
50
-
51
-
52
-
53
-
54
-
55
-
56
-
57
-
58
-
59
-
60
-
61
-
62
-
63
-
64
-
65
-
66
-
 67
67 -
 68
68 -
 69
69 -
 70
70 -
 71
71 -
 72
72 -
 73
73 -
 74
74 -
 75
75 -
 76
76 -
 77
77 -
78
-
79
-
80
-
81
-
82
-
83
-
84
-
85
-
86
-
87
-
88
-
89
-
90
-
91
-
92
-
93
-
94
-
95
-
96
-
97
-
98
-
99
-
100
-
101
-
102
-
103
-
104
-
105
-
106
-
107
-
108
-
109
-
110
-
111
-
112
-
113
-
114
-
115
-
116
-
117
-
118
-
119
-
120
-
121
-
122
-
123
-
124
-
125
-
126
-
127
-
128
-
129
-
130
-
131
 |
 |