Nokia 9000i Nokia 9000i User Guide in English - Page 58
E-mail envelope, Send e-mail upon request
 |
View all Nokia 9000i manuals
Add to My Manuals
Save this manual to your list of manuals |
Page 58 highlights
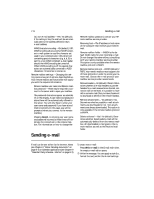
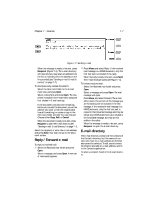
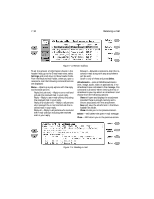
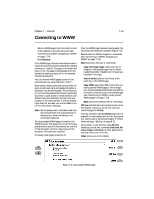
7-8 Sending e-mail • Move the selection frame over the contact's name and press Select. To select more than one recipient, use multi-select (Ctrl+space bar). The e-mail envelope will open if the contact has only one e-mail address. If the contact has several e-mail addresses, a pop-up box opens, listing the available addresses. Select an address and press Select to open the e-mail envelope (Figure 7-3). To enter the recipient's address manually, press Enter e-mail address. E-mail envelope The E-mail envelope opens whenever you are about to send e-mail (Figure 7-3). The command buttons and their functions are as follows: Send - Sends e-mail to the document outbox, provided all address fields are correct. Send options - Sets options for sending the current e-mail message. Send e-mail: Immediately (default), Upon request or During next connection (see "Sending e-mail: Send e-mail upon request" on page 7-8). CC: own e-mail address - Yes / No (default) (see "E-mail settings" on page 7-5). MIME encoding: On (default) or Off (see "E-mail settings" on page 7-5). Add recipient - Displayed as a choice if the cursor is over the To or CC fields. You may enter an address in either the To or the CC field, whichever was selected when Add recipient was pressed. Highlight a contact from the E-mail directory, and press Select. You can also manually enter standard Internet addresses. The basic format of an Internet address is mailbox@domain. Multiple addresses in the To and CC fields must be separated by a comma. Cancel - Allows you to cancel the send. You will be asked to confirm this action, as all information (To, CC, etc.) will be deleted from the E-mail envelope. To add attachments to the current message: Scroll down to Attachments and press Attachments. A list of attachments opens. To add documents to the list, press Add. You can select documents from the Own texts and Downloaded files folders. To remove documents from the attachment list, press Remove. When all the desired attachments are in the list, press Close. Send e-mail upon request When you have several e-mail messages to send, you may want to use the Upon request or the During next connection option (set in E-mail settings)- instead of the default Immediately option - so that you may send all your e-mail during the same data call. To send several messages at once: ¿ Write your e-mail and select the recipient. ¡ Press Send options. ¬ Select Send e-mail setting, and press Change. and choose either Upon request (you choose the time and initialize the sending) or During next connection (your mail will be sent the next time you make an connection to the Internet access point that your remote mailbox uses). Figure 7-3: E-mail envelope
-
 1
1 -
2
-
3
-
4
-
5
-
6
-
7
-
8
-
9
-
10
-
11
-
12
-
13
-
14
-
15
-
16
-
17
-
18
-
19
-
20
-
21
-
22
-
23
-
24
-
25
-
26
-
27
-
28
-
29
-
30
-
31
-
32
-
33
-
34
-
35
-
36
-
37
-
38
-
39
-
40
-
41
-
42
-
43
-
44
-
45
-
46
-
47
-
48
-
49
-
50
-
51
-
52
-
 53
53 -
 54
54 -
 55
55 -
 56
56 -
 57
57 -
 58
58 -
 59
59 -
 60
60 -
 61
61 -
 62
62 -
 63
63 -
64
-
65
-
66
-
67
-
68
-
69
-
70
-
71
-
72
-
73
-
74
-
75
-
76
-
77
-
78
-
79
-
80
-
81
-
82
-
83
-
84
-
85
-
86
-
87
-
88
-
89
-
90
-
91
-
92
-
93
-
94
-
95
-
96
-
97
-
98
-
99
-
100
-
101
-
102
-
103
-
104
-
105
-
106
-
107
-
108
-
109
-
110
-
111
-
112
-
113
-
114
-
115
-
116
-
117
-
118
-
119
-
120
-
121
-
122
-
123
-
124
-
125
-
126
-
127
-
128
-
129
-
130
-
131
 |
 |
